-
Notifications
You must be signed in to change notification settings - Fork 9
Security
- HTTP Basic Auth: - browser is able to authenticate to a web page using a username and password.
-
HTTP Digest Auth: - password is not used directly in the digest, but rather
HA1 = MD5(username:realm:password).
Is a security standard where you give one application permission to access your data in another application.
Instead of giving credentials (username + password), you can give one app a key that gives them speicific permission to access your data or do things on your behalf in another app.
Delegated authorization: You authorize one app to access your data or features in another app on your behalf without giving them your password. The key can then be taken away anyway you want.
OAuth replaces the password-sharing antipattern with a delegation protocol that’s simultaneously more secure and more usable.
Desined only for authorization.
- OAuth isn’t an authentication protocol, even though it can be used to build one.
- OAuth doesn’t define a mechanism for user-to-user delegation.
- OAuth doesn’t define authorization-processing mechanisms.
- OAuth doesn’t define a token format.
- OAuth 2.0 defines no cryptographic methods (unlike OAuth 1.0).
OAuth Flow - Visible steps to grant Consent as well as some invisible steps where two services agree on a secure way of exchanging information.
Resource Owner - It's you, owner of the identity, any data and actions that can be performed with your accounts.
Client - The application that wants to access data or perform actions on behalf of you, the Resource Owner.
Authorization Server - The application that knows the resource owner where the Resource Owner already has an account.
Resource Server - The API or service the Client wants to use on behalf of the Resource Owner. (Could be same as the Authorization Server).
Redirect URI / Callback URL - The URL the Authorization Server will redirect the Resource Owner after granting permission to the Client.
Response Type - The type of information the Client expects to receive (e.g. Authorization Code).
Scope - The granual permissions the Client wants, such as access data or perform actions.
Consent - Verification of requesting Scopes with the Resource Owner. "Wanna allow XYZ to do ABC?"
Client ID - To identify the Client with the Authorization Server.
Client Secret - A secret password that only the Client and Authorization Server know to securely share information privately behind the scenes.
Authorization Code - Short-lived temporary code the Authorization Server sends back to the Client. The Client then send it back to the Authorization Server along with the Client Secret in exchange for an Access Token.
Access Token - The key the Client will use from that point forward to communicate with the Resource Server. It's like a key card to the Client permission to access data or features of the Resource Server on your behalf.
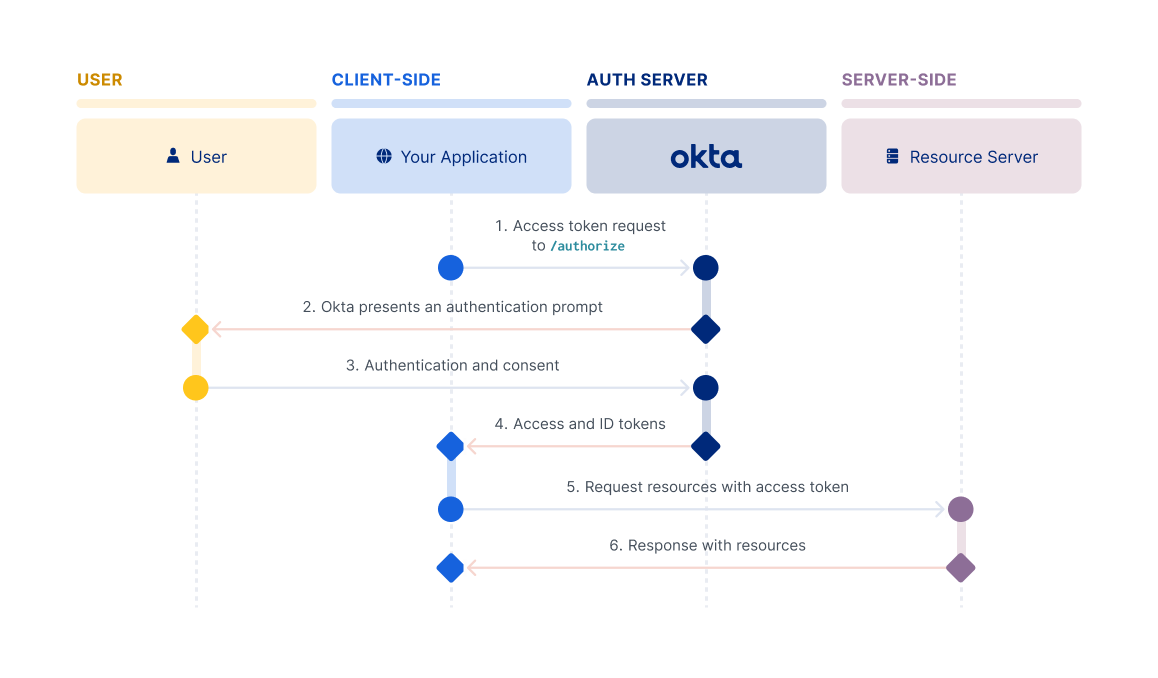
Components use direct back channel (highly secure, like HTTP communication between servers) and indirect front channel (less secure, like a web browser) HTTP to communicate with each other.
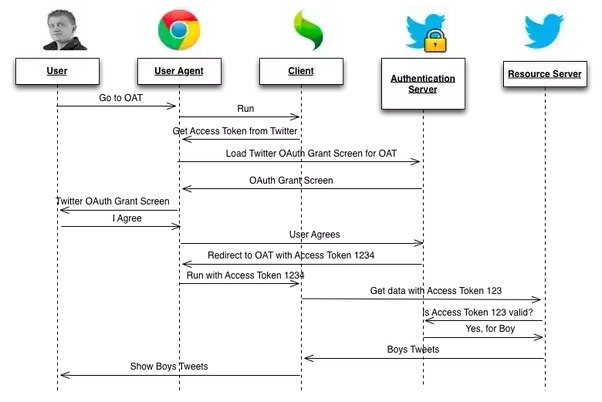
- The Client redirects your browser to the Authorization Server and includes the Client ID, Redirect URI, Response Type, and Scopes.
- The Authorization Server verifies who you are and prompts a login if necessary.
- The Authorization Server then presents your a request form based on Scopes requested by the Client to grant or deny the permission.
- The Authorization Server redirects back to the Client using the Redirect URI along with temporary Authorization Code.
- The Client then contacts the Authorization Server directly (not using Resource Owner's browser) and securely sends its Client ID, Client Secret, and the Authorization Code.
- The Authorization Server verifies the data and responds with an Access Token.
- The Client does not understand the Access Token. However, the Client can use the Access Token to send the request to the Resource Server.
- The Resource Server verifies the Access Token and if valid responds with the requested action.
- Starting the flow
https://auth.server.com/authorize?
  client_id=abc123&
  redirect_uri=https://client.com/callback&
  scope=profile&
  response_type=code&
  state=foo
- Calling back
https://client.com/callback?
  code=xyz123&
  state=foo
- Exchange code for an access token
POST https://auth.server.com/token
Content-Type: application/x-www-form-urlencoded

code=xyz123&
client_id=abc123&
client_secret=secret123&
grant_type=authorization_code
- Authorization server return an access token
{
  "access_token": "qwerty123456",
  "expires_in": 3920,
  "token_type": "Bearer"
}- Client uses the access token
GET http://my.resource.com/something
Authorization: Bearer qwerty123456
Front channel + back channel
Best used by server-side apps where the source code isn't publicly exposed (like a hard-coded password in a JavaScript file), because the request that exchanges the authorization code for a token requires a client secret, which has to be stored in your client.
The server-side app requires an end user, however, because it relies on interaction with the end user's web browser, which redirects the user and then receives the authorization code.
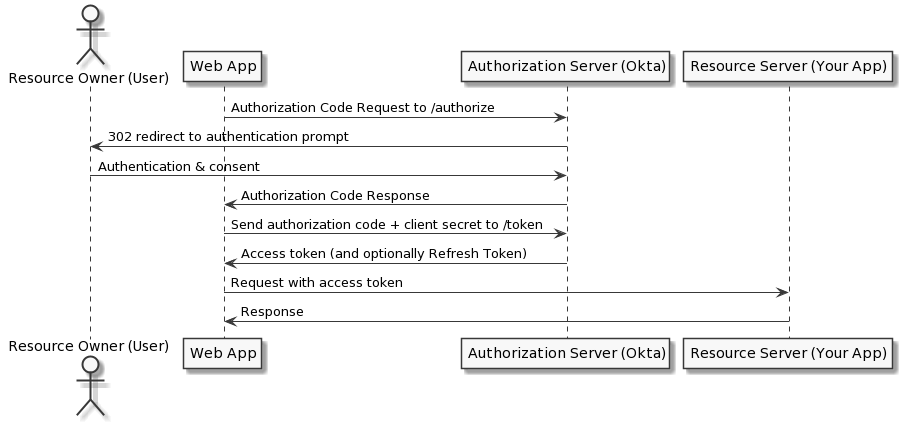
The extra step of exchanging an authorization code and client secret for an access token is added to make the flow more secure, as all the other steps are done via the less secure front channel. This exchange is performed via the back channel. The client secret is never transmitted via a front channel.
For web/native/mobile applications, the client secret can't be stored in the application because it could easily be exposed.
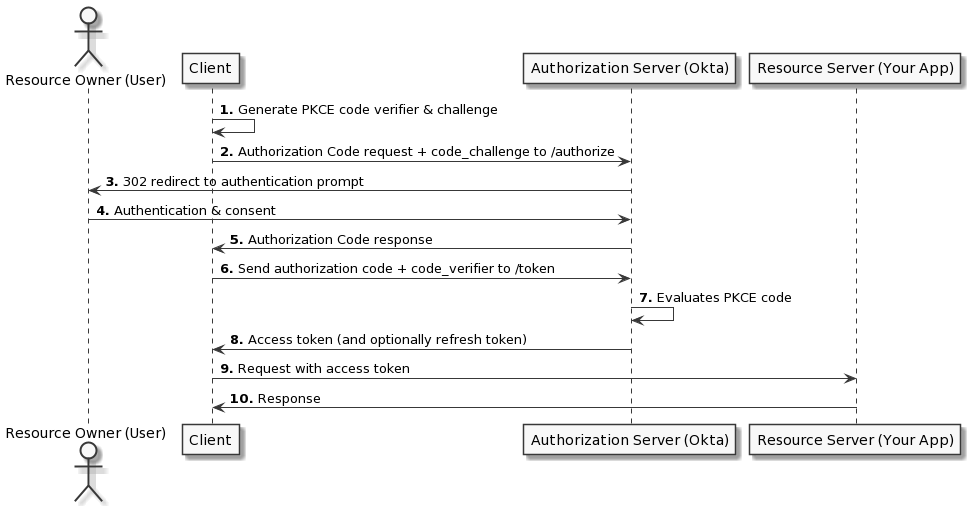
Therefore native apps should make use of Proof Key for Code Exchange (PKCE), which acts like a secret but isn't hard-coded, to keep the Authorization Code flow secure.
PKCE is an extension to the regular Authorization Code flow, so the flow is very similar, except that PKCE elements are included at various steps in the flow.
The PKCE-enhanced Authorization Code flow requires your application to generate a cryptographically random key called a "code verifier". A "code challenge" is then created from the verifier, and this challenge is passed along with the request for the authorization code.
When the authorization code is sent in the access token request, the code verifier is sent as part of the request. The authorization server recomputes the challenge from the verifier using an agreed-upon hash algorithm and then compares that. If the two code challenges and verifier match, then it knows that both requests were sent by the same client.
Front channel only
The Implicit flow is intended for applications where the confidentiality of the client secret can't be guaranteed (like a pure JavaScript application with no backend).
In this flow, the client doesn't make a request to the /token endpoint, but instead receives the access token directly from the /authorize endpoint.
The client must be capable of interacting with the resource owner's user agent and also capable of receiving incoming requests (through redirection) from the authorization server.
Because it is intended for less-trusted clients, the Implicit flow doesn't support refresh tokens.
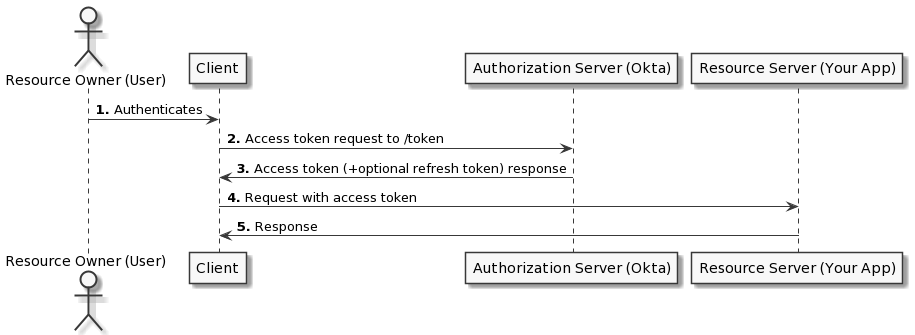
Back channel only
Intended for use cases where you control both the client application and the resource that it is interacting with.
It requires that the client can store a client secret and can be trusted with the resource owner's credentials, and so is most commonly found in clients made for online services, like the Facebook client applications that interact with the Facebook service.
It doesn't require redirects like the Authorization Code or Implicit flows, and involves a single authenticated call to the /token endpoint.
A thin layer that sits on top of OAuth 2.0 that adds functionality around login and profile information.
If OAuth is giving the client app a key, OpenID Connect is like giving the client app a badge with permission and identity.
Designed for authentication (login session) and identity.
An Authorization Server that supports OpenID Connect is sometimes called an Identity Provider.
In the OAuth Flow with OpenID Connect, the Client receives both an Access Token and an ID Token. The Client still does not understand the Access Token, however it do undestand the ID Token (JWT).
JWT tokens are self-contained in that it is not necessary for the recipient to call a server to validate the token. Information in JWT are called Claims.
Access Tokens are meant for the Resource Server, ID Tokens are meant for the Client.
Access Tokens must never be used for authentication.
Starting the flow with id_token response type and openid scope
https://auth.server.com/authorize?
  client_id=abc123&
  redirect_uri=https://client.com/callback&
  scope=openid profile&
  response_type=id_token&
  state=foo
Authorization server returns an access token and ID token
{
  "access_token": "qwerty123456",
  "id_token": "eqyW4a57ds...",
  "expires_in": 3920,
  "token_type": "Bearer"
}
Calling the userinfo endpoint
GET https://auth.server.com/userinfo
Authorization: Bearer qwerty123456

200 OK
{
  "sub": "[email protected]",
  "name": "Homer Simpson",
  "profile_picture": "..."
}
- Justin Richer, Antonio Sanso: OAuth 2 in Action
- Security Cheatsheets
- Twitter OAuth
- Java security best practices
- 10 ways to secure Spring boot
- Cryptography in Java
- OAuth 2.0 Patterns with Spring Cloud
- JWTs Suck as Session Tokens
- Mutual TLS Authentication (mTLS) De-Mystified
- An Illustrated Guide to OAuth and OpenID Connect
- OAuth 2.0 and OpenID Connect Overview
- The complete guide to protecting your APIs with OAuth2
- https://oauthdebugger.com
- https://oidcdebugger.com
- https://jwt.io
