-
Notifications
You must be signed in to change notification settings - Fork 15
USBJoystickMapping
From firmware_220113, it's possible to create a custom mapping interactively in the Joystick Setup/Test OSD page: you can simply "teach" SiDi to a specific mapping by pressing the appropriate button when it's asked for.
To use this feature, go to the Input Devices OSD page, then select the appropriate controller. By default, the actual mapping can be tested by pressing the buttons and check where it is mapped. Press F1 to start the learning process: just press the button which is asked for, use F1 if there's no such button on the controller (or you don't want it to be mapped).
After all buttons are programmed, you can save the new mapping via F2 to all cores into MISTCFG.INI file - Warning! This will override all (even core-specific) mapping lines in MIST.INI. Alternatively you can choose to save the current mapping for the current core only into the [CORENAME].CFG file pressing F3.
Priority of the mapping configs from the lowest to highest: MIST.INI < MISTCFG.INI < [CORENAME].CFG
SiDi features a virtual gamepad with four directions and twelve buttons that USB controller translate to, in order to standardize the many different existing gamepad layouts. This virtual gamepad features the following default mapping:
| Hardware | right | left | down | up | btn 1 | btn 2 | btn 3 | btn 4 | btn 5 | btn 6 | btn 7 | btn 8 | btn 9 | btn 10 | btn 11 | btn 12 |
|---|---|---|---|---|---|---|---|---|---|---|---|---|---|---|---|---|
| SiDi | right | left | down | up | A |
B |
SELECT |
START |
X |
Y |
L |
R |
L2 |
R2 |
L3 |
R3 |
| Hex | 0x01 |
0x02 |
0x04 |
0x08 |
0x10 |
0x20 |
0x40 |
0x80 |
0x100 |
0x200 |
0x400 |
0x800 |
0x1000 |
0x2000 |
0x4000 |
0x8000 |
All HID joysticks, joypads etc. connected to SiDi refer to an instance of this virtual gamepad with its default mapping.
Default mapping can be overidden by entering a line like the one below in MIST.INI, MISTCFG.INI or [CORENAME].CFG files:
joystick_remap=0584,2060,1,2,4,8,10,20,20,8,400,800,40,80
The first two numbers (0584 and 2060 in this example) are the VID and PID hex codes that the device report to USB.
The next four numbers (1,2,4,8) are mappings for the directional pad: these act like a digital D-Pad, overriding any analog joystick values if pressed.
Next are buttons (up to twelve) arranged to match the button order of the SiDi virtual gamepad above with the desired physical buttons (hexadecimal values) of the real device. This arrangement can be determined by the procedure described below.
The first step is to find out if your HID device is recognized at all: plug it in, turn on SiDi, then open the OSD (F12 on the keyboard) and go to the Joystick 1 test screen.

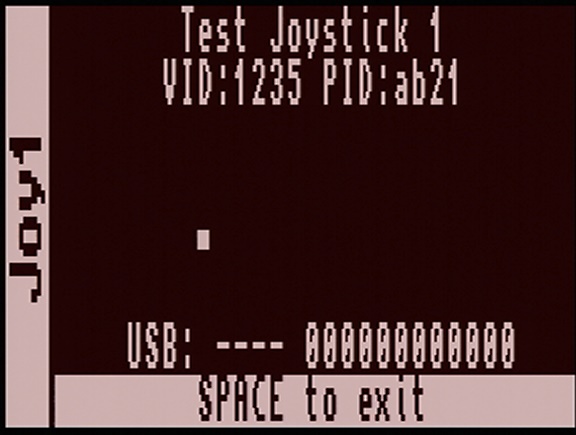
If the gamepad is recognized (and it is not among those already known by the SiDi firmware) it will display raw VID and PID numbers (this is the "device ID" reported by USB HID interface of the gamepad). Write these down as:
joystick_remap=1235,ab21,
Next, press the directional buttons and check if they are already mapped correctly, according to the right, left, down, up order in the default mapping of the virtual gamepad.
joystick_remap=1235,ab21,1,2,4,8
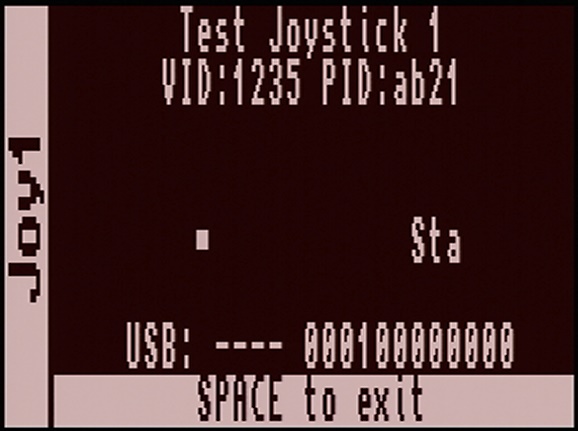
Now, using the character positions of the "USB" information at the bottom of the screen, note the order in which the various buttons are recognized. In the example below we are pressing "X" on the gamepad, but it is being recognized as "Start", due to the order in which the buttons are presented to USB.

The test screen shows that it is the 4th USB hardware button, which corresponds to "Start" in the default mapping of the SiDi virtual gamepad above. We need to change the mapping so that the position of the 4th button shows the hexadecimal code of "X", which is 100, leaving the other buttons at zero for now:
joystick_remap=1235,ab21,1,2,4,8,0,0,0,100,0,0,0,0,0,0,0,0
If you use this mapping, you'll notice that the buttons set at zero no longer work: this can be handy if there is a button on the controller you'd like to ignore.
Using this method you can work out which USB button number corresponds to each physical button and map it to the desired SiDi virtual button, repeat this as required and you will have a mapping that fits your need.
A few shortcuts have been defined based on the virtual gamepad; out of these one of the most useful is START+SELECT to open the OSD.
Let's assume you have a gamepad with many buttons and button 12 happens to be conveniently located to be used as a standalone OSD button.
To trigger the shortcut both START and SELECT must be pressed, this means we need to map both to button 12. This is done by summing the values of START and SELECT together, 0x40 + 0x80 = 0xC0, and assigning the value to the 12th USB button:
joystick_remap=1235,ab21,1,2,4,8,10,20,0,0,0,0,40,80,0,0,0,C0
Many other combinations are possible - giving you full flexibility on customizing how your HID-compatible controllers work with SiDi.
- SiDi User Guide
- User Guides of SiDi cores
-
Computer
- Acorn Archimedes
- Amiga
- Amstrad CPC
- Amstrad PCW
- Apple I
- Apple IIe
- Apple Macintosh
- Atari 800
- Atari ST
- Atari ST/STe (MiSTery)
- BBC Micro
- BK0011M
- Camputers Lynx
- Coleco Adam
- Color Computer 3
- Commodore 16
- Commodore 64
- Commodore PET
- Commodore VIC20
- ELan Enterprise
- Mattel Aquarius
- MSX2
- MSX1
- Next186 / PC
- Oric Atmos
- Sam Coupe
- Sinclair QL
- Speccy 128K
- TI99/4A
- Videoton TVC
- VTech Laser 500
- ZX Spectrum
- ZX Spectrum 48K Kyp
- ZX Spectrum Next
- ZX Spectrum TSConf
- ZX8X
- X68000
-
Console
-
Arcade