This repo is part of the WCMA TRICMA project, which is attempting to take data out of an eMuseum TMS system and let 3rd part developers consume that data via an API endpoint.
The GraphQL api's roll in the project is to provide 3rd party developers with an end point to access all the data that's been placed in the data store. It also manages rate limits (soon) and developer API token validation (soon), as well as an admin interface to the logs of api usage (soon)
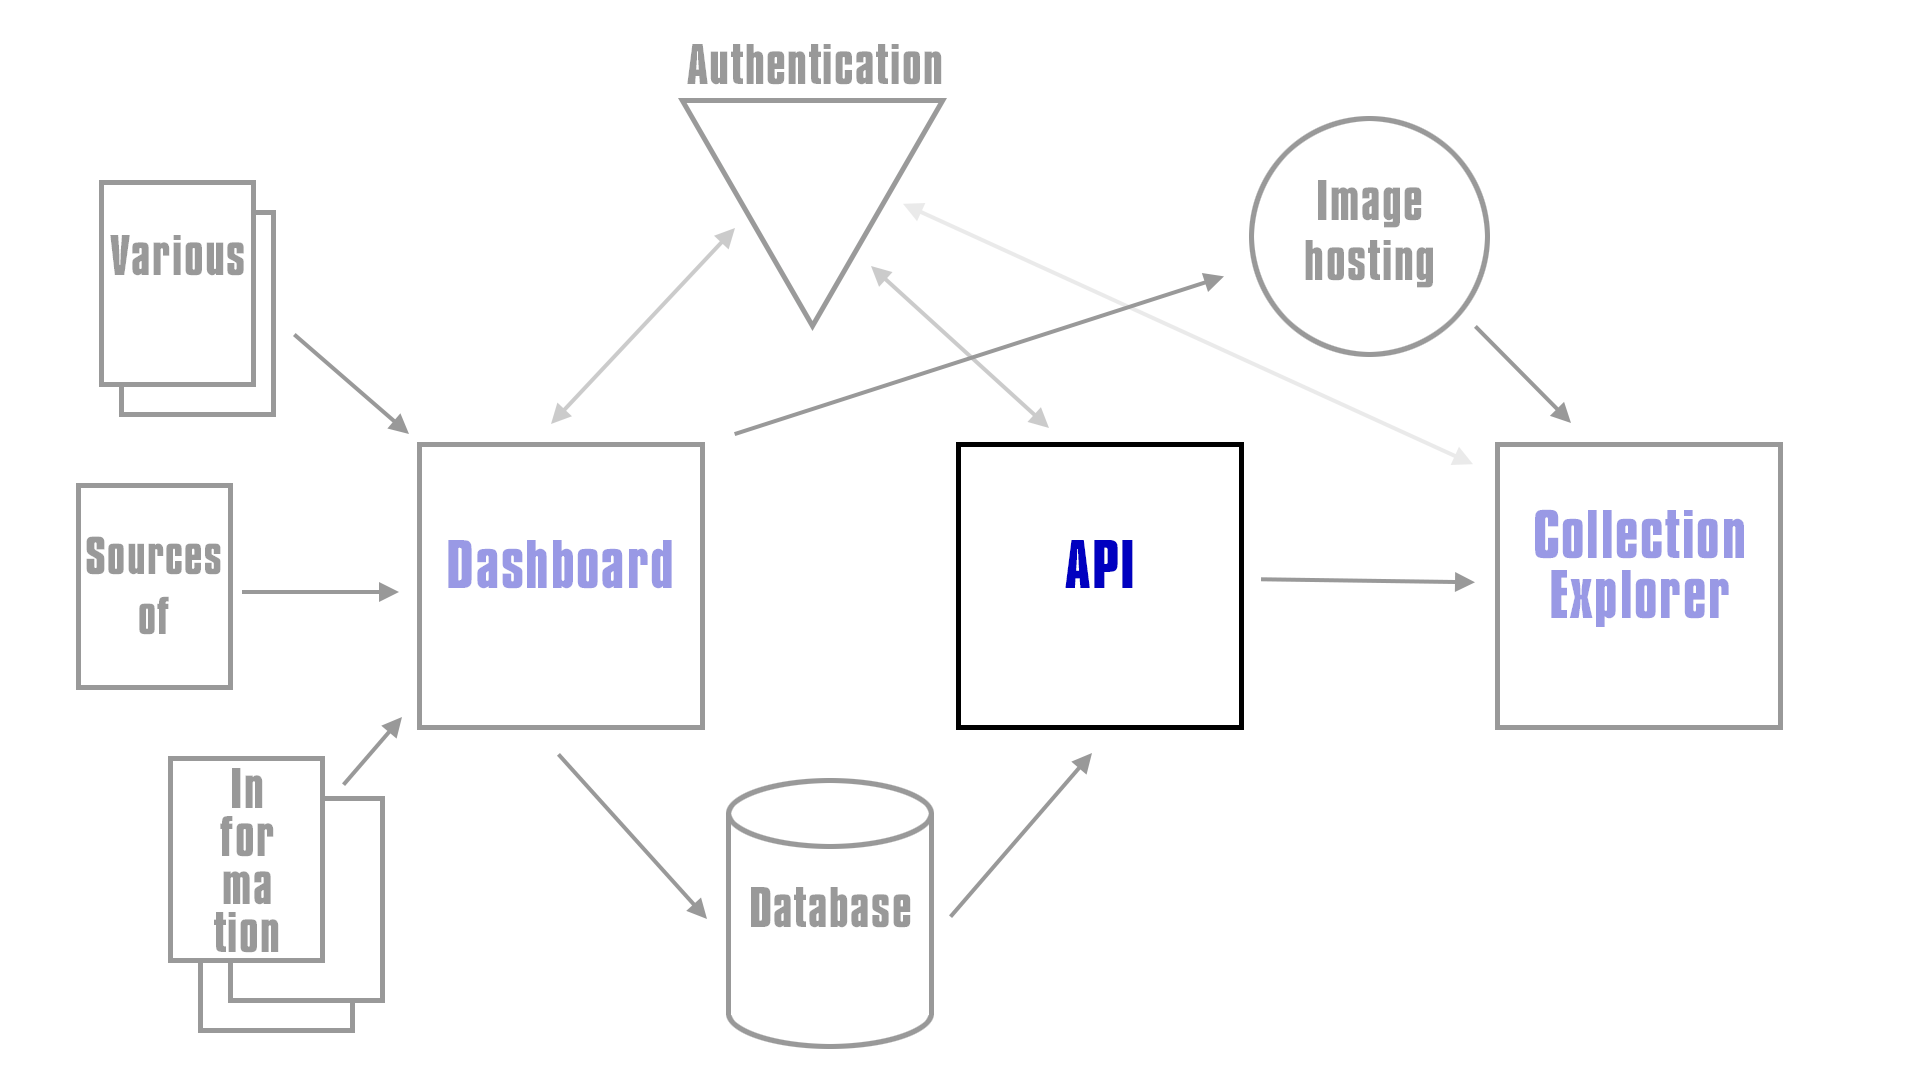
This is where the GraphQL fits into the overall architecture of the system, see the TRICMA repo for more details of the overall system.
- Installation
- Running for the first time
- Configuring and connecting to everything
- Admin tools
- Working with this code for developers
Below you will find all the notes you need to get up and running with the graphQL endpoint, note this has been tested on OSX and ubuntu, as for Windows ¯\(ツ)/¯
Before anything else you will need to make sure you have installed the following...
Then clone the repository and read the next section before doing anything else.
You will also need to have installed
- An instance of ElasticSearch and Kibana
- Set up and imported data with The Dashbaord
- Signed up to Auth0
...I advise setting up a "developer" and "production" version of each of the above, unless you intend on running just a developer version or just a production version. And hey, staging too if you wish.
This should set up ElasticSearch and Kibana for your local developerment...
brew install elasticsearch # You may be prompted to install Java first.

# To start elasticsearch:
brew services start elasticsearch
# To stop elasticsearch:
brew services stop elasticsearch

brew install kibana

# To start kibana:
brew services start kibana
# To stop elasticsearch:
brew services stop kibanaThe code has been written so that running yarn start will install all the node modules you need (this may take a while the first time), build the code and start the app, it will also start a "watcher" that will watch for code changes and restart the app. This means you don't have to use nodemon or any other tools, just run yarn start and you should be good to go.
(Note: to restart the app it attempts to kill the old process and starts a new one. Sometimes for various reasons an old version of the app may be left running, it will always write a file called .pid in the app's root directory should you need to kill the app by hand, with kill -9 $(cat .pid))
There are a couple of useful command line parameters you can use...
--skipOpen will start the app without trying to open a browser.
--skipBuild will start the app without running a yarn install or rebuilding any of the node or css files.
--buildOnly will make it so the app and any code watching doesn't start. Use this when you just want to rebuild the code but not actually start anything, will override --skipBuild.
After your first yarn start you should read Running for the first time in development
Running yarn start in production mode will install all the node modules you need, build the code and then start the app. Unlike running in development mode it will not create a watcher to watch for code changes.
If you are using a process manager tool like PM2 (github.com/Unitech/pm2) restarting the app with pm2 restart [app id|name] (say after a git pull, or deploy) will repeat the check for new modules and rebuild the code before starting.
If you wish to run the traditional yarn install and build step yourself you can use the --skipBuild option.
You can also specify port, host and environment directly on the commandline, for example...
yarn start --port 4000 --host localhost --env production
...there's more information on this in Running for the first time in production.
An example of a new "deploy" once you have PM2 running the dashboard may look like...
git pullpm2 restart dashboard
If you initially started the app in PM2 with the skikBuild option i.e. yarn start --buildOnly then your deply would need an extra build step in.
git pullyarn start --buildOnlypm2 restart dashboard
The second method is preferable to take advantage of pm2's hot reloading, as it will rebuild the code before restarting, while in the first method will cause the app to be down for the length of time it takes to build the code.
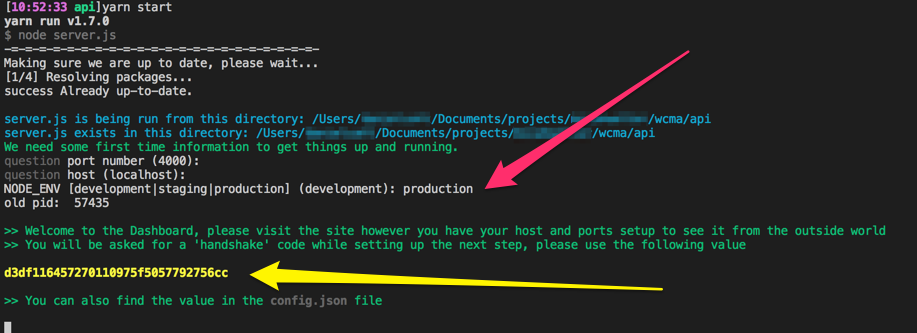
When you run yarn start for the first time it will (after installing packages) ask you a few questions about your environment, it will ask you for the port, host and what your NODE_ENV should be. Hitting return accepts the defaults of 4000, localhost and development. It will look something like this...
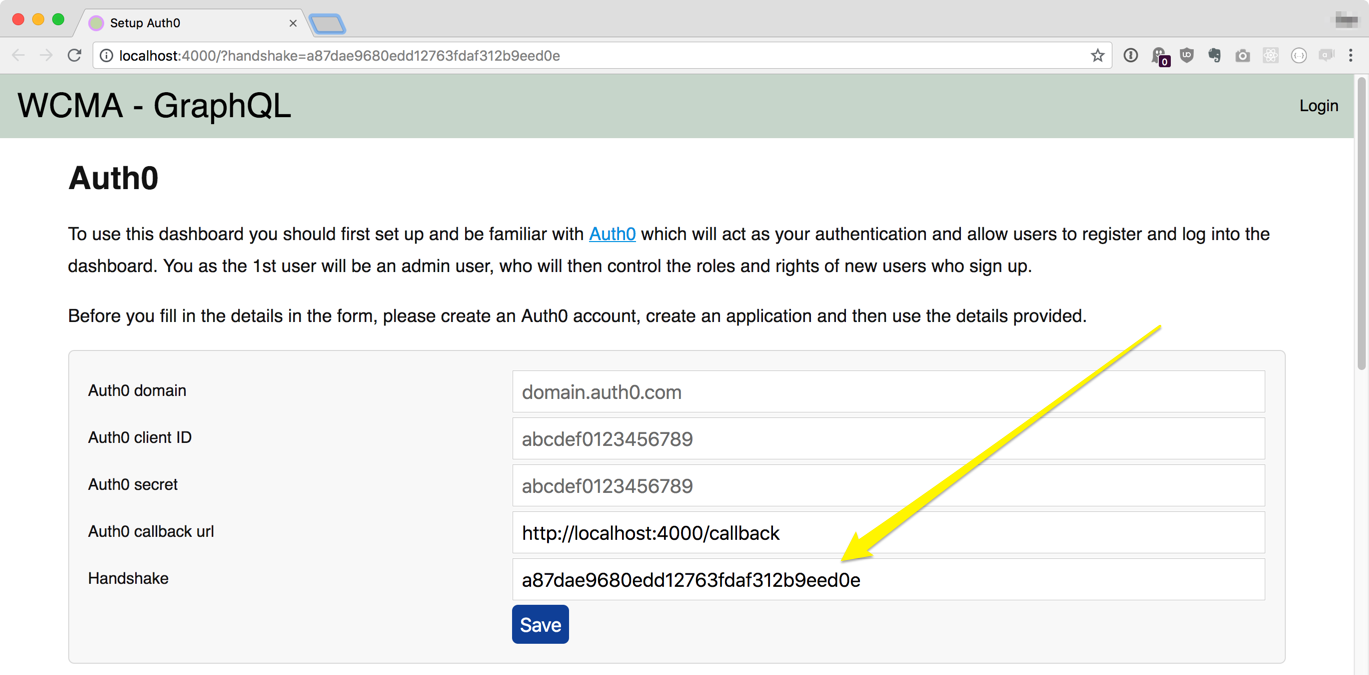
A browser will start and ask you for your Auth0 account details. There's more information on the page, but if you've already created your Auth0 account and application you should have your Auth0 domain, client ID and secret.
It will also ask for a Handshake value, if you're running development and locally this should already be filled in for you.
When running on a production server things are slightly different. Because the moment you start it up on a staging/production server it may be open to the world, anyone has access to the form. Only a person with the handshake value will be able to successfully submit the form. When starting the app in staging/production mode it will display the handshake on the command line...
...you can also find the handshake value in the config.json file that is created.
The app will attempt to reload at this point. If this fails just restart the app again with yarn start
It will now ask you to log in, the first user to log in will automatically become the Admin user, so you should probably do this asap :)
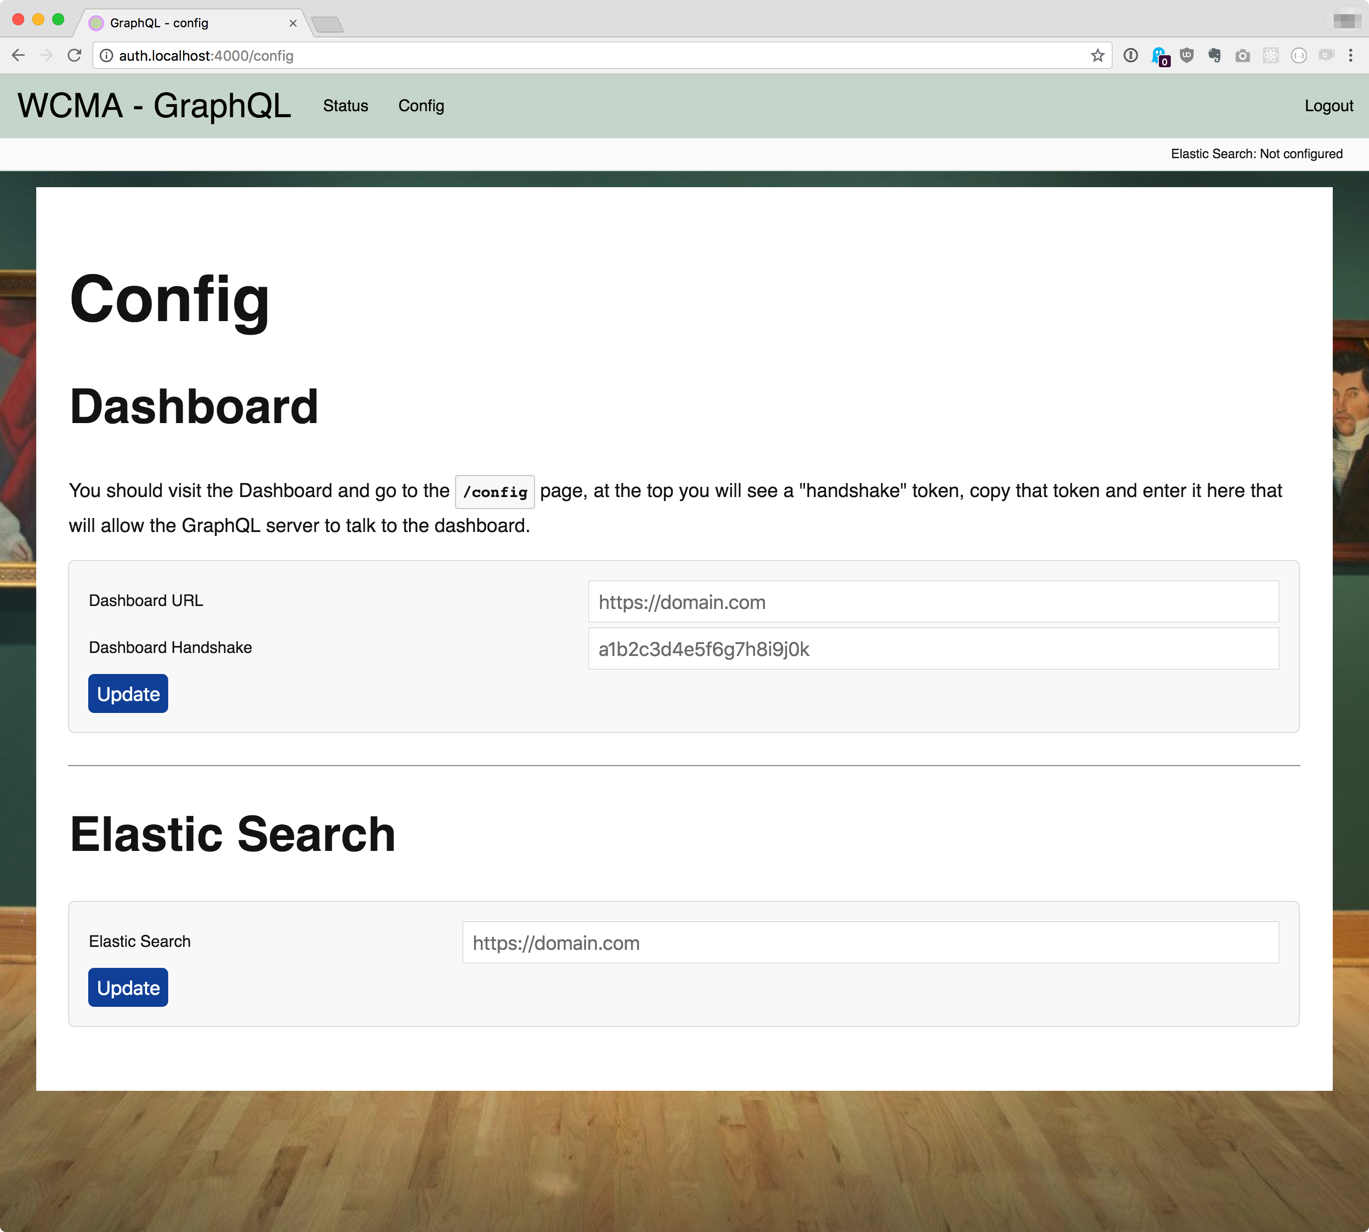
Once you have logged in the first thing you need to do is set up connections to all the things, heading to the "Config" page will give you a set of forms like this...
Sometimes the GraphQL server needs to talk to the dashboard, you should set up the URL of the dashboard here.
The Dashboard and the GraphQL api both have their own handshakes. For the GraphQL api to be able to talk to the Dashboard, we need to tell the GraphQL server what the Dashboard's handshake it. You should visit the /config page on the Dashboard, where it will display it's own handshake, then enter that into the config page on the GraphQL server.
When the GraphQL server then makes a request to the dashboard it'll pass over what it thinks in the Dashboard's handshake, if it gets it correct the Dashboard will respond.
This is the location of your ElasticSearch instance.
This is important as it's where the GraphQL server is going to get all the data from.
TO BE EXPANDED
Quick notes about the code: essentially all this code is doing is taking GraphQL formatted requests, and then converting them into one or more ElasticSearch queries. Once its fetched the results back from ElasticSearch it turns them into a valid GraphQL response.
Most of the work goes into validating input, construction queries and cleaning up output.
TO BE EXPANDED
TO BE EXPANDED
TO BE EXPANDED


