This workshop will guide you through creating a single page application leveraging a number of AWS AI services.
We will write our single page application in React and combine it with AWS Amplify to create and connect to the serverless backend. Finally, we will use AWS Cloud9 for our IDE.
We recommend following the steps in this workshop in the order they are presented.
- Build a single page application using React and AWS Amplify.
- Add & use AWS AI services in the application leveraging a serverless backend.
- Setup development environment
- Bootstrap your React application
- Amazon Rekognition
- Amazon Textract
- Amazon Transcribe
- Amazon Comprehend
- Amazon lex
1.1.1 Go to the Cloud9 web console.
1.1.2. At the top right corner of the console, make sure you’re using one of these regions: Virginia (us-east-1), Oregon (us-west-2), Ireland (eu-west-1), Singapore (ap-southeast-1) or Sydney (ap-southeast-2).
1.1.3. Press Create environment
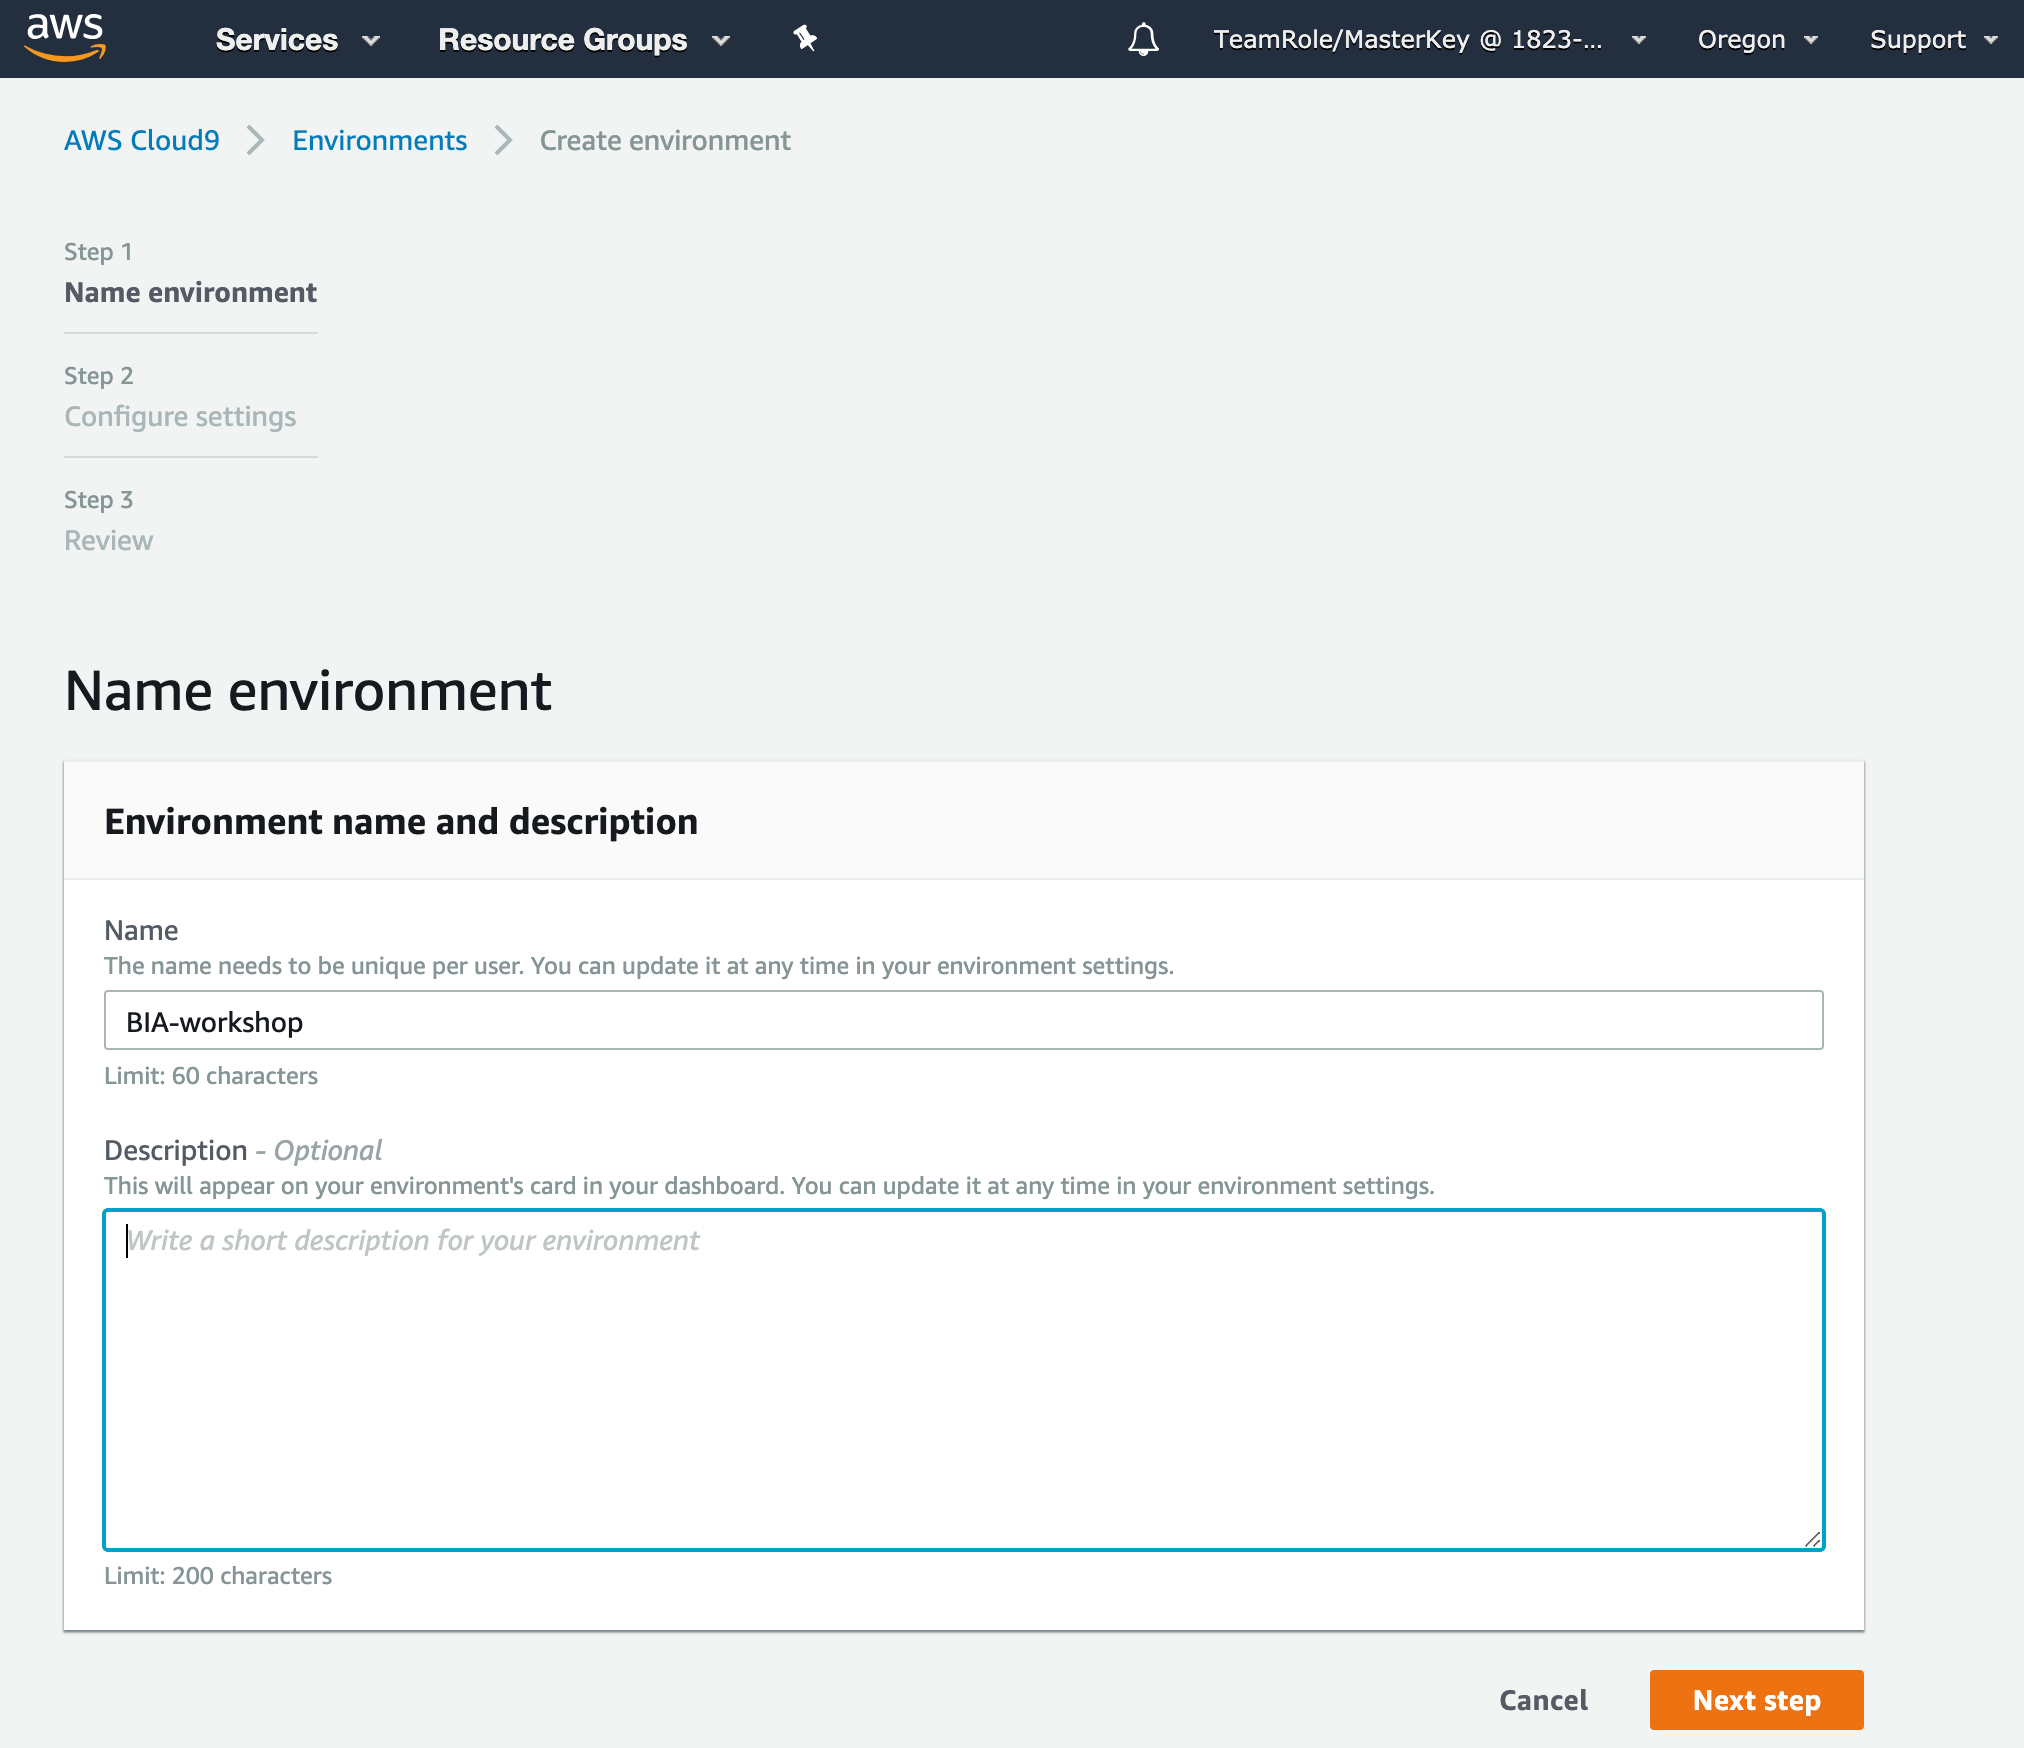
1.1.4. Name the environment BIA-workshop, and press Next step
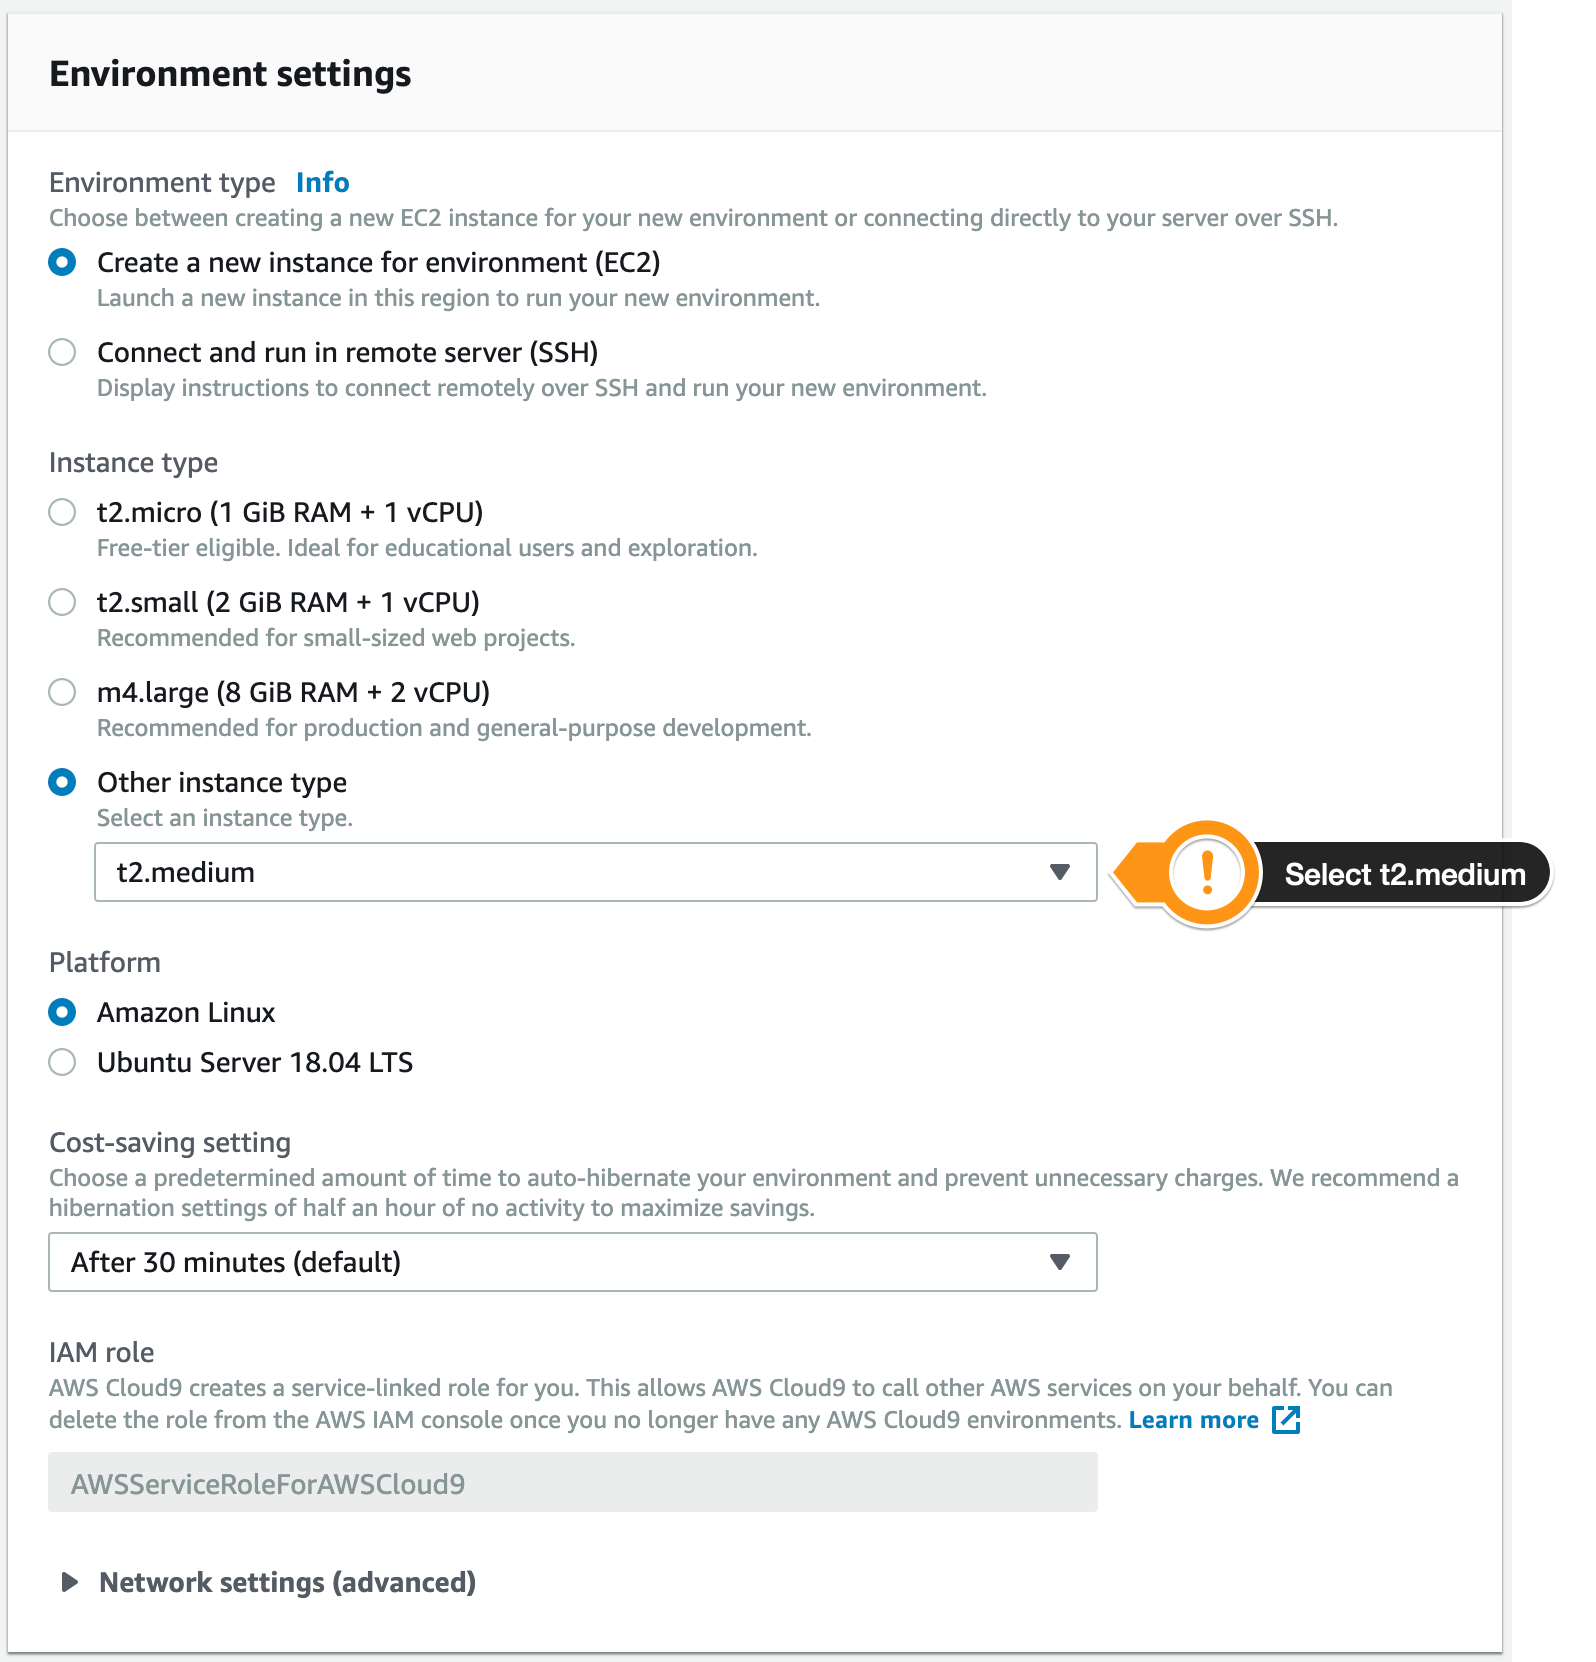
1.1.5. Select pick t2.medium for instance type, then press Next step
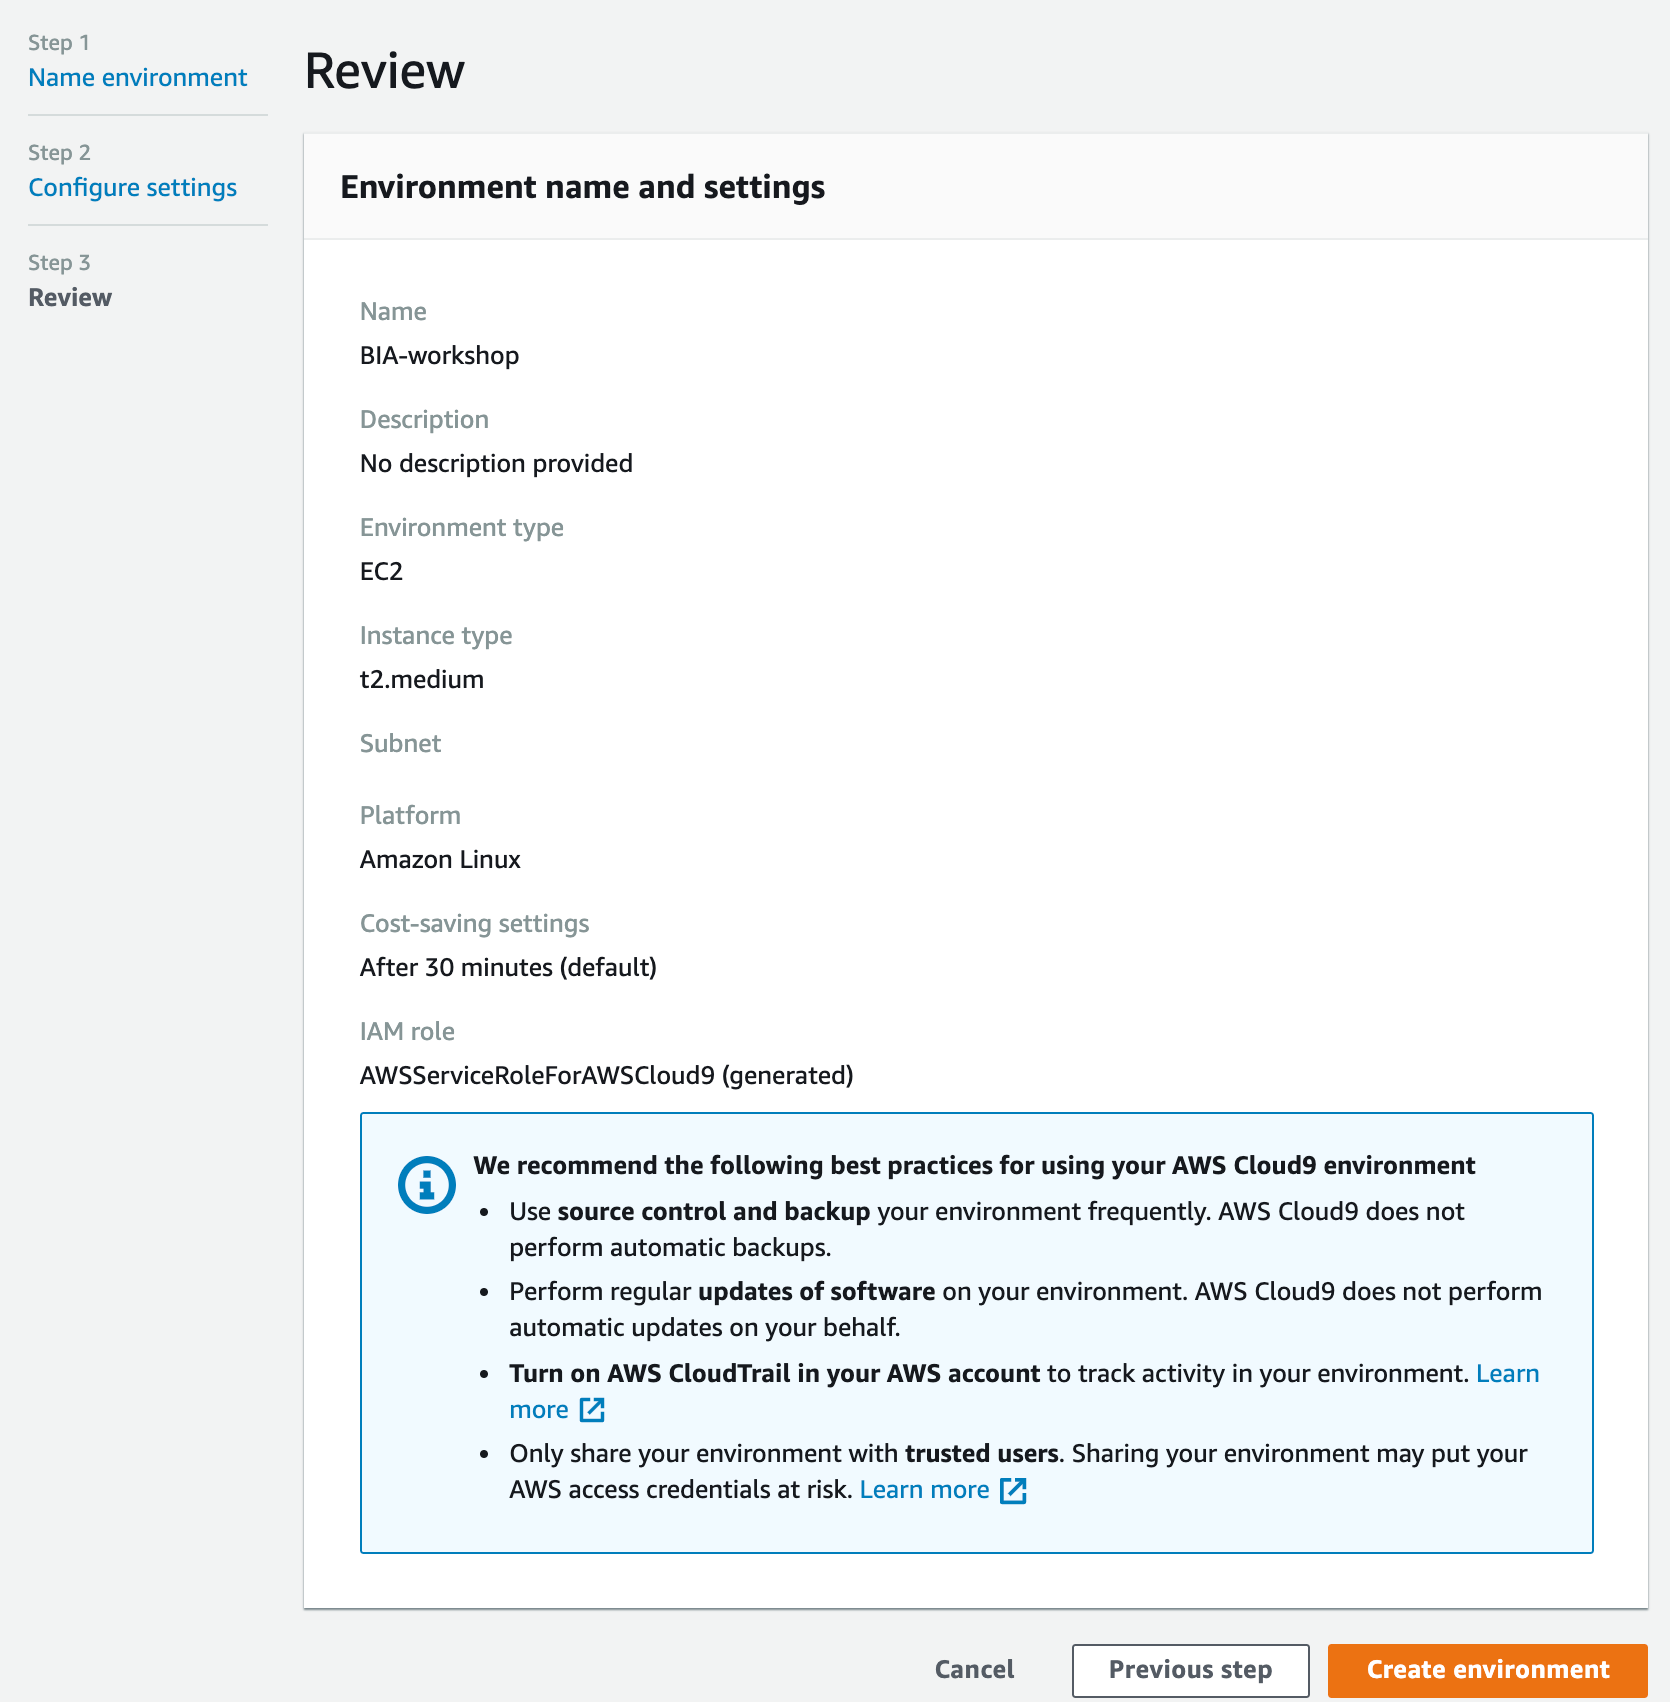
1.1.6. In the Review screen Press Create environment.
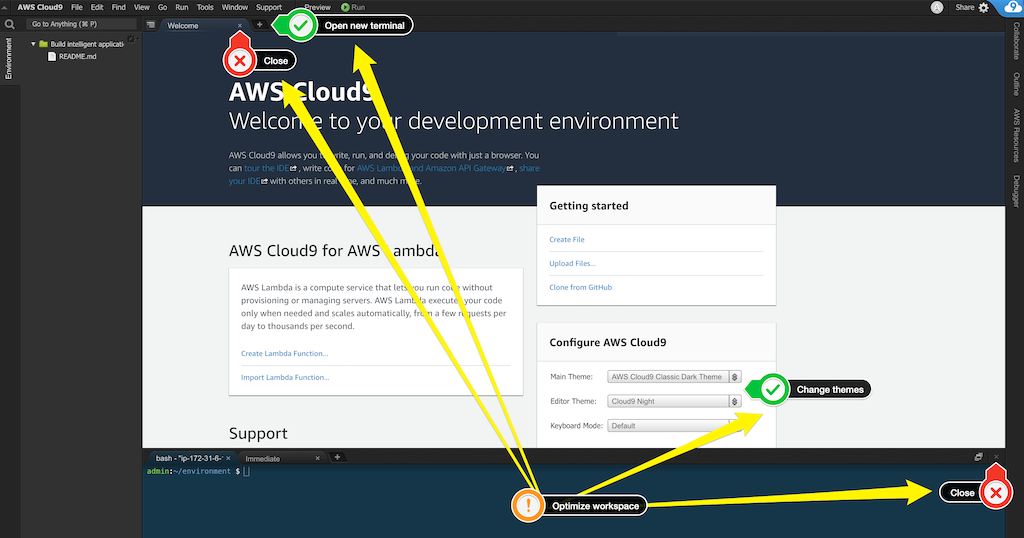
Once your environment is up and running. Time to optimize your space.
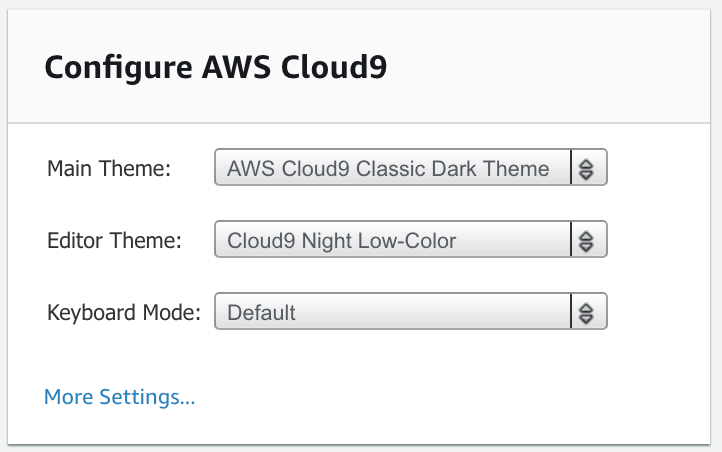
1.2.1. Switch Main Theme to AWS Cloud9 Classic Dark Theme
1.2.2. Switch Editor Theme to Cloud9 Night Low-Color
1.2.3 Close the lower terminal window
1.2.4 Close welcome screen
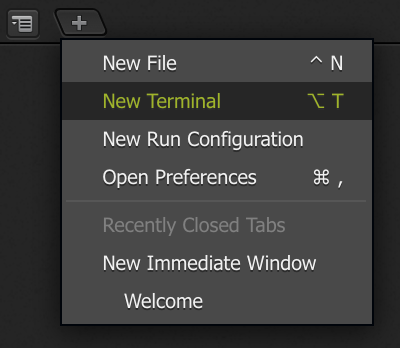
1.2.5 Open new terminal
1.2.6 if your environment is looking like the screenshot below you are ready to proceed.
Run the following commands in your cloud9 terminal.
# Update the AWS CLI
pip install --user --upgrade awscli

# Install the AWS Amplify CLI
npm install -g @aws-amplify/cli

# Install jq
sudo yum install jq -yConfigure default AWS region for Amplify CLI, please note we are using us-west-2 for this workshop. In your terminal run the following command
cat <<END > ~/.aws/config
[default]
region=ap-southeast-2
END2.1.1. Run the following command sto bootstram your app
npx create-react-app bia-workshop-app2.1.2. Switch to the newly created app directory
cd bia-workshop-app/For our components we will use Material UI (a popular React UI framework). In your terminal, run the following commands and ignore any warnings.
## install material-ui
npm install --save @material-ui/core

## install required font
npm install typeface-roboto


## install material-ui icons
npm install @material-ui/iconsRun the following command to start your local (cloud9) application so we can preview without deploying the single page app. A few seconds later it will be ready (it should not exit, we want to keep this running in the background).
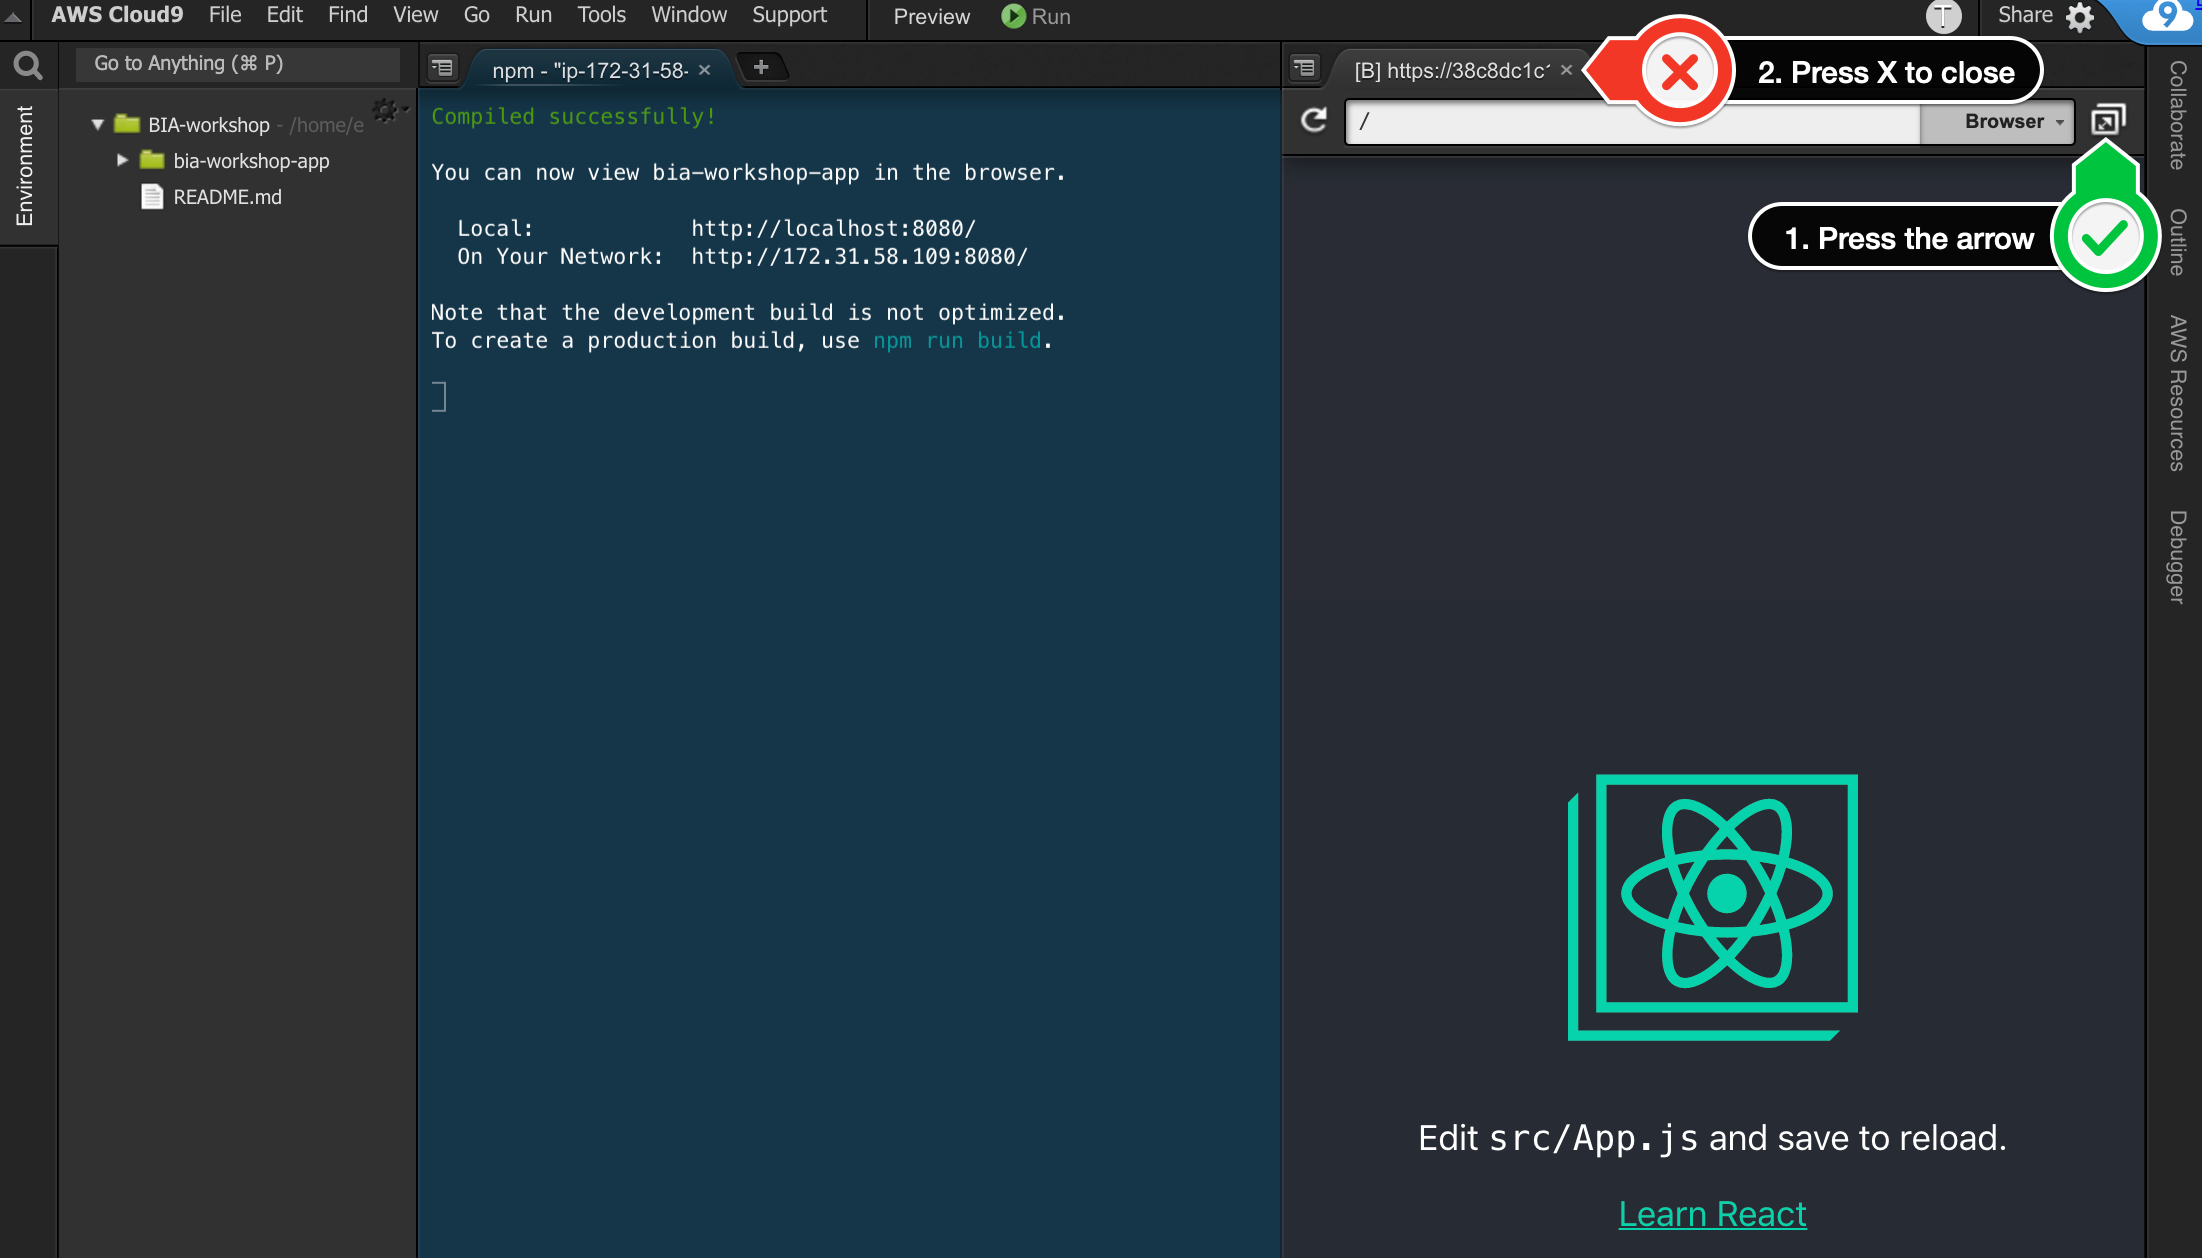
npm start2.4.1. Press Preview in the top horizontal bar

2.4.2.Open preview window in a new tab and close the window within the IDE.
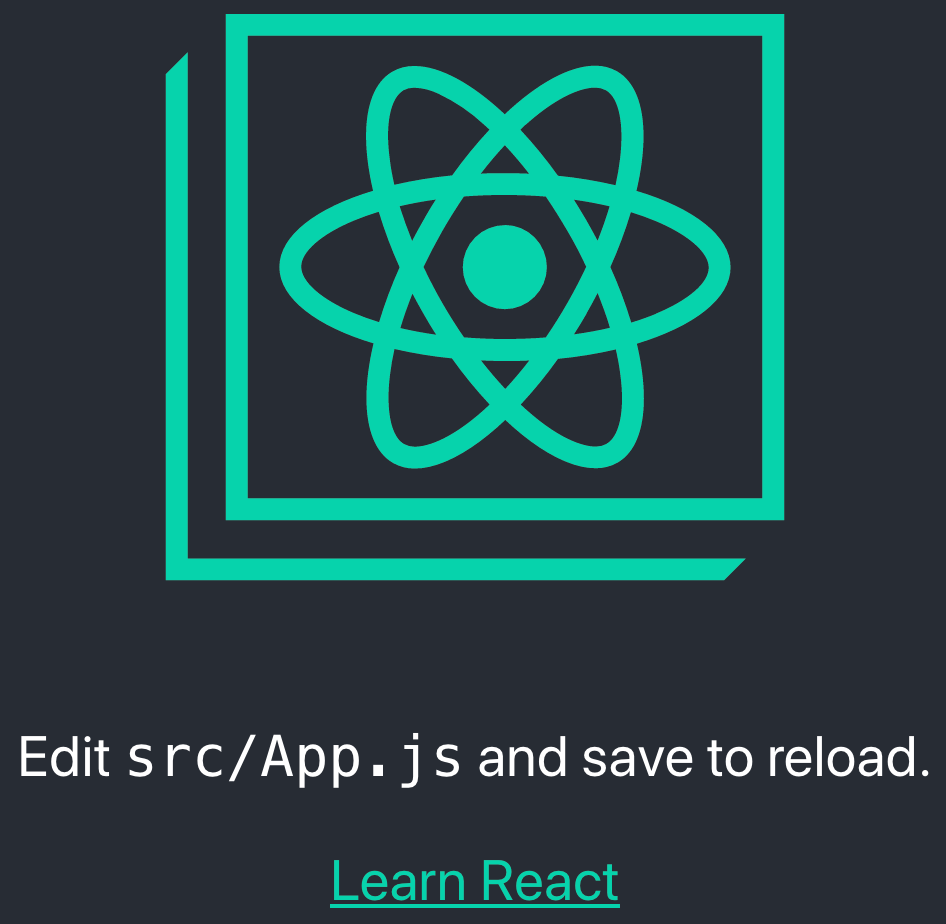
2.4.3. Hopefully you got a new tab in your browser open which has loaded your single page application
2.5.1. We want to keep the app preview running so that we can test our app. We will open one more terminal to use with Amplify CLI going forward.
2.5.2. In the new terminal run the following command to switch to the app directory.
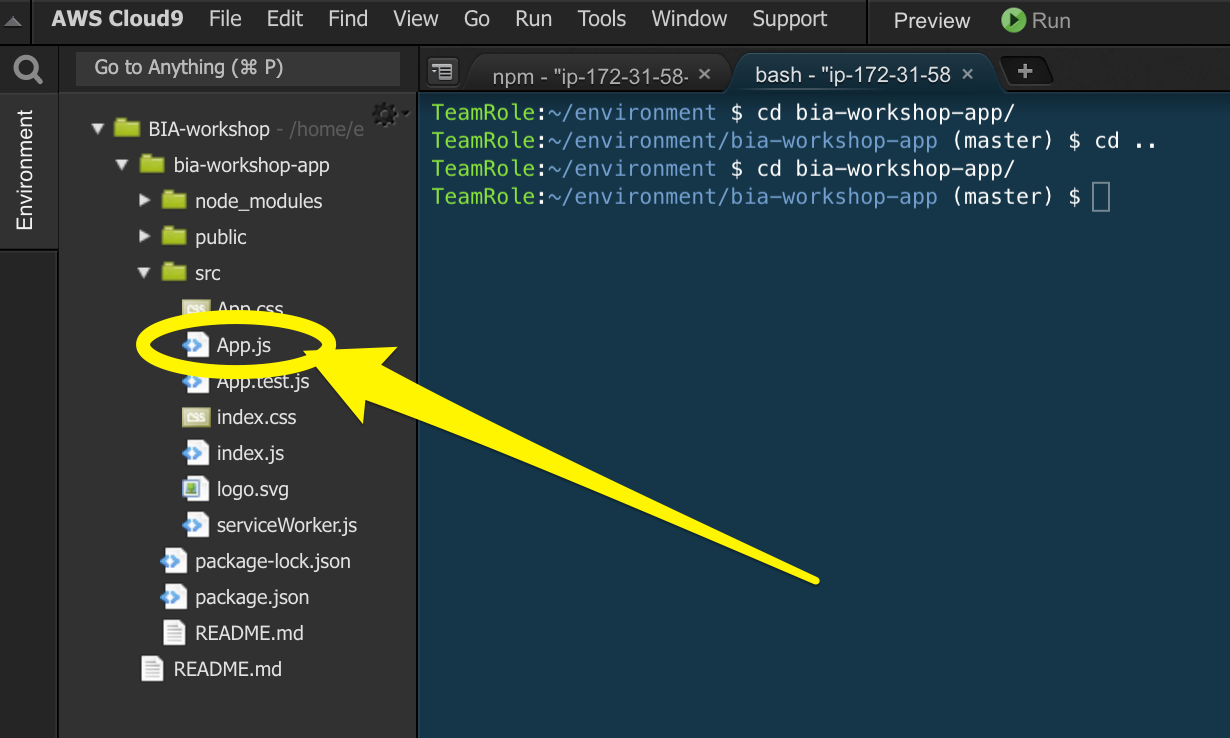
cd bia-workshop-app/ 2.6.1. Using the navigation on the left of your Cloud9 IDE, expand the file tree and open the file bia-workshop/bia-workshop-app/src/App.js
2.6.2. Replace the contents of src/App.js file with the below code. Its our entry point for our single page application and contains placeholders for the various components we will be building through out this workshop.
/**
 *
 * Building Intelligent Applications Workshop
 *
 * src/App.js
 *
 */

import React, { Component } from 'react';
import { makeStyles } from '@material-ui/core/styles';
import ExpansionPanel from '@material-ui/core/ExpansionPanel';
import ExpansionPanelSummary from '@material-ui/core/ExpansionPanelSummary';
import ExpansionPanelDetails from '@material-ui/core/ExpansionPanelDetails';
import Typography from '@material-ui/core/Typography';
import TextField from '@material-ui/core/TextField';
import Grid from '@material-ui/core/Grid';

import 'typeface-roboto';


class App extends Component {

    state = { response: "" }

    callbackFunction = (childData) => {
        console.log('parent state');
        this.setState({ response: childData });
    }

    render() {
        const classes = makeStyles(theme => ({
            root: {
                width: '100%',
            },
            heading: {
                fontSize: theme.typography.pxToRem(15),
                fontWeight: theme.typography.fontWeightRegular,
            },
        }));

        return (
            <div className={classes.root}>

                <Grid container direction="row" alignItems="flex-start" spacing={2}>

                    <Grid item xs={5}>
                        <Typography className={classes.heading}></Typography>
                        <Typography variant="h4" component="h4" align="center">Building Intelligent Applications Workshop</Typography>

                        <ExpansionPanel>
                            <ExpansionPanelSummary
                              aria-controls="panel1a-content"
                              id="panel1a-header">
                                <Typography className={classes.heading}>Generate labels for objects in an image</Typography>
                            </ExpansionPanelSummary>
                            <ExpansionPanelDetails>
                                Add Label Identification component here...
                            </ExpansionPanelDetails>
                        </ExpansionPanel>

                        <ExpansionPanel>
                            <ExpansionPanelSummary
                              aria-controls="panel2a-content"
                              id="panel2a-header">
                                <Typography className={classes.heading}>Extract text from images or documents</Typography>
                            </ExpansionPanelSummary>
                            <ExpansionPanelDetails>
                                Add text extraction component here...
                            </ExpansionPanelDetails>
                        </ExpansionPanel>

                        <ExpansionPanel>
                            <ExpansionPanelSummary
                              aria-controls="panel2a-content"
                              id="panel2a-header">
                                <Typography className={classes.heading}>Transcribe audio</Typography>
                            </ExpansionPanelSummary>
                            <ExpansionPanelDetails>
                                Add audio transcribe component here...
                            </ExpansionPanelDetails>
                        </ExpansionPanel>

                        <ExpansionPanel>
                            <ExpansionPanelSummary
                              aria-controls="panel2a-content"
                              id="panel2a-header">
                                <Typography className={classes.heading}>Text interpretation</Typography>
                            </ExpansionPanelSummary>
                            <ExpansionPanelDetails>
                                Add text interpretation component here...
                            </ExpansionPanelDetails>
                        </ExpansionPanel>

                        <ExpansionPanel>
                            <ExpansionPanelSummary
                              aria-controls="panel2a-content"
                              id="panel2a-header">
                                <Typography className={classes.heading}>Chatbot</Typography>
                            </ExpansionPanelSummary>
                            <ExpansionPanelDetails>
                                Add chatbot component here
                            </ExpansionPanelDetails>
                        </ExpansionPanel>

                    </Grid>

                    <Grid item xs={7}>
                        <TextField
                           id="outlined-multiline-flexible"
                           label="output"
                           multiline
                           fullWidth
                           rows="30"
                           value={this.state.response}
                           margin="normal"
                           variant="outlined"/>
                    </Grid>
                </Grid>
            </div>
        );
    }
}

export default App;
2.6.3. Save the file (command + S for mac, ctrl + s for windows or File Save using the Cloud9 navigation).
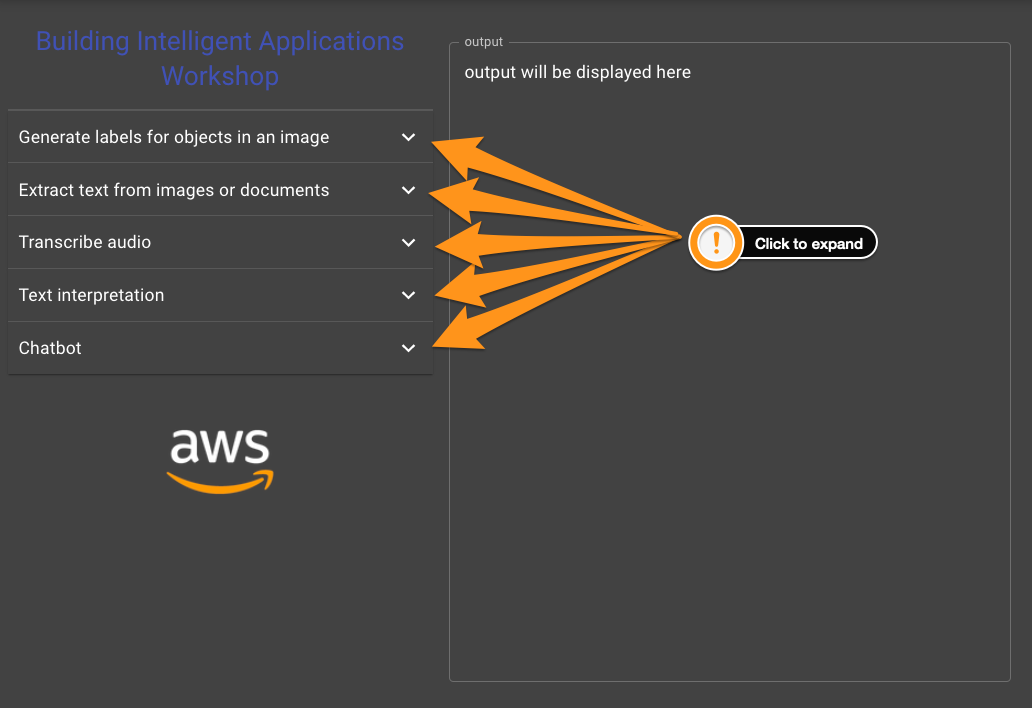
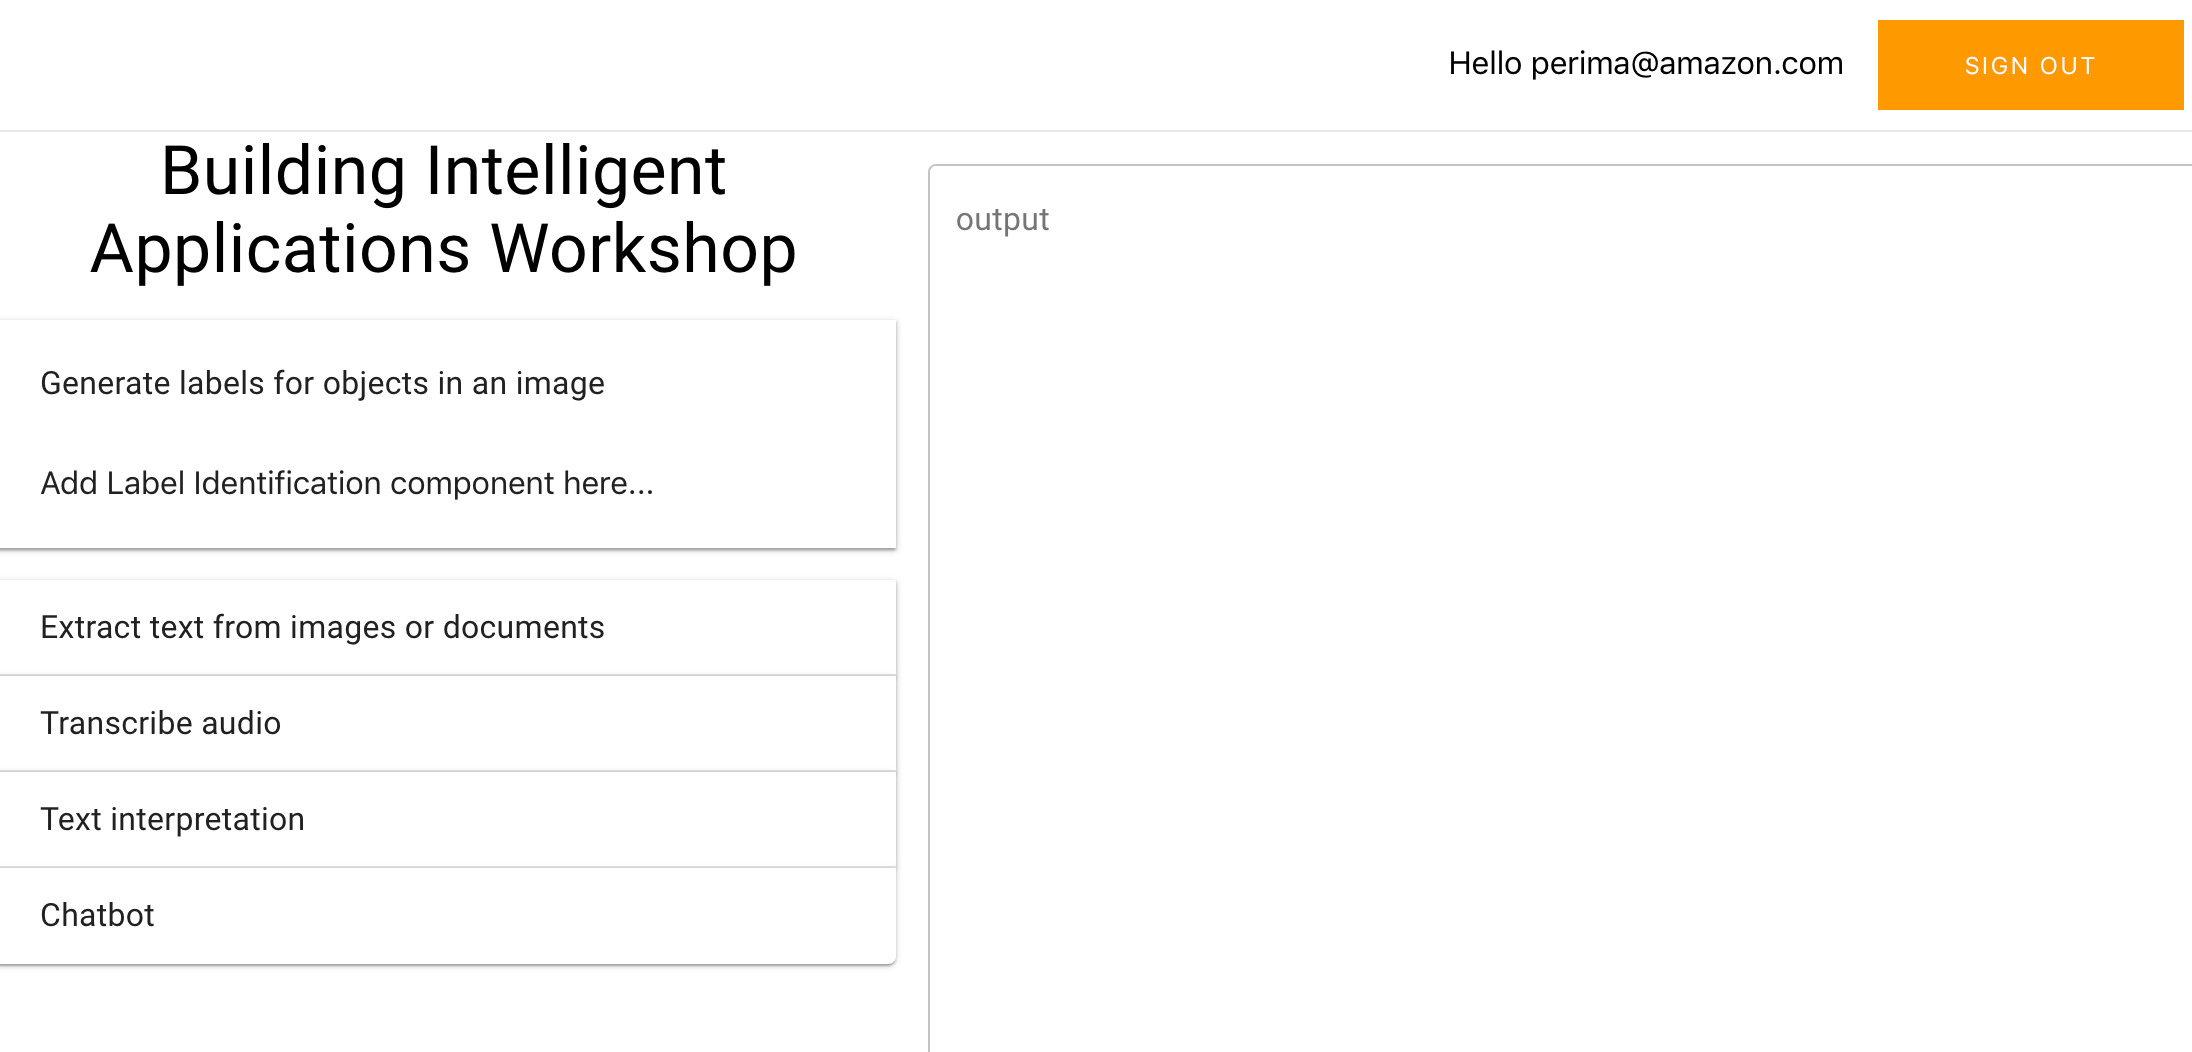
2.6.4. Check your app preview browser tab, you should be seeing the app with the placeholders (click to expand each section).
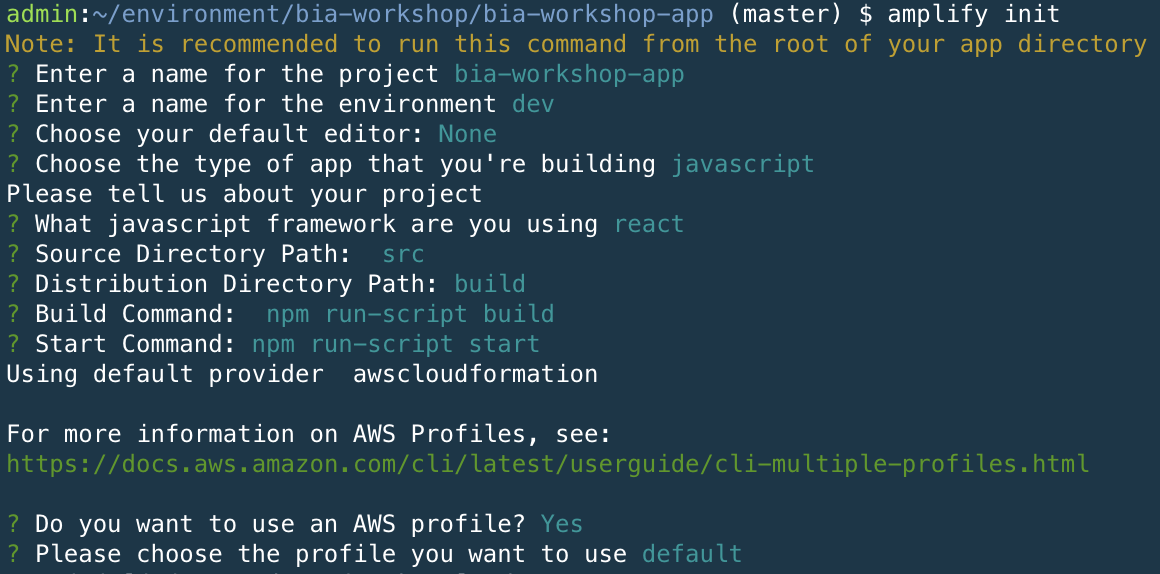
2.7.1. In your terminal (make sure you in the project source directory (bia-workshop/bia-workshop-app) run the command
amplify init
2.7.2. Press enter to accept the default project name (should be ‘biaworkshopapp’)
2.7.3. Enter ‘dev’ for the environment name
2.7.4. Select ‘None’ for the default editor (we’re using Cloud9)
2.7.5. Choose JavaScript and React when prompted
2.7.6. Accept the default values for src and build paths
2.7.7. Accept the default values for build start commands
2.7.8. Press Enter to accept the default value (Y) to use AWS profile
2.7.9. Press Enter to select the default AWS profile
Please note that you are now provisioning your cloud backend for the first time which may take a couple of minutes.
We will start by adding authentation to our app to make sure that all AI services are available only to authenticated users.
2.8.1. In the terminal execute the command
amplify add auth
You will be asked a number of questions, please use the following values:
-
Do you want to use the default authentication and security configuration? Default Configuration
-
How do you want users to be able to sign in? Username
-
Do you want to configure advanced settings? No, I am done.
2.8.2. In the terminal run the command to publish your backend changes in the cloud:
amplify push
When asked Are you sure you want to continue? Press Enter.
2.9.1. In the terminal run the following command to install the necessary npm packages to our app
npm install --save aws-amplify @aws-amplify/ui-reactTime to update the contents of src/App.js to include authentication.
2.10.1. Import and configure the AWS Amplify JS library
In your src/App.js file add the import statements for amplify and withAuthenticator auth comnponents near the top of the file after the line that reads import 'typeface-roboto';
import Amplify from 'aws-amplify';
import awsExports from './aws-exports';
import { withAuthenticator } from '@aws-amplify/ui-react';

Amplify.configure(awsExports); // aws-exports.js file is managed by AWS Amplify
2.10.2. Wrap the App component using withAuthenticator to make sure that its accessed only by authenticated users by replacing the last line that reads export default App; with
export default withAuthenticator(App, { includeGreetings: true });2.10.3. Your src/App.js file should like the one below
/**
 *
 * Building Intelligent Applications Workshop
 *
 * src/App.js
 *
 */

import React, { Component } from 'react';
import { makeStyles } from '@material-ui/core/styles';
import ExpansionPanel from '@material-ui/core/ExpansionPanel';
import ExpansionPanelSummary from '@material-ui/core/ExpansionPanelSummary';
import ExpansionPanelDetails from '@material-ui/core/ExpansionPanelDetails';
import Typography from '@material-ui/core/Typography';
import TextField from '@material-ui/core/TextField';
import Grid from '@material-ui/core/Grid';

import 'typeface-roboto';

import Amplify from 'aws-amplify';
import awsExports from './aws-exports';
import { withAuthenticator } from '@aws-amplify/ui-react';

Amplify.configure(awsExports); // aws-exports.js file is managed by AWS Amplify

class App extends Component {

    state = { response: "" }

    callbackFunction = (childData) => {
        console.log('parent state');
        this.setState({ response: childData });
    }

    render() {
        const classes = makeStyles(theme => ({
            root: {
                width: '100%',
            },
            heading: {
                fontSize: theme.typography.pxToRem(15),
                fontWeight: theme.typography.fontWeightRegular,
            },
        }));

        return (
            <div className={classes.root}>

                <Grid container direction="row" alignItems="flex-start" spacing={2}>

                    <Grid item xs={5}>
                        <Typography className={classes.heading}></Typography>
                        <Typography variant="h4" component="h4" align="center">Building Intelligent Applications Workshop</Typography>

                        <ExpansionPanel>
                            <ExpansionPanelSummary
                              aria-controls="panel1a-content"
                              id="panel1a-header">
                                <Typography className={classes.heading}>Generate labels for objects in an image</Typography>
                            </ExpansionPanelSummary>
                            <ExpansionPanelDetails>
                                Add Label Identification component here...
                            </ExpansionPanelDetails>
                        </ExpansionPanel>

                        <ExpansionPanel>
                            <ExpansionPanelSummary
                              aria-controls="panel2a-content"
                              id="panel2a-header">
                                <Typography className={classes.heading}>Extract text from images or documents</Typography>
                            </ExpansionPanelSummary>
                            <ExpansionPanelDetails>
                                Add text extraction component here...
                            </ExpansionPanelDetails>
                        </ExpansionPanel>

                        <ExpansionPanel>
                            <ExpansionPanelSummary
                              aria-controls="panel2a-content"
                              id="panel2a-header">
                                <Typography className={classes.heading}>Transcribe audio</Typography>
                            </ExpansionPanelSummary>
                            <ExpansionPanelDetails>
                                 Add audio transcribe component here...
                            </ExpansionPanelDetails>
                        </ExpansionPanel>

                        <ExpansionPanel>
                            <ExpansionPanelSummary
                              aria-controls="panel2a-content"
                              id="panel2a-header">
                                <Typography className={classes.heading}>Text interpretation</Typography>
                            </ExpansionPanelSummary>
                            <ExpansionPanelDetails>
                                Add text interpretation component here...
                            </ExpansionPanelDetails>
                        </ExpansionPanel>

                        <ExpansionPanel>
                            <ExpansionPanelSummary
                              aria-controls="panel2a-content"
                              id="panel2a-header">
                                <Typography className={classes.heading}>Chatbot</Typography>
                            </ExpansionPanelSummary>
                            <ExpansionPanelDetails>
                                Add chatbot component here
                            </ExpansionPanelDetails>
                        </ExpansionPanel>

                    </Grid>

                    <Grid item xs={7}>
                        <TextField
                           id="outlined-multiline-flexible"
                           label="output"
                           multiline
                           fullWidth
                           rows="30"
                           value={this.state.response}
                           margin="normal"
                           variant="outlined"/>
                    </Grid>
                </Grid>
            </div>
        );
    }
}

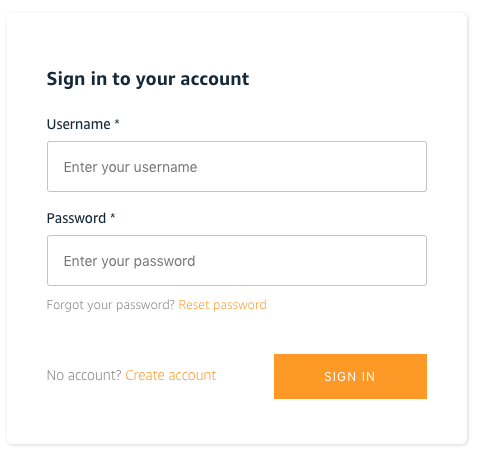
export default withAuthenticator(App, { includeGreetings: true });2.11.1 Refresh yourpreview browser tab, you shoul be seeing a login screen asking for username and password.
2.11.2 Click on the Create account link at the bottom to create a new account. make sure you use a valid email address for the registration as you will receive a code to complete the registration.
2.11.3 When you receive the email with the confirmation code, use your confirmation code to sign-in and to complete the registration.
2.11.4 We now have working authentation for our app and you should be seeing the placeholders again but this time you are an authenticated user (you should be seeing a sign out button at the top right).
The first AI service we will add to our application is Amazon Rekognition.
3.1.1. In your terminal run the command amplify add predictions to automatically create the backend configuration.
3.1.2. Please give the following answers to the questions when prompted:
-
Please select from one of the categories below Identify
-
What would you like to identify? Identify Labels
-
Provide a friendly name for your resource [Press Enter to accept the default value]
-
Would you like use the default configuration? Default Configuration
-
Who should have access? Auth users only
3.1.3. We are now ready to publish our backend by running the command
amplify push
press enter when asked if you would like to proceed.
Create a file called src/LabelsIdentification.js and add the following content.
You can create a file by right clicking the src folder in the tree navigation on the left of your Cloud9 environment and selecting New File.
/**
 *
 * Building Intelligent Applications Workshop
 *
 * src/LabelsIdentification.js
 *
 */
import React, { useState } from 'react';
import Predictions, { AmazonAIPredictionsProvider } from '@aws-amplify/predictions';
import Amplify from 'aws-amplify';

Amplify.addPluggable(new AmazonAIPredictionsProvider());

function LabelsIdentification(props) {

  function identifyFromFile(event) {
    props.parentCallback('please wait, calling rekognition');
    const { target: { files } } = event;
    const [file, ] = files || [];

    if (!file) {
      return;
    }

    Predictions.identify({
      labels: {
        source: {
          file,
        },
        type: "ALL" // "LABELS" will detect objects , "UNSAFE" will detect if content is not safe, "ALL" will do both default on aws-exports.js
      }
    }).then(result => {
      props.parentCallback(JSON.stringify(result, null, 2));
    }).catch(err => {
      props.parentCallback(JSON.stringify(err, null, 2));
    });
  }

  return (
    <div className="Text">
        <h3>Labels identification</h3>
        <input type="file" onChange={identifyFromFile}></input>
    </div>
  );
}

export default (LabelsIdentification);3.3.1. Add the following import statement to your new component at the top just before the Amplify.configure(awsExports); line.
import LabelsIdentification from './LabelsIdentification' //rekognition3.3.2. Replace the placeholder Add Label Identification component here... with the following
<LabelsIdentification parentCallback={this.callbackFunction} />3.3.4. Your src/App.js file should look like the below
/**
 *
 * Building Intelligent Applications Workshop
 *
 * src/App.js
 *
 */

import React, { Component } from 'react';
import { makeStyles } from '@material-ui/core/styles';
import ExpansionPanel from '@material-ui/core/ExpansionPanel';
import ExpansionPanelSummary from '@material-ui/core/ExpansionPanelSummary';
import ExpansionPanelDetails from '@material-ui/core/ExpansionPanelDetails';
import Typography from '@material-ui/core/Typography';
import TextField from '@material-ui/core/TextField';
import Grid from '@material-ui/core/Grid';

import 'typeface-roboto';

import Amplify from 'aws-amplify';
import awsExports from './aws-exports';
import { withAuthenticator } from '@aws-amplify/ui-react';

import LabelsIdentification from './LabelsIdentification' //rekognition

Amplify.configure(awsExports); // aws-exports.js file is managed by AWS Amplify

class App extends Component {

    state = { response: "" }

    callbackFunction = (childData) => {
        console.log('parent state');
        this.setState({ response: childData });
    }

    render() {
        const classes = makeStyles(theme => ({
            root: {
                width: '100%',
            },
            heading: {
                fontSize: theme.typography.pxToRem(15),
                fontWeight: theme.typography.fontWeightRegular,
            },
        }));

        return (
            <div className={classes.root}>

                <Grid container direction="row" alignItems="flex-start" spacing={2}>

                    <Grid item xs={5}>
                        <Typography className={classes.heading}></Typography>
                        <Typography variant="h4" component="h4" align="center">Building Intelligent Applications Workshop</Typography>

                        <ExpansionPanel>
                            <ExpansionPanelSummary
                              aria-controls="panel1a-content"
                              id="panel1a-header">
                                <Typography className={classes.heading}>Generate labels for objects in an image</Typography>
                            </ExpansionPanelSummary>
                            <ExpansionPanelDetails>
                                <LabelsIdentification  parentCallback={this.callbackFunction} />
                            </ExpansionPanelDetails>
                        </ExpansionPanel>

                        <ExpansionPanel>
                            <ExpansionPanelSummary
                              aria-controls="panel2a-content"
                              id="panel2a-header">
                                <Typography className={classes.heading}>Extract text from images or documents</Typography>
                            </ExpansionPanelSummary>
                            <ExpansionPanelDetails>
                                Add text extraction component here...
                            </ExpansionPanelDetails>
                        </ExpansionPanel>

                        <ExpansionPanel>
                            <ExpansionPanelSummary
                              aria-controls="panel2a-content"
                              id="panel2a-header">
                                <Typography className={classes.heading}>Transcribe audio</Typography>
                            </ExpansionPanelSummary>
                            <ExpansionPanelDetails>
                                 Add audio transcribe component here...
                            </ExpansionPanelDetails>
                        </ExpansionPanel>

                        <ExpansionPanel>
                            <ExpansionPanelSummary
                              aria-controls="panel2a-content"
                              id="panel2a-header">
                                <Typography className={classes.heading}>Text interpretation</Typography>
                            </ExpansionPanelSummary>
                            <ExpansionPanelDetails>
                                Add text interpretation component here...
                            </ExpansionPanelDetails>
                        </ExpansionPanel>

                        <ExpansionPanel>
                            <ExpansionPanelSummary
                              aria-controls="panel2a-content"
                              id="panel2a-header">
                                <Typography className={classes.heading}>Chatbot</Typography>
                            </ExpansionPanelSummary>
                            <ExpansionPanelDetails>
                                Add chatbot component here
                            </ExpansionPanelDetails>
                        </ExpansionPanel>

                    </Grid>

                    <Grid item xs={7}>
                        <TextField
                           id="outlined-multiline-flexible"
                           label="output"
                           multiline
                           fullWidth
                           rows="30"
                           value={this.state.response}
                           margin="normal"
                           variant="outlined"/>
                    </Grid>
                </Grid>
            </div>
        );
    }
}

export default withAuthenticator(App, { includeGreetings: true });
3.3.5. You should be able to test now the label detection functionality of your app by refreshing your preview browser tab.
4.1.1. In your Cloud9 terminal, run the command
amplify add predictions4.1.2. Answer the questionsas follows when prompted.
? Please select from one of the categories below Identify
? What would you like to identify? Identify Text
? Provide a friendly name for your resource identify [Press Enter to select the suggested name]
? Would you also like to identify documents? Yes
? Who should have access? Auth users only
4.1.3. Run the following command to update your cloud backend and select Yes when asked if you want to proceed.
amplify push4.2.1. Right click on the src folder on the tree navigation of your Cloud9 IDE and select New File (src/TextIdentification.js) and paste the source code below.
/**
 *
 * Building Intelligent Applications Workshop
 *
 * src/TextIdentification.js
 *
 */
import React, { useState } from 'react';
import Amplify from 'aws-amplify';
import Predictions, { AmazonAIPredictionsProvider } from '@aws-amplify/predictions';
import awsconfig from './aws-exports';

Amplify.configure(awsconfig);


function TextIdentification(props) {

  function identifyFromFile(event) {
     props.parentCallback('please wait, using textract to identify text');
    const { target: { files } } = event;
    const [file,] = files || [];

    if (!file) {
      return;
    }
    Predictions.identify({
      text: {
        source: {
          file,
        },
        format: "ALL", // Available options "PLAIN", "FORM", "TABLE", "ALL"
      }
    }).then(({text: { fullText }}) => {
      props.parentCallback(fullText);
    })
     .catch(err => {
         props.parentCallback(JSON.stringify(err, null, 2));
      });
  }

  return (
    <div className="Text">
        <h3>Text identification</h3>
        Please select an image as input document.Documents for synchronous operations can be in PNG or JPEG format.
        Documents for asynchronous operations can also be in PDF format. <a href="https://docs.aws.amazon.com/textract/latest/dg/API_DetectDocumentText.html">Read more</a>
        <br /><br />
        <input type="file" onChange={identifyFromFile}></input>
    </div>
  );
}

export default (TextIdentification);4.3.1. Add the new component in your imports at the top of the src/App.js file
import TextIdentification from './TextIdentification'; //textract 4.3.2. You also need to add the component in the render function replacing the text Add text extraction component here...
<TextIdentification parentCallback={this.callbackFunction} /> Your src/App.js shoud look like the one below
/**
 *
 * Building Intelligent Applications Workshop
 *
 * src/App.js
 *
 */

import React, { Component } from 'react';
import { makeStyles } from '@material-ui/core/styles';
import ExpansionPanel from '@material-ui/core/ExpansionPanel';
import ExpansionPanelSummary from '@material-ui/core/ExpansionPanelSummary';
import ExpansionPanelDetails from '@material-ui/core/ExpansionPanelDetails';
import Typography from '@material-ui/core/Typography';
import TextField from '@material-ui/core/TextField';
import Grid from '@material-ui/core/Grid';

import 'typeface-roboto';

import Amplify from 'aws-amplify';
import awsExports from './aws-exports';
import { withAuthenticator } from '@aws-amplify/ui-react';
import LabelsIdentification from './LabelsIdentification' //rekognition
import TextIdentification from './TextIdentification'; //textract
Amplify.configure(awsExports); // aws-exports.js file is managed by AWS Amplify


class App extends Component {

    state = { response: "" }


    callbackFunction = (childData) => {
        console.log('parent state');
        this.setState({ response: childData });
    }


    render() {

        const classes = makeStyles(theme => ({
            root: {
                width: '100%',
            },
            heading: {
                fontSize: theme.typography.pxToRem(15),
                fontWeight: theme.typography.fontWeightRegular,
            },
        }));

        return (
            <div className={classes.root}>

      <Grid container direction="row" alignItems="flex-start" spacing={2}>

             <Grid item xs={5}>
                <Typography className={classes.heading}></Typography>
                <Typography variant="h4" component="h4" align="center">Building Intelligent Applications Workshop</Typography>
                    <ExpansionPanel>
                    <ExpansionPanelSummary
                      aria-controls="panel1a-content"
                      id="panel1a-header"
                    >
                      <Typography className={classes.heading}>Generate labels for objects in an image</Typography>
                    </ExpansionPanelSummary>
                    <ExpansionPanelDetails>
                        <LabelsIdentification  parentCallback={this.callbackFunction} />
                    </ExpansionPanelDetails>
                  </ExpansionPanel>

                  <ExpansionPanel>
                    <ExpansionPanelSummary
                      aria-controls="panel2a-content"
                      id="panel2a-header"
                    >
                      <Typography className={classes.heading}>Extract text from images or documents</Typography>
                    </ExpansionPanelSummary>
                    <ExpansionPanelDetails>
                        <TextIdentification parentCallback={this.callbackFunction} />
                    </ExpansionPanelDetails>
                  </ExpansionPanel>

                  <ExpansionPanel>
                    <ExpansionPanelSummary
                      aria-controls="panel2a-content"
                      id="panel2a-header"
                    >
                      <Typography className={classes.heading}>Transcribe audio</Typography>
                    </ExpansionPanelSummary>
                    <ExpansionPanelDetails>
                       Add audio transcribe component here...
                    </ExpansionPanelDetails>
                  </ExpansionPanel>

                   <ExpansionPanel>
                    <ExpansionPanelSummary
                      aria-controls="panel2a-content"
                      id="panel2a-header"
                    >
                      <Typography className={classes.heading}>Text interpretation</Typography>
                    </ExpansionPanelSummary>
                    <ExpansionPanelDetails>
                         Add text interpretation component here...
                    </ExpansionPanelDetails>
                  </ExpansionPanel>

                   <ExpansionPanel>
                    <ExpansionPanelSummary
                      aria-controls="panel2a-content"
                      id="panel2a-header"
                    >
                      <Typography className={classes.heading}>Chatbot</Typography>
                    </ExpansionPanelSummary>
                    <ExpansionPanelDetails>
                        Add chatbot component here
                    </ExpansionPanelDetails>
                  </ExpansionPanel>

             </Grid>

               <Grid item xs={7}>
                 <TextField
                    id="outlined-multiline-flexible"
                    label="output"
                    multiline
                    fullWidth
                    rows="30"
                    value={this.state.response}
                    margin="normal"
                    variant="outlined"
                  />
              </Grid>
      </Grid>

    </div>
        );
    }

}

export default withAuthenticator(App, { includeGreetings: true });5.1.1. In your Cloud9 terminal run the command
amplify add predictionsand select the following answers when prompted
Please select from one of the categories below Convert
What would you like to convert? ** Transcribe text from audio **
Provide a friendly name for your resource [Press Enter to select suggested default name]
What is the source language? US English - or select desired supported language from the available list
Who should have access? Auth users only
5.1.2. Run the command to publish your backend changes to the cloud. Select Y when asked if you are sure you want to continue:
amplify push
Your application needs to be able to capture audio. In your Cloud9 terminal, run the command
npm install --save microphone-streamto add mic audio capture capability to your application. Please note depending on browser and system defaults you may not capture audio in a format that is expected by Amazon Transcribe (in which case you will get an error in your app).
In your Cloud9 IDE, right click on src folder and select New File. Name the new file SpeechToText.js (src/SpeechToText.js).
create file src/SpeechToText.js
/**
 *
 * Building Intelligent Applications Workshop
 *
 * src/SpeechToText.js
 *
 */
import React, { useState } from 'react';

import './App.css';
import Amplify, { Storage, Predictions } from 'aws-amplify';
import { AmazonAIPredictionsProvider } from '@aws-amplify/predictions';

import awsconfig from './aws-exports';

import mic from 'microphone-stream';

Amplify.configure(awsconfig);

function SpeechToText(props) {
  const [response, setResponse] = useState("Press 'start recording' to begin your transcription. Press STOP recording once you finish speaking.");

  function AudioRecorder(props) {
    const [recording, setRecording] = useState(false);
    const [micStream, setMicStream] = useState();
    const [audioBuffer] = useState(
      (function() {
        let buffer = [];
        function add(raw) {
          buffer = buffer.concat(...raw);
          return buffer;
        }
        function newBuffer() {
          console.log("reseting buffer");
          buffer = [];
        }

        return {
          reset: function() {
            newBuffer();
          },
          addData: function(raw) {
            return add(raw);
          },
          getData: function() {
            return buffer;
          }
        };
      })()
    );

    async function startRecording() {
      console.log('start recording');
      audioBuffer.reset();

      window.navigator.mediaDevices.getUserMedia({ video: false, audio: true }).then((stream) => {
        const startMic = new mic();

        startMic.setStream(stream);
        startMic.on('data', (chunk) => {
          var raw = mic.toRaw(chunk);
          if (raw == null) {
            return;
          }
          audioBuffer.addData(raw);

        });

        setRecording(true);
        setMicStream(startMic);
      });
    }

    async function stopRecording() {
      console.log('stop recording');
      const { finishRecording } = props;

      micStream.stop();
      setMicStream(null);
      setRecording(false);

      const resultBuffer = audioBuffer.getData();
         console.log('event', audioBuffer.event);
      if (typeof finishRecording === "function") {
        finishRecording(resultBuffer);
      }

    }

    return (
      <div className="audioRecorder">
        <div>
          {recording && <button onClick={stopRecording}>Stop recording</button>}
          {!recording && <button onClick={startRecording}>Start recording</button>}
        </div>
      </div>
    );
  }

  function convertFromBuffer(bytes) {
      console.log('bytes', bytes);
    setResponse('Converting text...');
     props.parentCallback('Converting text...');

    Predictions.convert({
      transcription: {
        source: {
          bytes
        },
         language: "en-US", // other options are "en-US", "fr-FR", "fr-CA", "es-US"
      },
    }).then(({ transcription: { fullText } }) => {
        console.log('fulltext', fullText);
        setResponse(fullText);
         props.parentCallback(fullText);
    })
      .catch(err => {
          console.log('error', err);
          setResponse(JSON.stringify(err, null, 2));
           props.parentCallback(JSON.stringify(err, null, 2));
      });
  }

  return (
    <div className="Text">
        <h3>Speech to text</h3>
        <AudioRecorder finishRecording={convertFromBuffer} />
    </div>
  );
}

export default (SpeechToText);5.4.1. Add the import statement below at the top of your src/App.js file just before the Amplify.configure(awsExports)
import SpeechToText from './SpeechToText'; // transcribe5.4.2 Replace the placeholder text Add audio transcribe component here... with your new component
<SpeechToText parentCallback={this.callbackFunction} />Your src/App.js file should look like the one below
/**
 *
 * Building Intelligent Applications Workshop
 *
 * src/App.js
 *
 */

import React, { Component } from 'react';
import { makeStyles } from '@material-ui/core/styles';
import ExpansionPanel from '@material-ui/core/ExpansionPanel';
import ExpansionPanelSummary from '@material-ui/core/ExpansionPanelSummary';
import ExpansionPanelDetails from '@material-ui/core/ExpansionPanelDetails';
import Typography from '@material-ui/core/Typography';
import TextField from '@material-ui/core/TextField';
import Grid from '@material-ui/core/Grid';

import 'typeface-roboto';

import Amplify from 'aws-amplify';
import awsExports from './aws-exports';
import { withAuthenticator } from '@aws-amplify/ui-react';
import LabelsIdentification from './LabelsIdentification' //rekognition
import TextIdentification from './TextIdentification'; //textract
import SpeechToText from './SpeechToText'; // transcribe
Amplify.configure(awsExports); // aws-exports.js file is managed by AWS Amplify


class App extends Component {

    state = { response: "" }


    callbackFunction = (childData) => {
        console.log('parent state');
        this.setState({ response: childData });
    }


    render() {

        const classes = makeStyles(theme => ({
            root: {
                width: '100%',
            },
            heading: {
                fontSize: theme.typography.pxToRem(15),
                fontWeight: theme.typography.fontWeightRegular,
            },
        }));

        return (
            <div className={classes.root}>

      <Grid container direction="row" alignItems="flex-start" spacing={2}>

             <Grid item xs={5}>
                <Typography className={classes.heading}></Typography>
                <Typography variant="h4" component="h4" align="center">Building Intelligent Applications Workshop</Typography>
                    <ExpansionPanel>
                    <ExpansionPanelSummary
                      aria-controls="panel1a-content"
                      id="panel1a-header"
                    >
                      <Typography className={classes.heading}>Generate labels for objects in an image</Typography>
                    </ExpansionPanelSummary>
                    <ExpansionPanelDetails>
                        <LabelsIdentification  parentCallback={this.callbackFunction} />
                    </ExpansionPanelDetails>
                  </ExpansionPanel>

                  <ExpansionPanel>
                    <ExpansionPanelSummary
                      aria-controls="panel2a-content"
                      id="panel2a-header"
                    >
                      <Typography className={classes.heading}>Extract text from images or documents</Typography>
                    </ExpansionPanelSummary>
                    <ExpansionPanelDetails>
                        <TextIdentification parentCallback={this.callbackFunction} />
                    </ExpansionPanelDetails>
                  </ExpansionPanel>

                  <ExpansionPanel>
                    <ExpansionPanelSummary
                      aria-controls="panel2a-content"
                      id="panel2a-header"
                    >
                      <Typography className={classes.heading}>Transcribe audio</Typography>
                    </ExpansionPanelSummary>
                    <ExpansionPanelDetails>
                        <SpeechToText parentCallback={this.callbackFunction} />
                    </ExpansionPanelDetails>
                  </ExpansionPanel>

                   <ExpansionPanel>
                    <ExpansionPanelSummary
                      aria-controls="panel2a-content"
                      id="panel2a-header"
                    >
                      <Typography className={classes.heading}>Text interpretation</Typography>
                    </ExpansionPanelSummary>
                    <ExpansionPanelDetails>
                         Add text interpretation component here...
                    </ExpansionPanelDetails>
                  </ExpansionPanel>

                   <ExpansionPanel>
                    <ExpansionPanelSummary
                      aria-controls="panel2a-content"
                      id="panel2a-header"
                    >
                      <Typography className={classes.heading}>Chatbot</Typography>
                    </ExpansionPanelSummary>
                    <ExpansionPanelDetails>
                        Add chatbot component here
                    </ExpansionPanelDetails>
                  </ExpansionPanel>

             </Grid>

               <Grid item xs={7}>
                 <TextField
                    id="outlined-multiline-flexible"
                    label="output"
                    multiline
                    fullWidth
                    rows="30"
                    value={this.state.response}
                    margin="normal"
                    variant="outlined"
                  />
              </Grid>
      </Grid>

    </div>
        );
    }

}

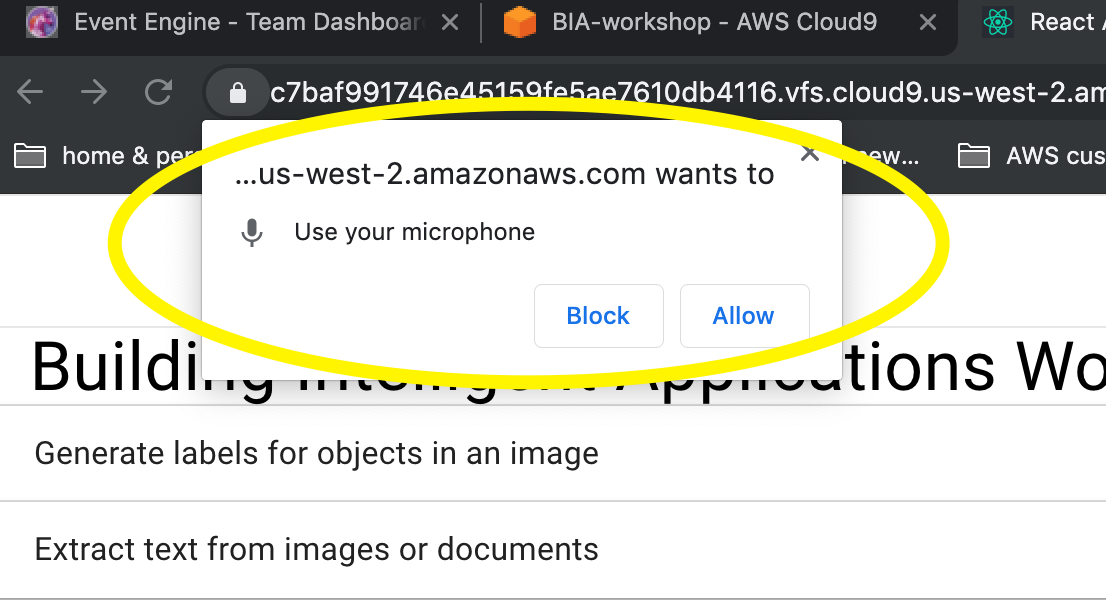
export default withAuthenticator(App, { includeGreetings: true });Once you saved the changes, go back to your browser application preview tab and try transcribe. Please note that your browser may ask you to authorise access to the microphone as per below.
6.1.1. Run the following command in your Cloud9 terminal
amplify add predictions6.1.2. Answer the questions as follows when prompted
Please select from one of the categories below Interpret
*What would you like to interpret? Interpret Text
Provide a friendly name for your resource [Press Enter to accept the name suggested]
What kind of interpretation would you like? All
Who should have access? Auth users only
6.1.3. It's now time to publish our backend changes to the cloud. Run the command and select Y when asked if you want to continue:
amplify push
6.2.1. Right click on the src folder at the Cloud9 tree navigation on the left of your IDE and select New File. Name the new file TextInterpretation.js (src/TextInterpretation.js)
6.2.2. Copy and paste the contents below.
/**
 *
 * Building Intelligent Applications Workshop
 *
 * src/TextInterpretation.js
 *
 */
import React, { useState } from 'react';
import Amplify, { Storage, Predictions } from 'aws-amplify';
import { AmazonAIPredictionsProvider } from '@aws-amplify/predictions';

import awsconfig from './aws-exports';

function TextInterpretation(props) {
  const [response, setResponse] = useState("Input some text and click enter to test")
  const [textToInterpret, setTextToInterpret] = useState("write some text here to interpret");

  function interpretFromPredictions() {
    Predictions.interpret({
      text: {
        source: {
          text: textToInterpret,
        },
        type: "ALL"
      }
    }).then(result => {
        setResponse(JSON.stringify(result, null, 2))
        props.parentCallback(JSON.stringify(result, null, 2));
    })
      .catch(err => {
          setResponse(JSON.stringify(err, null, 2))
           props.parentCallback(JSON.stringify(err, null, 2));
      })
  }

  function setText(event) {
    setTextToInterpret(event.target.value);
  }

  return (
    <div className="Text">
        <h3>Text interpretation</h3>
        <input value={textToInterpret} onChange={setText}></input>
        <button onClick={interpretFromPredictions}>test</button>
    </div>
  );
}

export default (TextInterpretation);6.3.1 Add the import statement for the new component just before the Amplify.configure(awsExports); line.
import TextInterpretation from './TextInterpretation'; // comprehend6.3.2 Now replace the placeholder text Add text interpretation component here... with the actual component.
<TextInterpretation parentCallback={this.callbackFunction} />
Your src.App.js should look like the one below
/**
 *
 * Building Intelligent Applications Workshop
 *
 * src/App.js
 *
 */

import React, { Component } from 'react';
import { makeStyles } from '@material-ui/core/styles';
import ExpansionPanel from '@material-ui/core/ExpansionPanel';
import ExpansionPanelSummary from '@material-ui/core/ExpansionPanelSummary';
import ExpansionPanelDetails from '@material-ui/core/ExpansionPanelDetails';
import Typography from '@material-ui/core/Typography';
import TextField from '@material-ui/core/TextField';
import Grid from '@material-ui/core/Grid';

import 'typeface-roboto';

import Amplify from 'aws-amplify';
import awsExports from './aws-exports';
import { withAuthenticator } from '@aws-amplify/ui-react';
import LabelsIdentification from './LabelsIdentification' //rekognition
import TextIdentification from './TextIdentification'; //textract
import SpeechToText from './SpeechToText'; // transcribe
import TextInterpretation from './TextInterpretation'; // comprehend
Amplify.configure(awsExports); // aws-exports.js file is managed by AWS Amplify


class App extends Component {

    state = { response: "" }


    callbackFunction = (childData) => {
        console.log('parent state');
        this.setState({ response: childData });
    }


    render() {

        const classes = makeStyles(theme => ({
            root: {
                width: '100%',
            },
            heading: {
                fontSize: theme.typography.pxToRem(15),
                fontWeight: theme.typography.fontWeightRegular,
            },
        }));

        return (
            <div className={classes.root}>

      <Grid container direction="row" alignItems="flex-start" spacing={2}>

             <Grid item xs={5}>
                <Typography className={classes.heading}></Typography>
                <Typography variant="h4" component="h4" align="center">Building Intelligent Applications Workshop</Typography>
                    <ExpansionPanel>
                    <ExpansionPanelSummary
                      aria-controls="panel1a-content"
                      id="panel1a-header"
                    >
                      <Typography className={classes.heading}>Generate labels for objects in an image</Typography>
                    </ExpansionPanelSummary>
                    <ExpansionPanelDetails>
                        <LabelsIdentification  parentCallback={this.callbackFunction} />
                    </ExpansionPanelDetails>
                  </ExpansionPanel>

                  <ExpansionPanel>
                    <ExpansionPanelSummary
                      aria-controls="panel2a-content"
                      id="panel2a-header"
                    >
                      <Typography className={classes.heading}>Extract text from images or documents</Typography>
                    </ExpansionPanelSummary>
                    <ExpansionPanelDetails>
                        <TextIdentification parentCallback={this.callbackFunction} />
                    </ExpansionPanelDetails>
                  </ExpansionPanel>

                  <ExpansionPanel>
                    <ExpansionPanelSummary
                      aria-controls="panel2a-content"
                      id="panel2a-header"
                    >
                      <Typography className={classes.heading}>Transcribe audio</Typography>
                    </ExpansionPanelSummary>
                    <ExpansionPanelDetails>
                        <SpeechToText parentCallback={this.callbackFunction} />
                    </ExpansionPanelDetails>
                  </ExpansionPanel>

                   <ExpansionPanel>
                    <ExpansionPanelSummary
                      aria-controls="panel2a-content"
                      id="panel2a-header"
                    >
                      <Typography className={classes.heading}>Text interpretation</Typography>
                    </ExpansionPanelSummary>
                    <ExpansionPanelDetails>
                        <TextInterpretation parentCallback={this.callbackFunction} />
                    </ExpansionPanelDetails>
                  </ExpansionPanel>

                   <ExpansionPanel>
                    <ExpansionPanelSummary
                      aria-controls="panel2a-content"
                      id="panel2a-header"
                    >
                      <Typography className={classes.heading}>Chatbot</Typography>
                    </ExpansionPanelSummary>
                    <ExpansionPanelDetails>
                        Add chatbot component here
                    </ExpansionPanelDetails>
                  </ExpansionPanel>

             </Grid>

               <Grid item xs={7}>
                 <TextField
                    id="outlined-multiline-flexible"
                    label="output"
                    multiline
                    fullWidth
                    rows="30"
                    value={this.state.response}
                    margin="normal"
                    variant="outlined"
                  />
              </Grid>
      </Grid>

    </div>
        );
    }

}

export default withAuthenticator(App, { includeGreetings: true });It's time to add a chatbot to our app.
7.1.1 In your Cloud9 terminal run
amplify add interactions7.1.2. Answer the questions as follows when prompted
Provide a friendly resource name that will be used to label this category in the project: [Press Enter to accept the suggested name]
Would you like to start with a sample chatbot, import a chatbot, or start from scratch? Start with a sample
Choose a sample chatbot: OrderFlowers
Please indicate if your use of this bot is subject to the Children's Online Privacy Protection Act (COPPA). Learn more: https://www.ftc.gov/tips-advice/business-center/guidance/complying-coppa-frequently-asked-questions No
7.1.3. Run the command to publish your changes to your cloud backend. Answer Y when asked if you are sure you want to continue:
amplify push
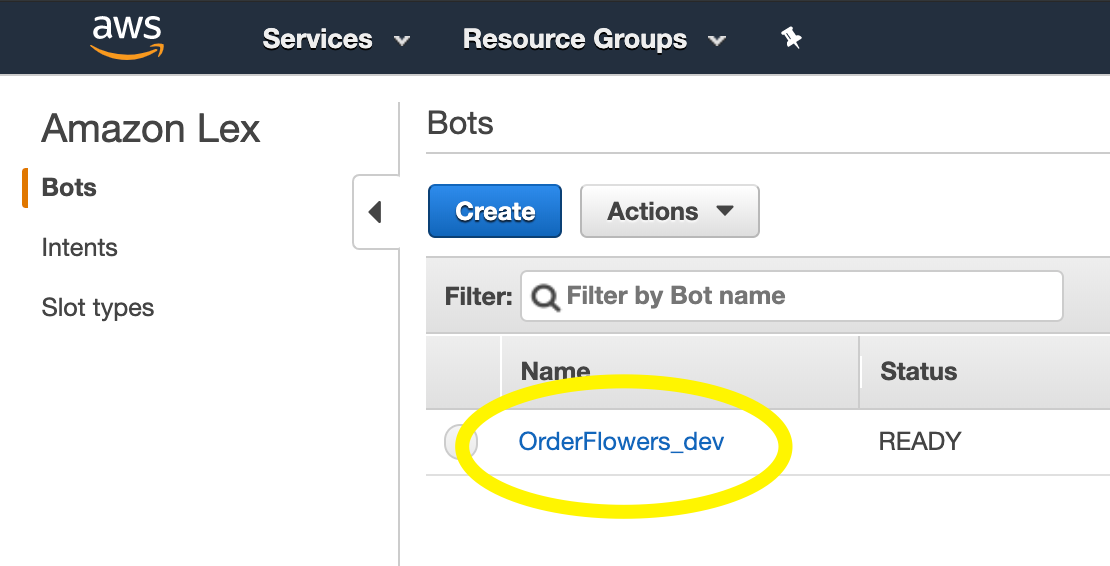
7.1.4. Get the name of your newly created bot.
Go to the Lex console https://us-west-2.console.aws.amazon.com/lex/home to get the name of your newly created flower bot.
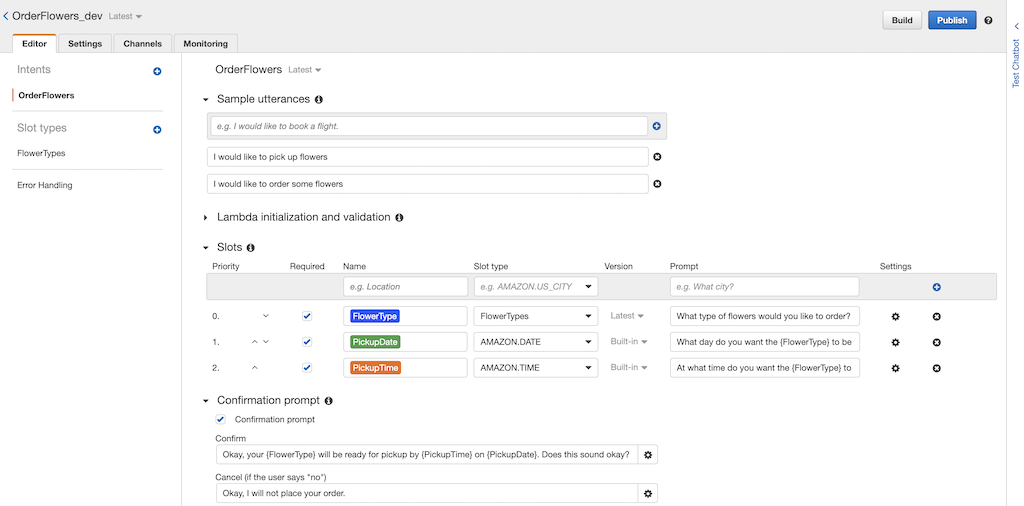
7.1.5. Take a moment to look at the bot settings in the console.
7.2.1. Right click on the src folder on the tree navigation of your Cloud9 IDE and select New File. Name the new file MyChatbox.js (src/MyChatbox.js).
7.2.2. Copy and paste the contents below in the new file. Don't forget to replace replace_this_with_your_own_bot_name_from_console with the name of the bot you got of step 7.1.4
/**
 *
 * Building Intelligent Applications Workshop
 *
 * src/MyChatbox.js
 *
 */
import React, { Component } from 'react';
import Amplify, { Interactions } from 'aws-amplify';
import { ChatBot, AmplifyTheme } from 'aws-amplify-react';
import awsconfig from './aws-exports';

Amplify.configure(awsconfig);

// Imported default theme can be customized by overloading attributes
const myTheme = {
  ...AmplifyTheme,
  sectionHeader: {
    ...AmplifyTheme.sectionHeader,
    backgroundColor: '#ff6600'
  }
};

class MyChatbox extends Component {

  handleComplete(err, confirmation) {
    if (err) {
      alert('Bot conversation failed')
      return;
    }

    alert('Success: ' + JSON.stringify(confirmation, null, 2));
    return 'Done! Thank you! what would you like to do next?';
  }

  render() {
    return (
        <ChatBot
          title="My workshop demo chatbot"
          theme={myTheme}
          botName="replace_this_with_your_own_bot_name_from_console"
          welcomeMessage="Welcome, how can I help you today?"
          onComplete={this.handleComplete.bind(this)}
          clearOnComplete={true}
          conversationModeOn={false}
        />
    );
  }
}

export default MyChatbox;7.3.1. Add the import statement of the new component near the top of your src/App.js file just before the Amplify.configure(awsExports); line.
import MyChatbox from './MyChatbox.js'; // lex7.3.2. Replace the placeholder text Add chatbot component here in the render method with the newcomponent below.
<MyChatbox />Your src/App.js file should like the one below
/**
 *
 * Building Intelligent Applications Workshop
 *
 * src/App.js
 *
 */

import React, { Component } from 'react';
import { makeStyles } from '@material-ui/core/styles';
import ExpansionPanel from '@material-ui/core/ExpansionPanel';
import ExpansionPanelSummary from '@material-ui/core/ExpansionPanelSummary';
import ExpansionPanelDetails from '@material-ui/core/ExpansionPanelDetails';
import Typography from '@material-ui/core/Typography';
import TextField from '@material-ui/core/TextField';
import Grid from '@material-ui/core/Grid';

import 'typeface-roboto';

import Amplify from 'aws-amplify';
import awsExports from './aws-exports';
import { withAuthenticator } from '@aws-amplify/ui-react';
import LabelsIdentification from './LabelsIdentification' //rekognition
import TextIdentification from './TextIdentification'; //textract
import SpeechToText from './SpeechToText'; // transcribe
import TextInterpretation from './TextInterpretation'; // comprehend
import MyChatbox from './MyChatbox.js'; // lex
Amplify.configure(awsExports); // aws-exports.js file is managed by AWS Amplify


class App extends Component {

    state = { response: "" }


    callbackFunction = (childData) => {
        console.log('parent state');
        this.setState({ response: childData });
    }


    render() {

        const classes = makeStyles(theme => ({
            root: {
                width: '100%',
            },
            heading: {
                fontSize: theme.typography.pxToRem(15),
                fontWeight: theme.typography.fontWeightRegular,
            },
        }));

        return (
            <div className={classes.root}>

      <Grid container direction="row" alignItems="flex-start" spacing={2}>

             <Grid item xs={5}>
                <Typography className={classes.heading}></Typography>
                <Typography variant="h4" component="h4" align="center">Building Intelligent Applications Workshop</Typography>
                    <ExpansionPanel>
                    <ExpansionPanelSummary
                      aria-controls="panel1a-content"
                      id="panel1a-header"
                    >
                      <Typography className={classes.heading}>Generate labels for objects in an image</Typography>
                    </ExpansionPanelSummary>
                    <ExpansionPanelDetails>
                        <LabelsIdentification  parentCallback={this.callbackFunction} />
                    </ExpansionPanelDetails>
                  </ExpansionPanel>

                  <ExpansionPanel>
                    <ExpansionPanelSummary
                      aria-controls="panel2a-content"
                      id="panel2a-header"
                    >
                      <Typography className={classes.heading}>Extract text from images or documents</Typography>
                    </ExpansionPanelSummary>
                    <ExpansionPanelDetails>
                        <TextIdentification parentCallback={this.callbackFunction} />
                    </ExpansionPanelDetails>
                  </ExpansionPanel>

                  <ExpansionPanel>
                    <ExpansionPanelSummary
                      aria-controls="panel2a-content"
                      id="panel2a-header"
                    >
                      <Typography className={classes.heading}>Transcribe audio</Typography>
                    </ExpansionPanelSummary>
                    <ExpansionPanelDetails>
                        <SpeechToText parentCallback={this.callbackFunction} />
                    </ExpansionPanelDetails>
                  </ExpansionPanel>

                   <ExpansionPanel>
                    <ExpansionPanelSummary
                      aria-controls="panel2a-content"
                      id="panel2a-header"
                    >
                      <Typography className={classes.heading}>Text interpretation</Typography>
                    </ExpansionPanelSummary>
                    <ExpansionPanelDetails>
                        <TextInterpretation parentCallback={this.callbackFunction} />
                    </ExpansionPanelDetails>
                  </ExpansionPanel>

                   <ExpansionPanel>
                    <ExpansionPanelSummary
                      aria-controls="panel2a-content"
                      id="panel2a-header"
                    >
                      <Typography className={classes.heading}>Chatbot</Typography>
                    </ExpansionPanelSummary>
                    <ExpansionPanelDetails>
                         <MyChatbox />
                    </ExpansionPanelDetails>
                  </ExpansionPanel>

             </Grid>

               <Grid item xs={7}>
                 <TextField
                    id="outlined-multiline-flexible"
                    label="output"
                    multiline
                    fullWidth
                    rows="30"
                    value={this.state.response}
                    margin="normal"
                    variant="outlined"
                  />
              </Grid>
      </Grid>

    </div>
        );
    }

}

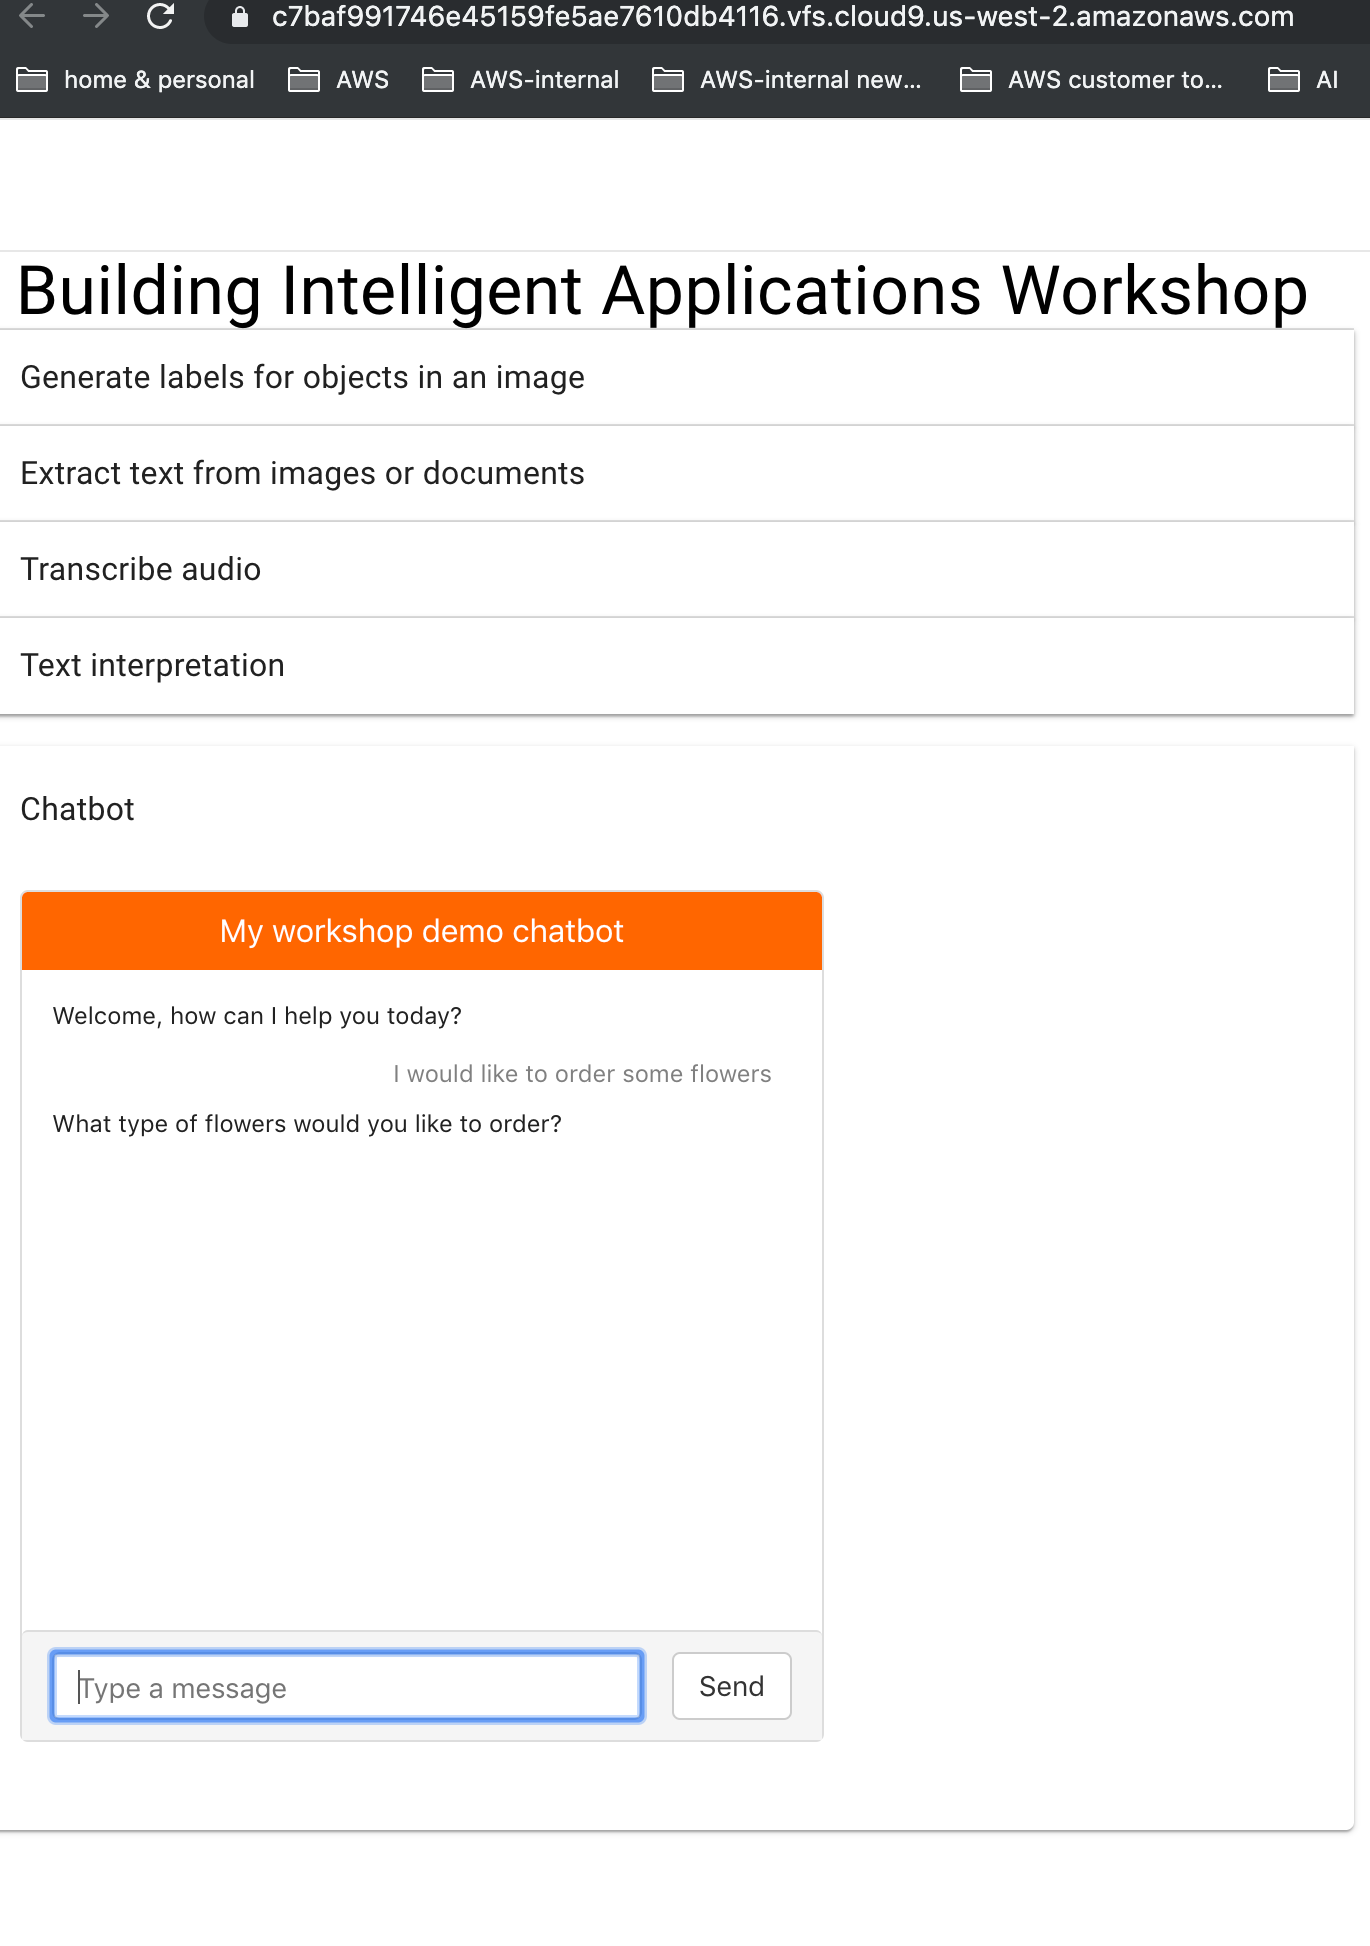
export default withAuthenticator(App, { includeGreetings: true });Once you saved, refresh your browser tab with the application review. Try asking your bot I would like to order some flowers or any of the utterances configured in your console.
8.1. To delete all resources in the cloud associated with your application run the following command in your terminal. Select Y when asked if you are sure.
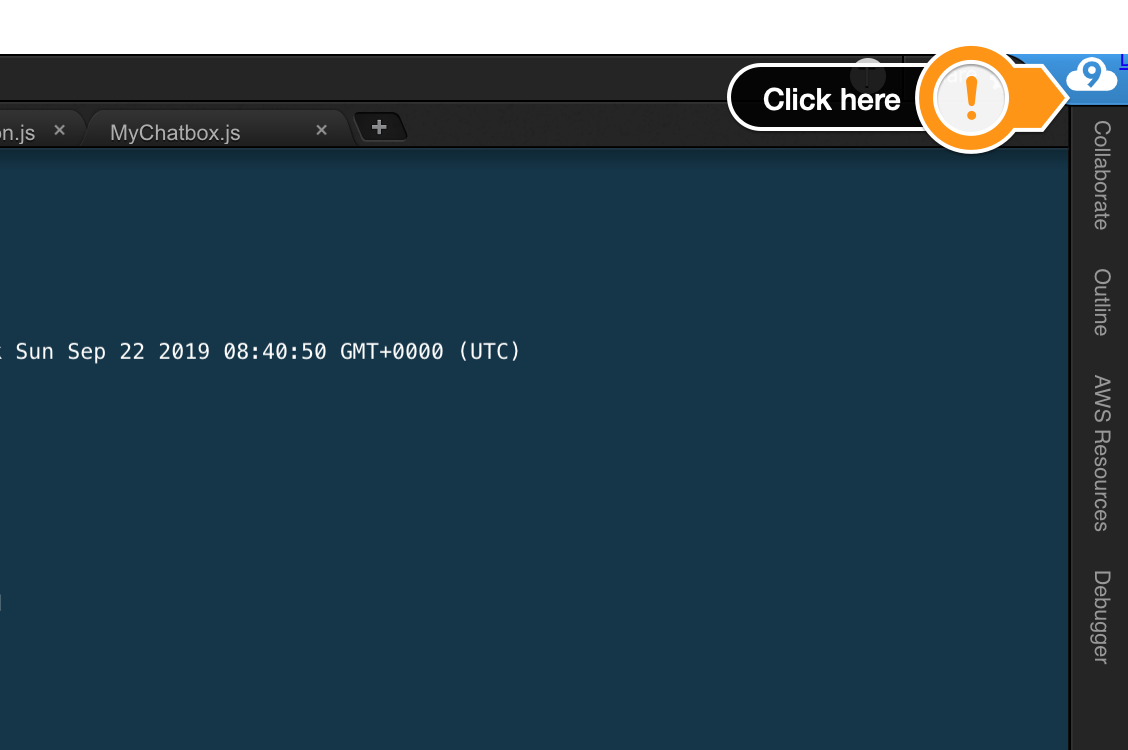
amplify delete8.2. Go to the Cloud9 dashboard by click on the blue Cloud9 logo on the top right.
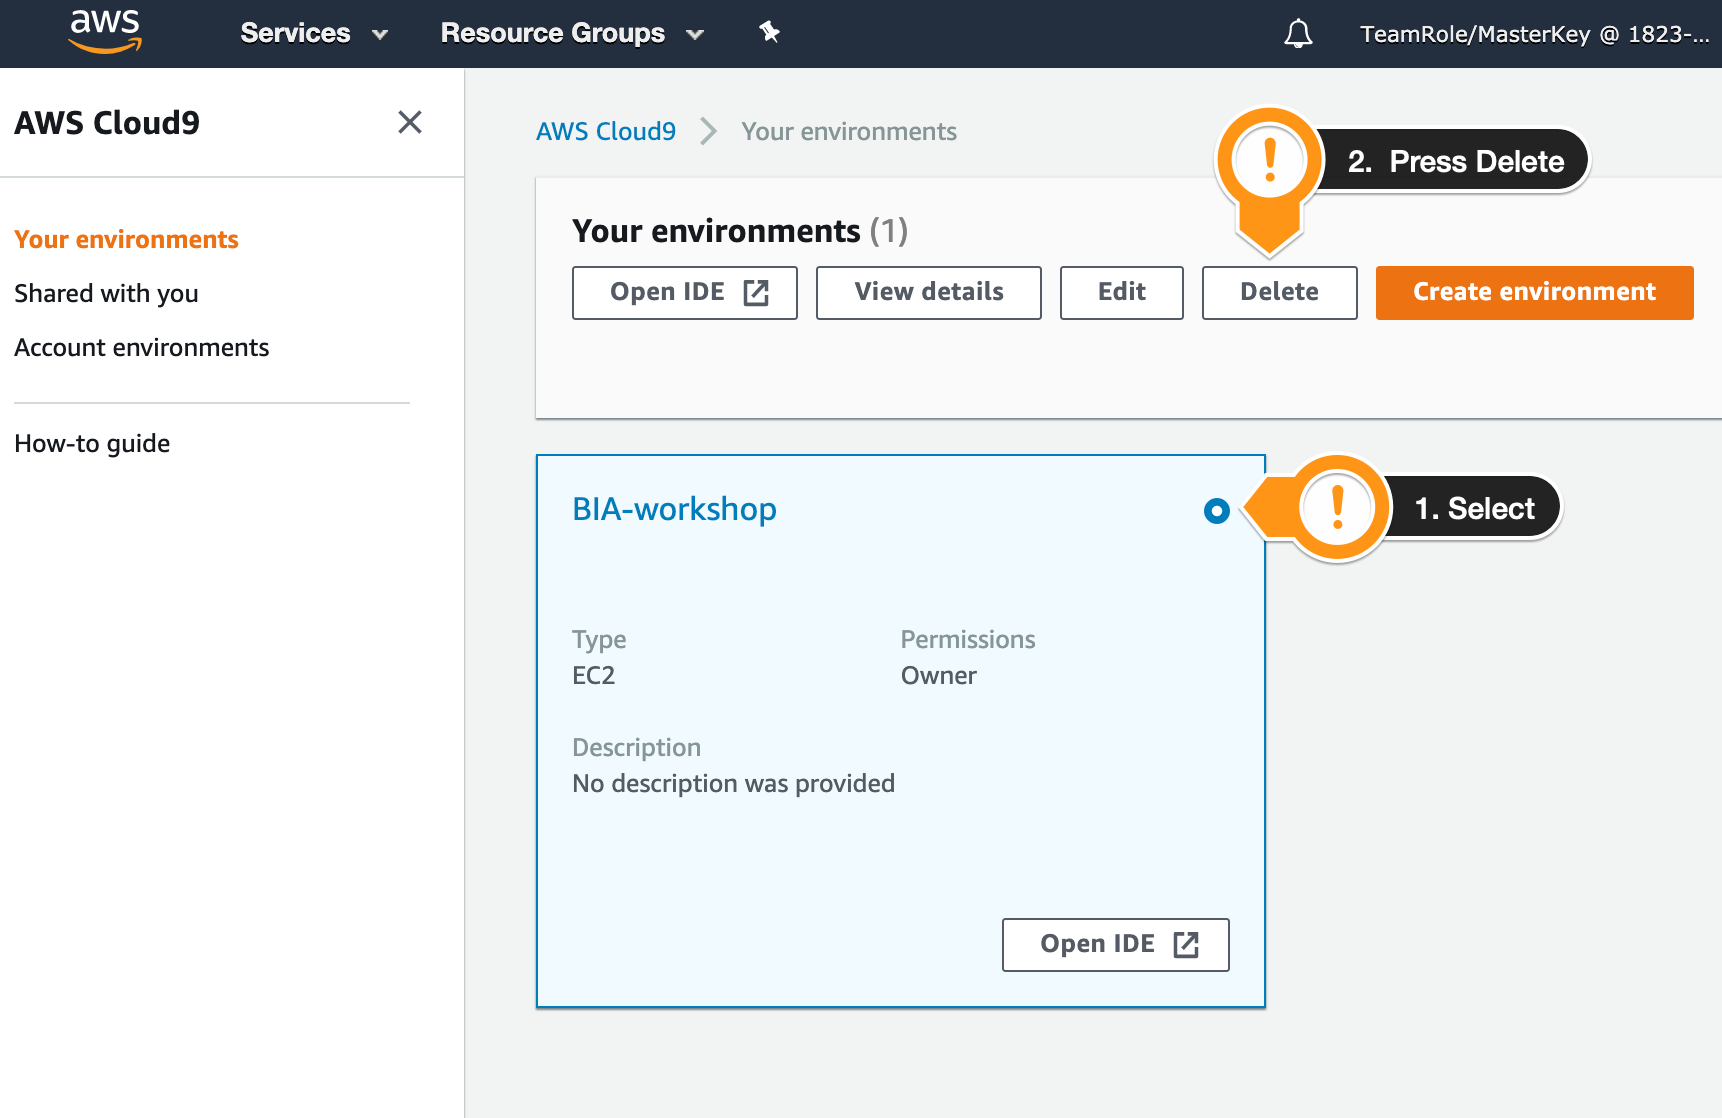
8.3. Select the environment you want to delete and press the Delete button.
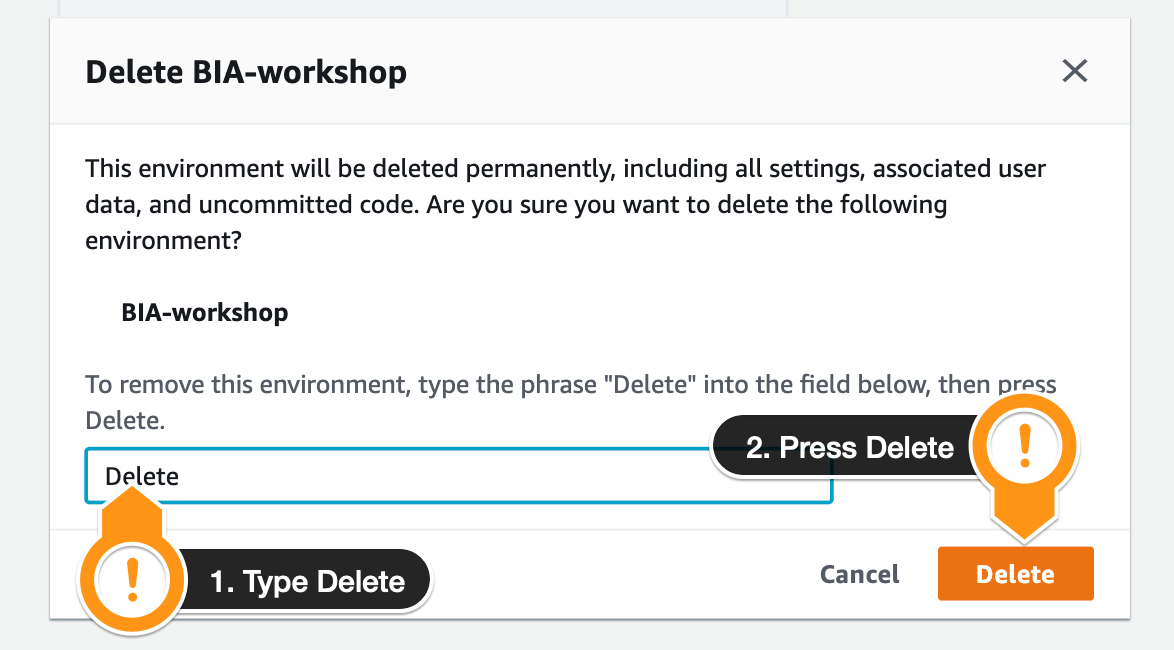
8.4. Type Delete and press the Delete button.
You can find the code for this workshop in the following github repo

