-
Notifications
You must be signed in to change notification settings - Fork 1.2k
How to Get Started
iD has been the default editor on OpenStreetMap.org for over 10 years now. Because of its age, the source code has a few quirks which makes it slightly unusual to get into. Especially compared to current days' javascript SPA frameworks, some of the design patterns used in iD are a bit more low level as the user interface parts of iD are implemented using D3 as a core library.
- D3's getting started guide.
-
ARCHITECTURE.mdgives an detailed explanation of the data model abstractions used in iD - The old Mapbox dev blog (available on archive.org) has many interesting articles about the development of the iD editor in its early days.
- The
CONTRIBUTING.mddocument contains information about coding conventions, etc.
The ARCHITECTURE.md describes iD's data model, patterns and core concepts in much more detail, but here's a few things to keep in mind to get started:
- The used data model is based tightly on top of OSM's data types (i.e. nodes, ways and relations).
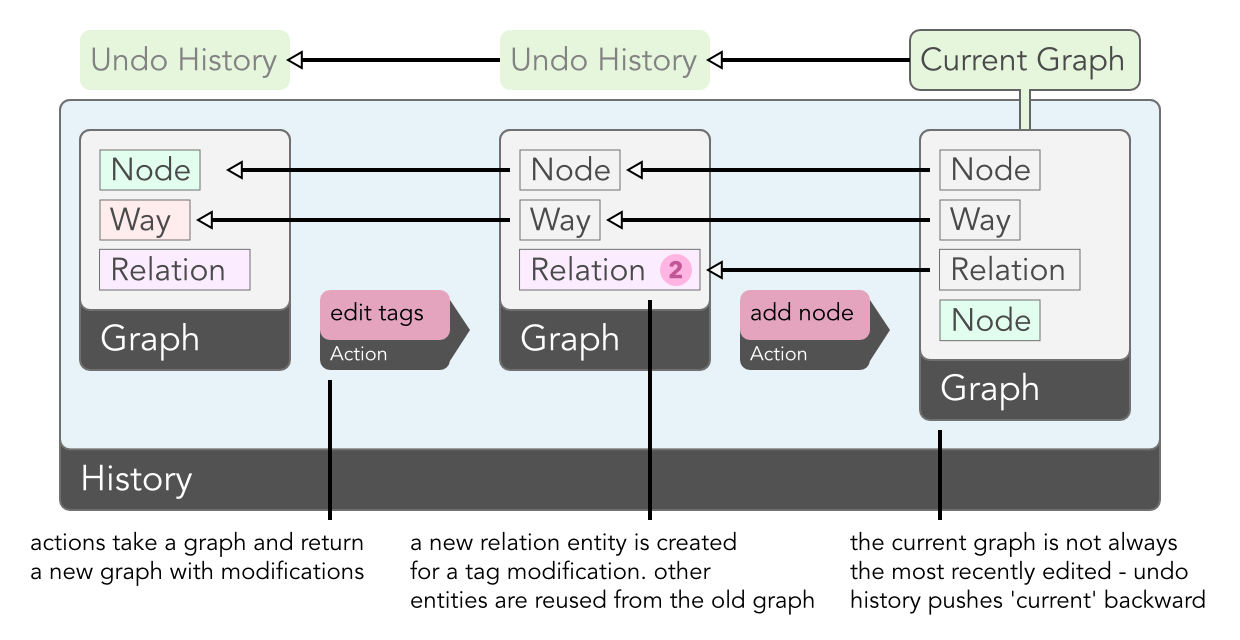
- A collection of OSM data entities is called a graph
- In order to provide the mapper with the ability to undo/redo changes, iD maintains a history of graphs, where for each state before and after an edit action a separate (immutable) graph exists. The graphs in different stages of the edit history share the same wrapper objects to the underlying OSM data entities, except for the ones which have been changed by the respective map edit action:
- The difference of the graphs at the start and the end of the edit session is used to upload a diff to the OSM API in a changeset:
- Actions are implemented to take a graph as input and produce an altered graph as output
- User interface code is divided into different stages called modes, operations and behaviours and result in an action.
The directories in the repository should be mostly self-explanatory, but here is a short list of where you can find the most important stuff:
-
modulescontains all of iD's javascript code, fromuiuser interface code, to thecoredata models, wrappers forosmdata entities, code to handle taggingpresets, interfaces to handle externalservices(like the OSM API, taginfo, etc.), code for datavalidations, and so on. - unit tests for these are found in the
testsdirectory -
datacontains auxiliary data sets used in iD: some of these are generated automatically (e.g.languages.jsonor currently also theimagery.json), others like the set of translatable strings incore.yamlare meant to be edited directly -
svgcontains icons
Here's a minimal set of instructions for how to set up your system to work on iD
If you haven't already, install Node.js version 18 or newer, and install git. Now you should be able to follow the instructions below.
- Note for Windows users: Edit
$HOME\.gitconfig: Add these lines to avoid checking in files with CRLF newlines[core] autocrlf = input
The repository is reasonably large, and it's unlikely that you need the full history. If you are happy to wait for it all to download, run:
git clone https://github.com/openstreetmap/iD.git
To clone only the most recent version, instead use a 'shallow clone':
git clone --depth=1 https://github.com/openstreetmap/iD.git
If you want to add in the full history later on, perhaps to run git blame or git log, run git fetch --depth=1000000
-
cdinto the project folder -
npm clean-installto install dependencies (npm installalso works, but is slower as it also checks for available updates for the to be installed dependencies) -
npm run allto generate static assets (translation strings, icons, etc.) -
npm startto start up a development instance locally - open
http://127.0.0.1:8080in a web browser
The development server refreshes itself automatically whenever you change something in the code (except for static assets like translation strings, icons, etc.). However, this does not yet support hot code reloading, so you need to refresh the page in the browser in order to get the respective changes also live there.
A few more useful commands are:
-
npm testruns test suite: please execute these at least before submitting a pull request -
npm lintchecks the code for for code formatting mistakes -
npm run buildgenerates a production build, whose results (static html, js, css and assets) are written to thedistdirectory. This directory is self-contained; you can copy it into the public directory of your webserver to deploy iD. - Detailed instructions about building a packaged version of iD see
RELEASING.md.
- How to get started with developing on iD
- How to use iD's localizer module
- Streetlevel modules explained

