spring cloud致力于为典型的使用场景提供良好的开箱即用的体验,为其他场景提供可扩展的机制。
- 分布式/版本化配置
- 服务注册与发现
- 路由
- 服务间调用
- 负载均衡
- 断路器
- 分布式消息
spring cloud 示例
- eureka-client 服务注册与发现客户端(eureka已闭源)
- eureka-server 服务注册与发现服务端(eureka已闭源)
- circuit-breaker 断路器,介绍如何配置断路器及监控仪表盘
- ribbon 客户端负载均衡、sleuth分布式链路追踪(ribbon已进入维护模式)
- mock-client 断路器、sleuth分布式链路追踪客户端,普通spring boot应用,没有特殊配置
- config-client 服务配置客户端
- config-server 服务配置服务端
Netflix Eureka服务发现客户端,介绍如何使用Eureka客户端
使用@EnableDiscoveryClient注解启用Eureka客户端,需要在构建系统中使用spring-cloud-starter-netflix-eureka-client依赖;
及配置application.yml:
    eureka:
      client:
        serviceUrl:
          defaultZone: http://localhost:8761/eureka/
默认的应用名称(即服务ID),是应用名称(${spring.application.name})+ 服务端口(${server.port})。
如果要禁用Eureka发现客户端功能,设置eureka.client.enabled=false或spring.cloud.discovery.enabled=false。
启用客户端的http basic认证的application.yaml配置:
    eureka:
      client:
        service-url:
          defaultZone: http://user:password@localhost:8761/eureka/ # 对应服务端配置的user, password
        enabled: true
        healthcheck:
          enabled: true
      instance:
        non-secure-port-enabled: false
        secure-port-enabled: true
        hostname: localhost
prefer-ip-address: trueNetflix Eureka服务注册与发现服务端
使用@EnableEurekaServer注解启用Eureka Server,需要在构建系统中使用spring-cloud-starter-netflix-eureka-server依赖;
通过http://127.0.0.1:8761访问系统自带的UI页面,界面中展示了应用的系统状态、当前已注册实例及其他系统信息。
服务发现独立模式的application.yaml配置:
    server:
      port: 8761

    eureka:
      instance:
        hostname: localhost
      client:
        registerWithEureka: false # 关闭客户端服务注册
        fetchRegistry: false
        serviceUrl:
defaultZone: http://${eureka.instance.hostname}:${server.port}/eureka/服务发现2个节点感知模式的application.yaml配置:(peer1、peer2需要在/etc/hosts配置)
    ---
    spring:
      profiles: peer1
    eureka:
      instance:
        hostname: peer1
      client:
        serviceUrl:
          defaultZone: http://peer2/eureka/

    ---
    spring:
      profiles: peer2
    eureka:
      instance:
        hostname: peer2
      client:
        serviceUrl:
          defaultZone: http://peer1/eureka/
服务发现3个节点感知模式的application.yaml配置:(peer1、peer2、peer3需要在/etc/hosts配置)
    eureka:
      client:
        serviceUrl:
          defaultZone: http://peer1/eureka/,http://peer2/eureka/,http://peer3/eureka/
    ---
    spring:
      profiles: peer1
    eureka:
      instance:
        hostname: peer1
    ---
    spring:
      profiles: peer2
    eureka:
      instance:
        hostname: peer2
    ---
    spring:
      profiles: peer3
    eureka:
      instance:
hostname: peer3某些场景下,使用IP地址比使用hostname更合适。可以通过设置eureka.instance.preferIpAddress=true,应用将会使用IP而不是hostname。
在多个IP的Java环境中,有时候Java应用中不能确定使用哪个IP,可以使用eureka.instance.hostname属性指定。
当然也可以在运行时通过环境变量指定hostname,如eureka.instance.hostname=${HOST_NAME}.
Eureka服务端需要引入spring-boot-starter-security依赖。默认情况下,Spring Security对于接收到的每个请求需要有效的CSRF(Cross Site Request Forgery) token。
Eureka客户端通常不会生成一个CSRF token,所以需要禁用/eureka/**端点:
    @EnableWebSecurity
    class WebSecurityConfig extends WebSecurityConfigurerAdapter {

        @Override
        protected void configure(HttpSecurity http) throws Exception {
            http.csrf().ignoringAntMatchers("/eureka/**");
            super.configure(http);
        }
    }
启用客户端的http basic认证的application.yaml配置:
    spring:
      profiles: secure
      security:
        user:
          name: user
          password: password
    eureka:
      instance:
        hostname: localhost
        prefer-ip-address: true
      client:
        registerWithEureka: true
        fetchRegistry: true
        serviceUrl:
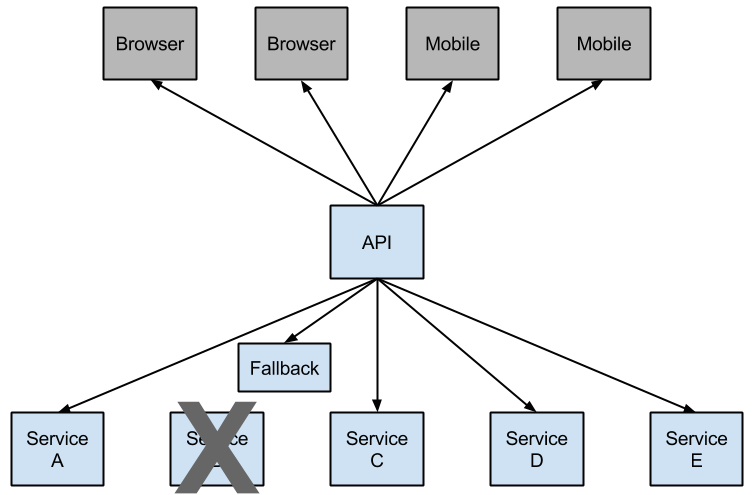
defaultZone: http://${spring.security.user.name}:${spring.security.user.password}@${eureka.instance.hostname}:${server.port}/eureka/Netflix创建了一个叫做Hystrix的库,它实现了断路模式。 在微服务架构中,通常涉及到了多个服务之间的服务调用。
低级别的服务故障可能会产生级联故障,最终导致服务不可用。当特定服务的在滑动窗口(通过metrics.rollingStats.timeInMilliseconds定义,默认10秒)内,
调用超过circuitBreaker.requestVolumeThreshold(默认:20个请求)且失败比例超过circuitBreaker.errorThresholdPercentage(默认:>50%)时,
断路将会打开,服务不再调用。在断路或错误发生的情况下,开发者可以提供回调功能,即服务降级。
要在项目中使用Hystrix,需要在构建系统中包含group ID为org.springframework.cloud、artifact ID为spring-cloud-starter-netflix-hystrix的依赖。
下面的示例代码演示了Eureka服务使用Hystrix断路器的最小实现:
    @SpringBootApplication
    @EnableCircuitBreaker
    public class Application {

        public static void main(String[] args) {
            new SpringApplicationBuilder(Application.class).web(WebApplicationType.SERVLET).run(args);
        }

    }

    @Component
    public class StoreIntegration {

        @HystrixCommand(fallbackMethod = "defaultStores")
        public Object getStores(Map<String, Object> parameters) {
            //do stuff that might fail
        }

        public Object defaultStores(Map<String, Object> parameters) {
            return /* something useful */;
        }
}@HystrixCommand由一个名为"javanica"的Netflix contrib库提供。
Spring Cloud会自动将带有该批注的Spring bean包装在连接到Hystrix断路器的代理中。
断路器计算何时断开和闭合电路,以及在发生故障时应采取的措施。
配置@HystrixCommand可以使用commandProperties属性的list注解@HystrixProperty,查看更多详情。
查看Hystrix wiki获取更多可用属性。
如果你想在thread local上下文中使用@HystrixCommand,默认的注解声明是不会生效的,因为在超时的情况下它执行命令是在线程池中。
您可以通过配置或直接在注释中将Hystrix切换为使用与调用方相同的线程,方法是要求它使用不同的“隔离策略”,下面的示例演示了如何在注释中设置线程:
    @HystrixCommand(fallbackMethod = "stubMyService",
        commandProperties = {
          @HystrixProperty(name="execution.isolation.strategy", value="SEMAPHORE")
        }
    )
    ...
使用@SessionScope或@RequestScope同样适用。如果遇到运行时异常,提示它找不到范围内的上下文,则需要使用同一线程。
您还可以选择将hystrix.shareSecurityContext属性设置为true。 这样做会自动配置一个Hystrix并发策略插件钩子,以将SecurityContext从您的主线程转移到Hystrix命令使用的线程。
Hystrix不允许注册多个Hystrix并发策略,因此可以通过将自己的HystrixConcurrencyStrategy声明为Spring bean来使用扩展机制。
Spring Cloud在Spring上下文中寻找你的实现,并将其包装在自己的插件中。
要启用Hystrix metrics stream,要包含spring-boot-starter-actuator并设置management.endpoints.web.exposure.include: hystrix.stream,
同时暴露/actuator/hystrix.stream管理端点。
Hystrix的优点之一是它收集有关每个HystrixCommand的度量值,Hystrix仪表板以有效的方式显示每个断路器的运行状况。要启用Hystrix Dashboard,需要:
- 添加
spring-cloud-starter-netflix-hystrix-dashboardjar包 - Spring Boot启动类上加上
@EnableHystrixDashboard注解 - 访问
/hystrix.stream监控接口
连接到使用HTTPS的
/hystrix.stream端点时,JVM必须信任服务器使用的证书。如果证书不受信任,则必须将证书导入JVM,以便Hystrix仪表盘成功连接到stream端点。
通过访问/hystrix(http://localhost:8080/hystrix)访问Hystrix Dashboard。
在输入框中输入http://127.0.0.1:8080/actuator/hystrix.stream监控单个Hystrix应用。
默认情况下不会有数据,需要发送实现了@HystrixCommand的Http请求,如"curl localhost:8080/to-read"。
Turbine是用于将服务器发送事件(SSE: Server-Sent Event)以JSON数据流聚合到单个流中的工具。
如集合多个/hystrix.stream端点的数据到/turbine.stream,然后在Dashboard展示。
在如,Netflix使用Hystrix,它具有一个实时仪表板,该仪表板使用Turbine聚合来自100或1000台计算机的数据。
要使用Turbine多实例监控,需要:
- 添加
spring-cloud-starter-netflix-turbinejar包 - Spring Boot启动类上加上
@EnableTurbine注解 - 访问
/turbine.stream监控接口 [todo turbine集群]
客户端负载均衡
Ribbon是客户端负载均衡器,可让您对HTTP和TCP客户端的行为进行大量控制。Feign已经使用Ribbon,因此,如果使用@FeignClient,则本节也适用。
要将Ribbon包含在您的项目中,请使用gourp ID为org.springframework.cloud及artifact ID为spring-cloud-starter-netflix-ribbon的依赖。
要使用服务配置客户端,需要包含spring-cloud-starter-config依赖包;要启用刷新配置功能,需要启用管理端点/actuator/refresh和@RefreshScope注解,
通过访问curl -X POST http://localhost:8080/actuator/refresh使修改的配置生效。
    @SpringBootApplication
    @RestController
    public class ConfigClientApp {

        public static void main(String[] args) {
            SpringApplication.run(ConfigClientApp.class, args);
        }

        @RequestMapping("/")
        public String home() {
            return "Hello World!";
        }
    }

    @RestController
    @RefreshScope
    class ConfigController {

        @Value("${info.foo:default hello}")
        private String foo;

        @RequestMapping("/foo")
        public String getValue() {
            return foo;
        }

        public String getFoo() {
            return foo;
        }

        public void setFoo(String foo) {
            this.foo = foo;
        }
    }
application.yml指定配置服务器的地址:
    spring:
      cloud:
        config:
          uri: http://localhost:8888
    management:
      endpoints:
        web:
          exposure:
include: "*"要使用服务配置服务端,需要包含spring-cloud-config-server依赖包、激活@EnableConfigServer、指定配置地址:
    @SpringBootApplication
    @EnableConfigServer
    public class ConfigServerApp {

        public static void main(String[] args) {
            SpringApplication.run(ConfigServerApp.class, args);
        }
    }
application.yml配置:
    server:
      port: 8888
    spring:
      application:
        name: config-server
      cloud:
        config:
          server:
            git:
uri: file://${HOME}/code/config-repo通过修改${HOME}/code/config-repo仓库文件内容,访问http://localhost:8080/foo测试配置是否发生变更。
通过访问curl -X POST http://localhost:8080/actuator/refresh使修改的配置生效。
在pom中加入spring-cloud-starter-sleuthjar包即可启用分布式链路追踪,日志记录应用名称及唯一请求ID;
如果是从上游来的请求,则会记录上游的唯一请求ID。


