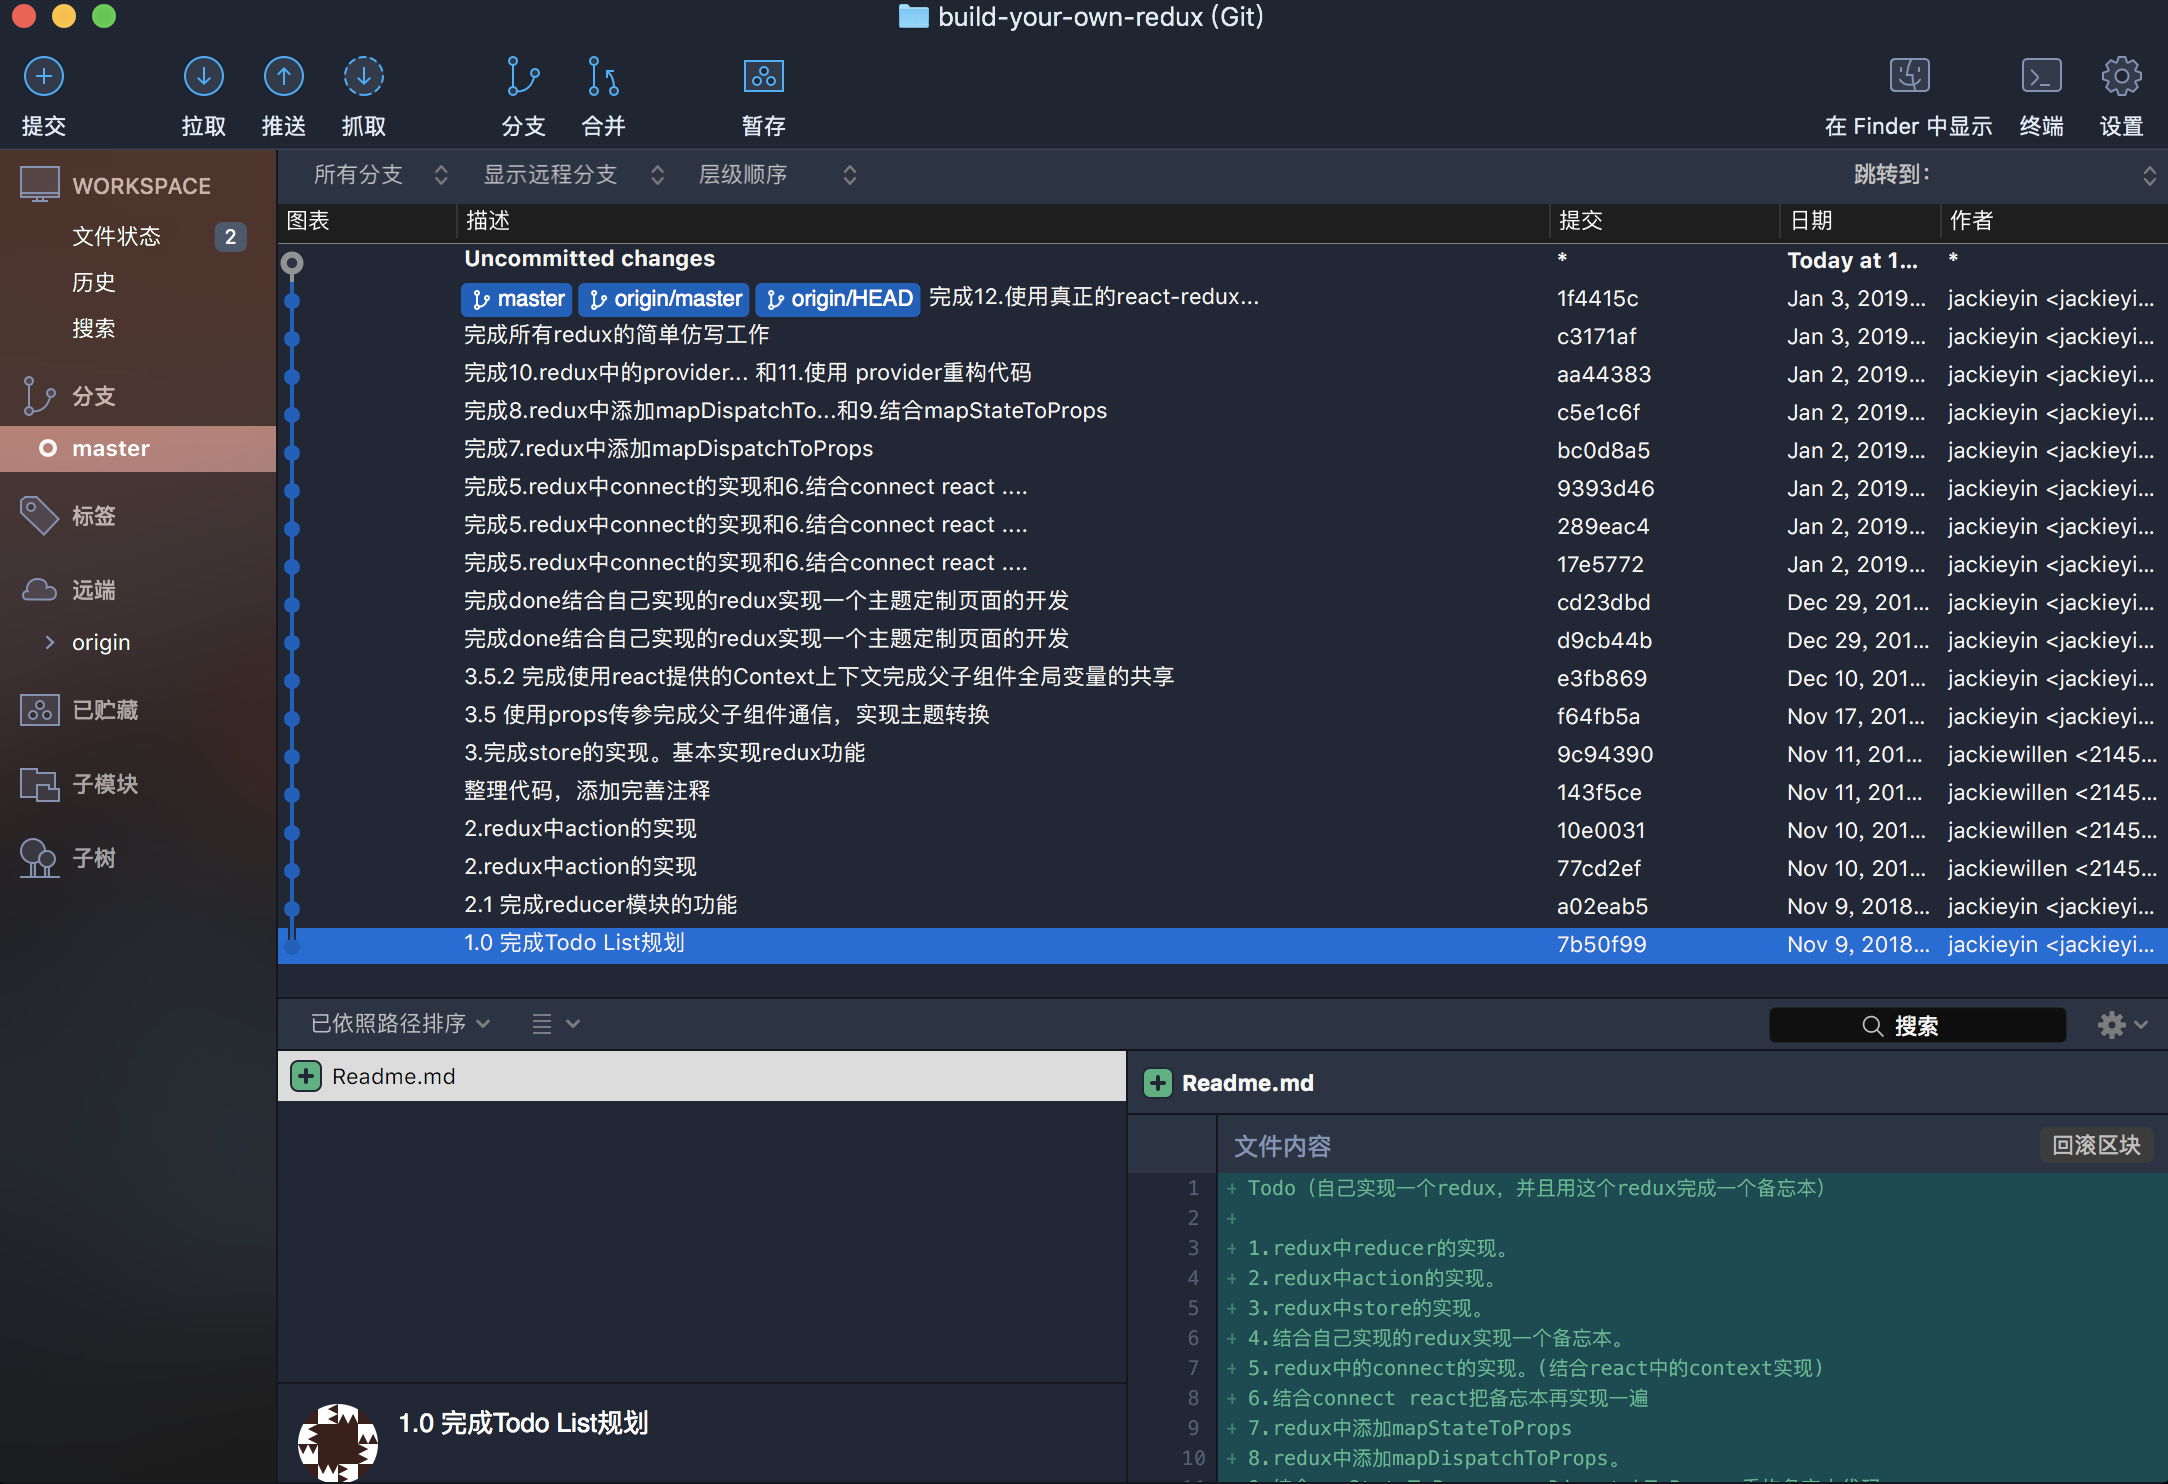
先来看一下,完成文章标题所说的,需要完成哪些任务:
TODO LIST(计划列表)

1.redux中reducer的实现

2.redux中action的实现

3.redux中store的实现

3.5 先不使用redux,直接用react实现一个主题定制页面的开发

  3.5.1 使用props传参完成父子组件共享同一个全局变量(演示全局变量的原始层层传递共享数据)

  3.5.2 使用react提供的Context上下文完成父子组件全局变量的共享(演示全局变量使用react context 跨越组件共享数据)

4.结合自己实现的redux实现一个主题定制页面的开发

5.redux中的connect的实现。(结合react中的context实现)

6.结合connect react把主题定制页面再实现一遍

7.redux中添加mapStateToProps

8.redux中添加mapDispatchToProps

9.结合mapStateToProps,mapDispatchToProps 主题定制页面

10.redux中的provider的实现

11.使用provider重构代码

12.使用真正的react-redux替代进来,看项目是否正常运行。代码整理,provider中页面刷新相关的移动到connect,语法检查,错误检查,添加注释,合并commit
接下来我们试着一个一个去实现。当然这其中包括了为什么需要redux的历史演化的过程,总的用了十几个commit来完成了这篇文章,基本上每个commit实现TODO list中的一个计划(在这墙裂推荐你使用source tree这个工具来查看各个commit都干了啥,修改了啥,对阅读源代码很有帮助)。在完成一个完整的功能后都会使用完整的demo进行演示,基本上可以覆盖redux的进化历程了。最后真正实现redux的部分连100行代码都不到,所以你千万不要被redux的名头吓跑。最后再不要脸一下,如果你觉得文章写得还行,欢迎您在我的Github中送上star.
接下来,就照着项目提交的commit一个一个的讲:
(1)commit1:完成TODO list规划 这个commit主要是完成了实现这篇文章所要完成的任务。也就是上面陈列的TODO list.
(2)commit2:完成reducer模块的功能 没有使用任何的构建工具,直接打开index.html就可以运行。需要在Google 调试工具的控制台中查看结果,界面上并无内容。这个commit主要就是实现了一个reducer,并在index.html中调用了reducer.js,主要是调试了一下reducer是否可以正常的运行。reducer实现的代码部分如下。
var reducer = (state = initialState, action) => {
    switch(action.type) {
        case CREATE_NOTE: {
            let currentId = state.nextNoteId;
            return {
                nextNoteId: currentId + 1,
                notes: {
                    ...state.notes,
                    [currentId]: action.content
                },
            };
        }
        case UPDATE_NOTE: {
            let {id, content} = action;
            return {
                ...state,
                notes: {
                    ...state.notes,
                    [id]: content
                }
            };
        }
        default:
            return state;
    }
}
调试成功的结果如下:
(3)commit3-commit4:redux中action的实现
这两个commit主要实现了redux中action的定义。同样在index.html中引入了actions.js来对所写的action进行测试。
const CREATE_NOTE = "CREATE_NOTE";
const UPDATE_NOTE = "UPDATE_NOTE";

// 添加一条备忘录
let create_action = {
    type: CREATE_NOTE,
    content: '明天下午要开会'
};
// 更新一条备忘录
let update_action = {
    type: UPDATE_NOTE,
    id: 1,
    content: '好像记错了,是明天上午要开会'
};
(4)commit5-commit6:完成store的实现,基本实现redux功能
function createStore(reducer) {
    let state = undefined;
    const subscribers = [];
    let store = {
        getState: () => state,
        dispatch: (action) => {
            state = reducer(state, action);
            subscribers.forEach(handler => handler());
        },
        subscribe: (handler) => {
            // handler就要比如备忘录有更新就发送通知到对应的人之类的
            subscribers.push(handler);
            return () => {
                let index = subscribers.indexOf(handler);
                if (index >= 0) {
                    // 防止搜索不到index为-1时,把subscribers最后一个删除了
                    subscribers.splice(0, index);
                }
            }
        }
    }
    store.dispatch(init_action); // 初始化一下备忘录
    return store;
}
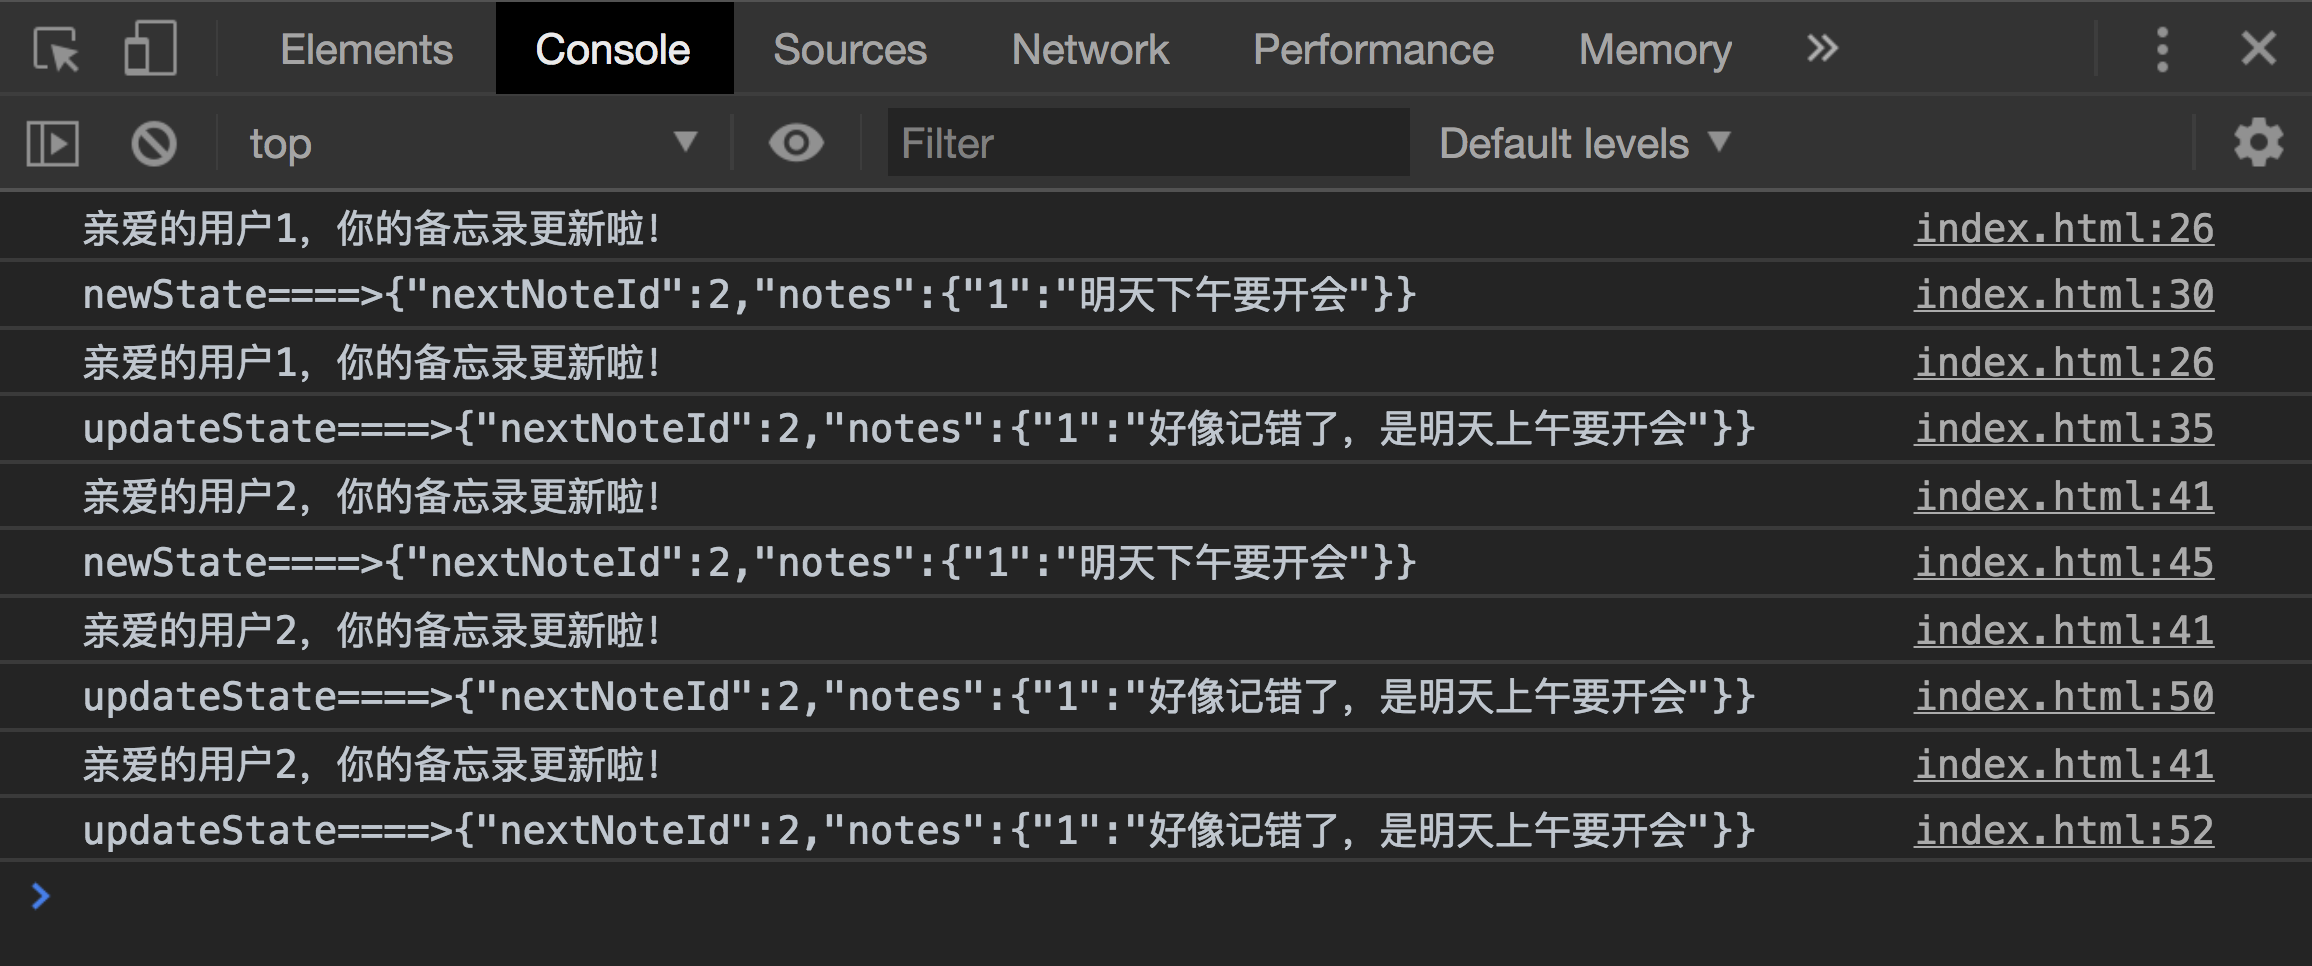
基本实现redux后,来测试一下自己写的redux是否正常运行。以下为正常运行的结果:
(5)commit7:使用props传参完成父子组件通信,完成主题切换 使用react的项目初始化工具,详情参考react项目初始化工具,完成项目的初始化工作,并使用最原始的方式进行父子组件的传参,使用了props进行传参。使用这种方式的弊端就是,如果要从父向儿子,孙子,重孙....一直传到祖宗十九代的时候,每个子组件都要写向下传递的代码,非常的冗余和难以维护。在项目中才使用了几层代码都能感觉到代码的冗余和难以维护。(注意:项目中的Index.js需要修改为index.js才可以在my-app目录下使用npm run start运行,我的锅,不要意思,之后的commit都要改成index.js才可以正常运行)
 class Content extends Component {
  render() {
    return (
      <div>
          <span
            color={this.props.color}
            style={{color: this.props.color}}>
              主内容区域
          </span>
          <br/>
          <ChildContent
            switchColor={this.props.switchColor}
            color={this.props.color}
            ></ChildContent>
      </div>
    );
  }
}
以下是完成的主题切换的效果:
(6)commit8:完成react提供的Context上下文完成父子组件全局变量的共享 为了避免代码的冗余。可以考虑使用react中提供的全局context来进行完成。这样就可以避免层层使用props来进行传参。在任何一行使用contextTypes就可以完成引用全局变量。但是这样写代码的弊端依然很明显。代码中依然存在冗余。但维护性相对于使用props较好。以下是使用contextTypes在组件中引用属性的方法。
class Title extends Component {
    static contextTypes = {
        color: PropTypes.string
    }
    render() {
        return (
            <div style={{color: this.context.color}}>我是文章的标题</div>
        );
    }
}
(7)commit9-commit10:结合自己实现的redux实现一个主题定制页面的开发
到这就可以结合自己开发的redux实现一个简单的主题定制页面的开发。主要在红色主题与蓝色主题之间切换。来测试自己所写的redux是否可以正常工作。主要实现的结果和上面相同。通过在my-app/的目录下运行npm run start就可成功启动页面。
(8)commit11-commit13:redux中connect的实现
connect实现部分的代码如下:
let connect = (WrappedComponent) => {
    class connect extends Component {
        static contextTypes = {
            store: PropTypes.object,
        }
        componentWillMount() {
            this.store = this.context.store;
        }
        render() {
            return <WrappedComponent store = {this.store}></WrappedComponent>
        }
    }
    return connect;
}
(9)commit14:redux中mapStateToProps的实现
mapStateToProps实现的代码如下:
let mapStateToProps = (state) => {
    return {
        themeColor: state.color,
    }
}
(10)commit15:redux中mapDispatchToProps的实现并结合自己实现的mapStateToProps和mapDispatchToProps更新主题修改小应用
let mapDispatchToProps = (dispatch) => {
    return {
        changeThemeColor: function(color) {
            dispatch({type: UPDATE_THEME, color})
        }
    }
}
(11)commit16:redux中provider的实现,并使用其更新主题修改小程序
class Provider extends Component {
    static propTypes = {
        store: PropTypes.object,
    }
    static childContextTypes = { // 定义父子组件共享的变量
        store: PropTypes.object,
    }
    getChildContext () {
        return {
          store: this.props.store
        }
    }
    componentWillMount() {
        this.props.store.subscribe(() => this.updateComponent());
    }
    updateComponent() {
        // 每次store数据更新后重新渲染一下页面
        this.setState({color: this.props.store.getState().color});
    }
    render() {
        return this.props.children;
    }
}
(12)commit17-commit18:完成redux的简单仿写,并将项目中引用自己所写redux部分全部改成react中的redux,好看代码是否可行。
-import createStore from './redux/store';
+import {createStore} from 'redux';
-import Provider from './redux/provider';
+import {Provider} from 'react-redux';
通过上述的替换之后,切换主题的小应用工作正常(需要使用命令npm run dev,手贱,把start改成了dev),如下图所示。可见所仿写的redux基本成功,当然其中精细部分与原版有所差别,但是整体的原理上基本相似。所以到这基本上就了解了redux的工作原理,以后再也不要对redux的语法死记硬背了,因为你都已经写过一遍。
(如果发现文章中代码存在问题,请批评指正并留言,我会更新到文章以及代码中去,谢谢)
参考资料
https://code-cartoons.com/a-cartoon-intro-to-redux-3afb775501a6(a cartoon intro to redux)
https://zapier.com/engineering/how-to-build-redux/#routing(build yourself a redux)
https://www.sohamkamani.com/blog/2017/03/31/react-redux-connect-explained/ (React-redux "connect" explained)
https://codesandbox.io/s/github/reduxjs/redux/tree/master/examples/todos(provider and connect example)
http://huziketang.mangojuice.top/books/react/lesson29 (React.js 的 context)
http://huziketang.mangojuice.top/books/react/lesson33 (动手实现 Redux(四):共享结构的对象提高性能,为什么需要使用...(spread operator)来提供性能)
https://juejin.im/post/5a90e0545188257a63112977(聊一聊我对 React Context 的理解以及应用)


