Here's a visual guide on how to transfer your Facebook Leads to Google Sheets in realtime, with the use of Google Apps Script, without using Facebook Javascript SDK. Refer to the bottom section for the way to do it in non-realtime (pull in bulk) as well.
To be quick, there are actually lots of paid or free integration services out there which you can directly use. Free service does have its limitations. Since I am now having my year-end holiday, so it is totally not a big deal for me to spend some time doing the manual configuration.
We will be using Google Apps Script to write our integration script, well it does have its quotas as well but they are very high which would definitely meet most people's needs. The overall flow goes like this:
- Create a Facebook Lead Ads
- Prepare a blank Google Sheets
- Create a Facebook app
- Create a Facebook webhook
- Get a Facebook page access token
- Subscribe your Facebook page to your Facebook webhook
- Update your webhook script to receive and store your lead data in Google Sheets
- Facebook Graph API Explorer: https://developers.facebook.com/tools/explorer/
- Facebook Lead Ads Testing Tool: https://developers.facebook.com/tools/lead-ads-testing
- Facebook Access Token Debugger: https://developers.facebook.com/tools/debug/accesstoken
- A very good documentation explaining about Facebook access token expiration https://developers.facebook.com/docs/facebook-login/access-tokens/expiration-and-extension
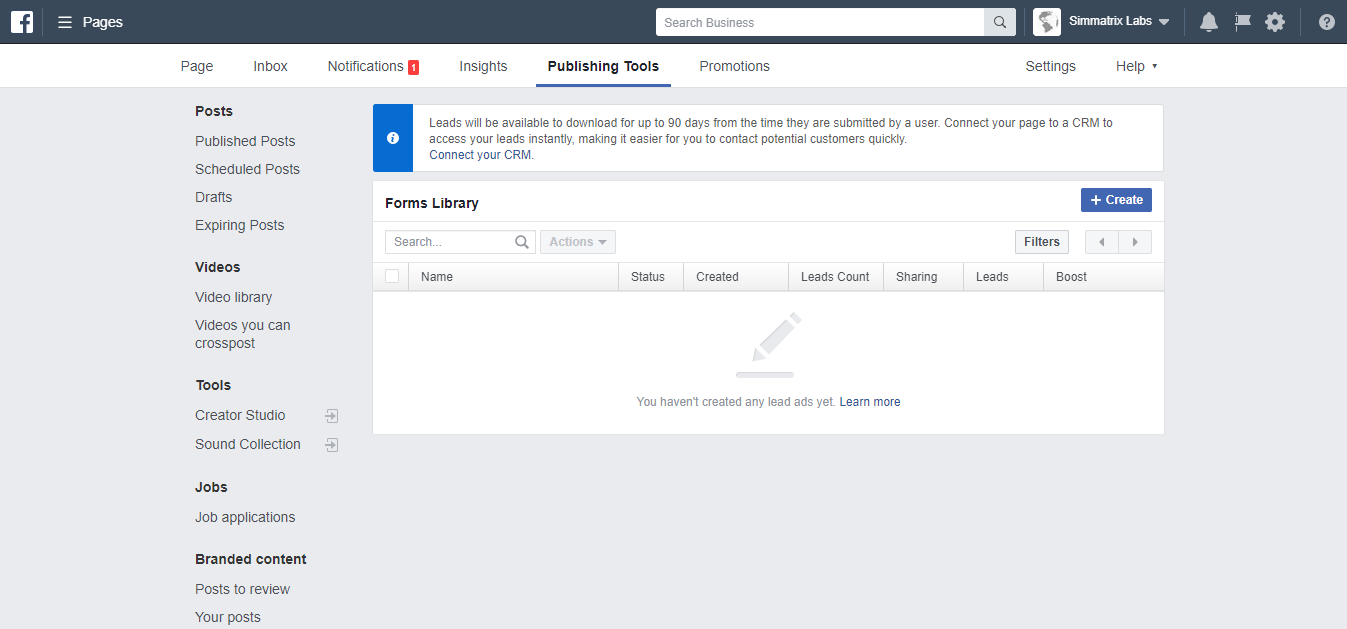
Head over to your Facebook page settings page > "Publishing Tools" > "Forms Library". Start creating a Lead Ads if you don't have an existing one.
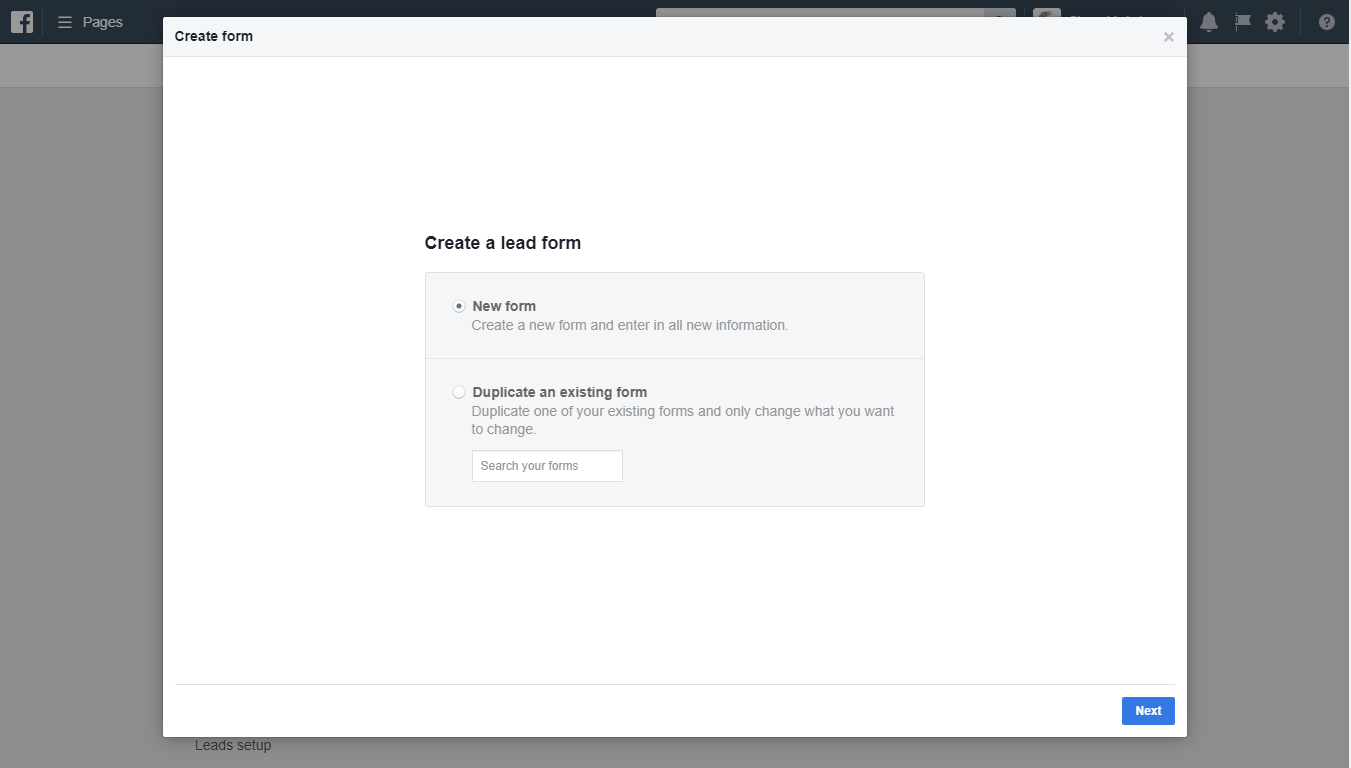


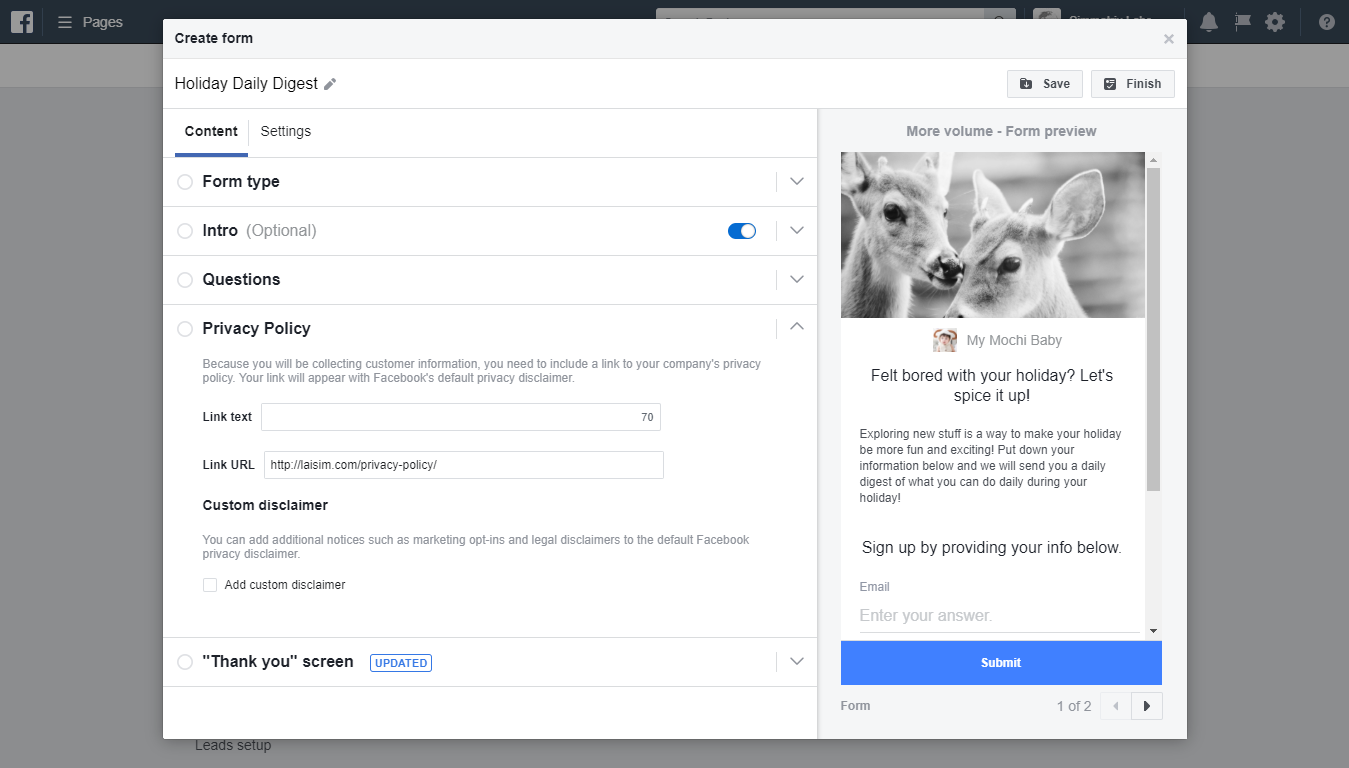
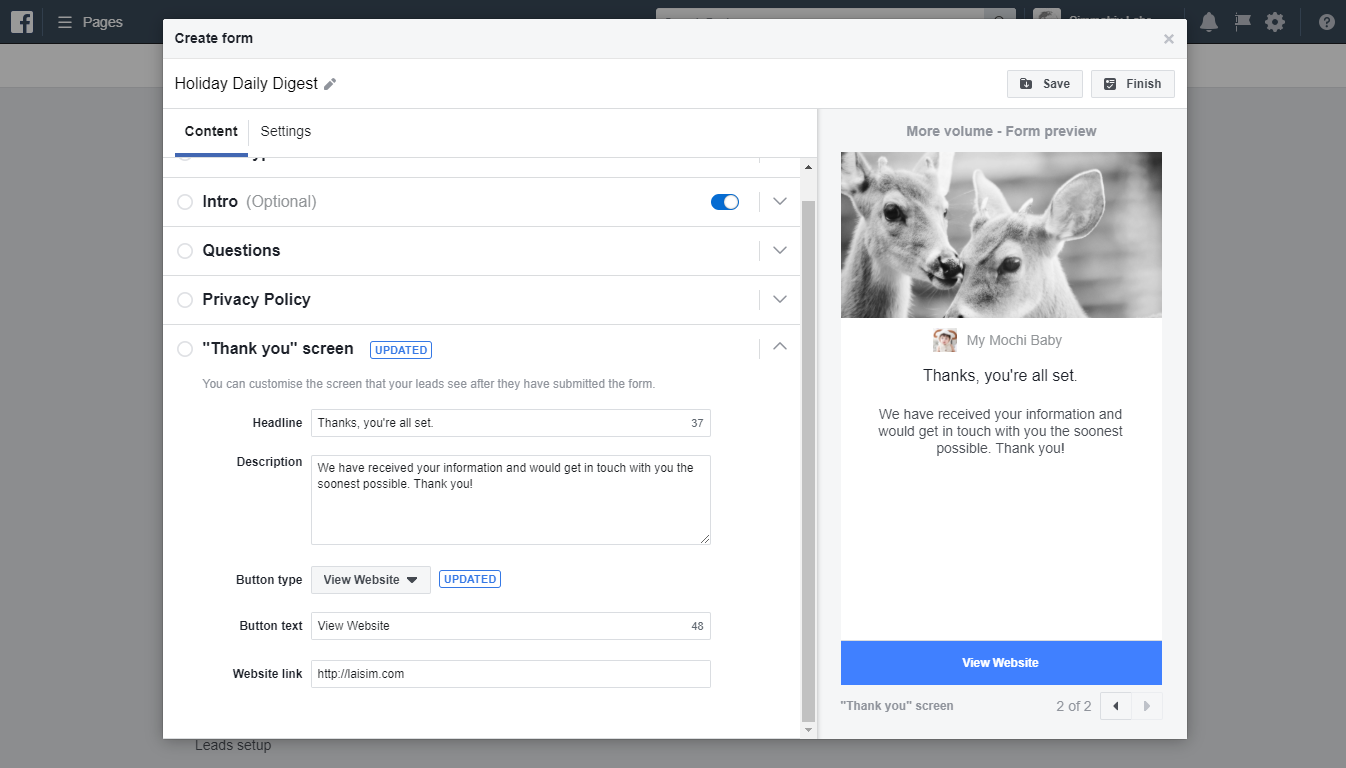
After the step below, just click on the "Finish" button

Here's your newly created Lead Ads! You may click on the "Preview" link to view your lead ads.

Here's the lead ads which I have created.

Head over to https://developers.facebook.com/apps/ and add a new app.

Key in a display name for your new app.

Key in the security check and you are all set with a new Facebook app!

Mouse over to the "Webhooks" selection and click on the "Set Up" button

You will be directed to this page. Now keep this browser tab open. We need to head over to Google Apps Script first.

In your Google Drive, create a new Google Apps Script

This is for Facebook to verify the existence of our webhook. Copy these lines of code into your script panel. You can put any random string as the hub.verify_token.
You can copy the code here but please only copy the doGet() section first and NOT the whole script!
Then you need to deploy your script to make it live.

Make sure you are executing your script as Me (<your_email_address>) and give Anyone, even anonymous the access to your app. And the Project version should be New.

After you have made it live, copy your web app URL.

You may now head back to your Facebook Developers App page.

Make sure to change the User option to Page from the drop down list, then proceed to click on the "Subscribe to this object" button.

Key in the web app URL that you copied from your Google Apps script just now into the Callback URL field, and key in the same verify_token that you have keyed into your Google Apps script. Click Verify and Save to finish this off.

You will now see a list of items below. (You may ignore the warning message as of now, it will go away once you have finished configuring and set your app to live)

Search for the item leadgen and hit on the "Subscribe" button


Step 5: [NEW - DUE TO FACEBOOK RECENT TIGHTEN SECURITY] Request for "manage_pages" permission and set your FB app to live after approval
While waiting for the approval from Facebook, which usually takes quite a while, you may go through the subsequent steps below, with your Facebook app still under development mode, but you won't get a final working version without having the approval from Facebook and without having your FB app goes to live mode.
But let's continue on with requesting for permission from Facebook. First, under your Facebook Developer page for your app, go to the App Review page, and click on the Start a Submission button.
Search for the manage_pages permission and tick on the checkbox, then click Add 1 Item to exit this dialog box.
After this, click on the detail link and fill in the details in the subsequent pop-up dialog box.
Note: I'm still waiting for someone to reply to my question on Facebook Developer Group. Will elaborate more on how to fill in the details after I have gotten a reply from some good folks over there.
So basically after submitted for app review, you would need to wait till Facebook approves your Facebook app. The next step to do after approval is to set your Facebook app to live mode.
Side Note: For the submission of Facebook chatbot, it took me a shocking 2 months, but no worries, I submitted around May 2018, which was the time when Facebook had just re-enabled back their app submission after deactivating it for a while due to the Cambridge Analytica data breach legal case, and requires all existing apps to re-submit to retain their existing permissions. Probably due to the huge influx of requests that Facebook had some delay on their end during that period of time.
For this section, you would need to head over to Facebook Graph API Explorer
Before proceeding further, I would like to let you know that actually there is a quick way of obtaining a page access token but I would not encourage you to do so because the token will expire in about one hour plus. You would need a long-lived token that never expire. Here's a quick way of obtaining a Page Access Token, just select your Facebook page from the drop-down list above of the Access Token field, then click Get Access Token.
You may then click on the blue "info" icon within the Access Token field to view its expiry time. You can see that it will be expiring soon. I created this around 6.45PM and it will expire at 8.00PM.
So right now I would take you for a ride of how to obtain a long-lived page access token. Here's a big picture:
- First we would need to get a short-lived
user access token - Then we exchange the short-lived
user access tokenwith a long-lived one - Finally we request for a
page access tokenwith our long-liveduser access token
If our user access token is long-lived, so will our page access token. And vice versa...
On a fresh page of your Graph API Explorer... (I switched to Facebook's new beta Graph Explorer. If you're still in the classic mode, you can either stay as it is or switch to this new beta and nicer look interface)

Make sure you have selected the correct Facebook app at the top-right drop-down list, for mine, it is Lead Ads Google Sheets Linkage. After this, from the "Get Token" drop-down list, click on Get User Access Token

Authorize your Facebook app to read your name and profile picture.
Now you would need to add permission. Go to the Add a Permission selection list, click on the subsection Events Groups Pages, then tick on the manage_pages checkbox

Then click on the blue Get Access Token button

Continue on with authorizing your Facebook app to read your Facebook page data.

Copy the string as shown in the Access Token field. This is your short-lived user access token.

Open a blank text editor and key in this line of code. Remember to replace the placeholders INSERT_YOUR_USER_ACCESS_TOKEN, INSERT_YOUR_CLIENT_ID, INSERT_YOUR_APP_SECRET with your own data.
oauth/access_token?grant_type=fb_exchange_token&fb_exchange_token=INSERT_YOUR_USER_ACCESS_TOKEN&client_id=INSERT_YOUR_CLIENT_ID&client_secret=INSERT_YOUR_APP_SECRET
You can obtain both your App ID and App Secret under Settings > Basic. Do fill in the rest of the details as well, for example, app icon, category, business use, contact email and privacy policy URL.

Now you need to copy and paste the text that you have just typed in your text editor into the text field beside of the Submit button, then hit Submit.

The result shown is your long-lived user access token.

Key in me/accounts to the text field beside the Submit button, and make sure you have pasted your long-lived user access token into the Access Token field, then hit the Submit button. The result shown are all of your Facebook pages
Copy the
access_tokenandid(Your Facebook Page ID) of your intended Facebook page.
Optionally, if you're curious to know whether this page access token expires or not, you may head on to Facebook Access Token Debugger and give it a check! The result is Never expires.

To link together both of your Facebook page and webhook, you would need to make a POST request with the endpoint <YOUR_FACEBOOK_PAGE_ID>/subscribed_apps. Make sure that it is POST, and make sure that you have keyed in your page access token to the Access Token field, then hit Submit.

You should then be getting the following result:
{
  "success": true
}
Now you can make a GET request with the same endpoint as above to view the list of subscribed apps.

Copy the doPost() function from this file and paste it into your script panel. Remember to replace the placeholders INSERT_YOUR_GOOGLE_SHEETS_ID and INSERT_YOUR_LONG_LIVED_PAGE_ACCESS_TOKEN with your own data.
If you're curious of where you can obtain your Google Spreadsheet ID, you can get it from the URL itself.
You can now deploy your web app again.
Make sure you are executing your script as Me (<your_email_address>) and give Anyone, even anonymous the access to your app. And the Project version should be New. If you are prompted with any Authorization pop-up dialog again, just do it like how you have done that before.
Because you have now added the lines of code that will access and write to your Google Sheets, you would need to authorize and grant the necessary permissions for your Google Apps script to write to your Google Sheets on behalf of you.
Sign in with your Google account
Your browser will prompt a warning that this app is not verified. You may click on the Advanced link and proceed. No worries, after all this app is being created by you yourself so it's safe.
After clicking on the Advanced link, you may proceed by clicking the link at the bottom Go to xxxxx (unsafe)
Grant the permission for your Google Apps script to view and manage your spreadsheets in Google Drive.
Now you would need to head over to the Business Settings page of your Facebook Page > "Leads Access" > "CRMs". Select the Facebook APP then click on Assign access button.
Then you will see the indicator turns green.
For this section, you would need to head over to Facebook Lead Ads Testing Tool
Hit on the "Create lead" button and wait for a moment, then hit on the button "Track status"

So for the above we deal with pulling of Facebook Leads in real-time. How if you just implement it half-way when your campaigns are running? You definitely need to pull all of the other previous leads into your Google Sheets as well right... You can refer to this alternative script of which can be called by <YOUR_GOOGLE_SCRIPTS_WEB_APP_URL>?pull_all_leads=true. Kindly refer to the doGet() function. It handles the pagination as well (as Facebook returns 25 leads per call)
To find the ID of your lead form to be keyed into var lead_form_id = 'INSERT_YOUR_LEAD_FORM_ID';, you can go to Facebook Lead Ads Testing Tool and create a test lead, then look at the Payload column at the bottom. ..."form_id":"xxxxxxxxxxx"...

In this additional script, I have also sorted the data in the order which I have wanted before inserting it into Google Sheets because I realized that for some of my previous leads, sometimes "email" comes first, sometimes "full_name" comes first, so without ordering them in proper format, it would be a mess in Google Sheets later.
Sometimes you may have multiple lead forms created for a single Facebook page, if so, you may refer to this alternative script
If you would like to have the leads be sent to your mailbox instead, you can refer to this alternative script. Do remember to replace "<YOUR_EMAIL_ADDRESS>" with your own email address.
Should you have any feedback, feel free to send your enquiries via simmatrix100[at]gmail[dot]com.
