Note
This project is part of the DevOpsTheHardWay course.
Tip
The project builds upon the work done in previous projects. We recommend completing the Docker, AWS and Terraform projects first.
In this project, you will build a high-quality Kubernetes cluster on AWS using EC2 instances. Your tasks will include creating the cluster, deploying the Polybot service, setting up CI/CD pipelines, implementing monitoring, and enabling cluster autoscaling.
Warning
This project involves working with multiple AWS services. Note that you are responsible for the costs of any resources you create. Proceed with caution and ensure that you understand the implications of provisioning resources using Terraform and deploying applications in Kubernetes cluster.
Warning
Never commit AWS credentials into your git repo nor your Docker containers!
Let's get started...
In this section you'll provision a Kubernetes cluster consists by one control plane node and one worker node.
Although AWS offers EKS, a managed service that simplifies cluster setup and management, we will manually set up the cluster using kubeadm.
This hands-on approach will allow you to gain a deeper understanding of Kubernetes architecture and the processes involved in cluster creation and configuration.
The underlying nodes infrastructure are based on - you guess right - Ubuntu EC2 instances.
In the k8s-kubeadm-tf/ directory, you will find Terraform configuration files designed to provision EC2 instances for your cluster.
To configure your cluster, you need to fill in the terraform.tfvars file with values, with the following considerations:
cluster_name- a name of your cluster (e.g.john-k8s).ami_id- an Ubuntu AMI according to your region.public_subnet_ids- at least two in different AZs.control_plane_iam_role- require a minimum ofAmazonEKSClusterPolicy,AmazonEBSCSIDriverPolicyandAmazonEC2ContainerRegistryReadOnlypolicies.control_plane_sg_ids- require an inbound rules that allow SSH connections, and all TCP and UDP traffic from cluster nodes to each other.worker_node_iam_role- require a minimum ofAmazonEKSWorkerNodePolicy,AmazonEBSCSIDriverPolicyandAmazonEC2ContainerRegistryReadOnlypolicies.worker_node_sg_ids- require an inbound rules that allow SSH connections, and all TCP and UDP traffic from cluster nodes to each other.
Note
The provided Terraform configurations are only the basic. We strongly encourage you to extend these configuration files to include additional resources, such as VPC, IAM roles and Security Groups, etc.
The instances would be provisioned with User Data script that prepare the instance to be compliant with Kubernetes cluster node requirements. The script essentially installs:
kubeadm- the official Kubernetes tool that initializes the cluster and make it up and running.kubelet- a Linux service that runs on each node in the cluster, responsible for Pods lifecycle.cri-oas the container runtime.kubectl- to control the cluster.
Warning
In this cluster we don't use Docker as the container runtime (i.e. the engine that responsible to run your containers). We do this because Docker itself is not implementing the Container Runtime Interface (CRI) required by Kubernetes. Using Docker would require an additional adapter to be installed.
To avoid this headache, we use CRI-O, which is another great container runtime.
This should not affect the operation of your Kubernetes cluster in any way. Anyway, do not install Docker, as it may cause conflicts with the setup.
Provision the nodes by:
terraform apply -var-file terraform.tfvarsConnect to the control-plane node and initialize the cluster as detailed below.
Create the ClusterConfiguration object manifest:
# cluster-configs.yaml

apiVersion: kubeadm.k8s.io/v1beta3
kind: ClusterConfiguration
clusterName: <your-cluster-name>   # TODO change to your cluster name
apiServer:
  extraArgs:
    cloud-provider: external
    allow-privileged: "true"
controllerManager:
  extraArgs:
    cloud-provider: external
networking:
  podSubnet: "10.244.0.0/16"
  serviceSubnet: "10.96.0.0/12"
While changing <your-cluster-name> to your cluster name (the same name you assign to the cluster_name var in the terraform.tfvars file).
Then, perform:
sudo kubeadm init --config cluster-configs.yamlCarefully read the output to understand how to start using your cluster, and how to join nodes.
Note
- To run
kubeadm initagain, you must first tear down the cluster. - The join token is valid for 24 hours. Read here how to generate a new one if needed.
- For more information about initializing a cluster using
kubeadm, read the official docs.
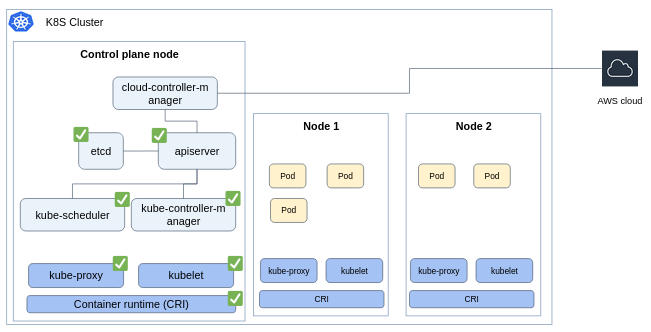
The kubeadm init command essentially does the below:
- Runs pre-flight checks.
- Creates certificates that used by different components for secure communication.
- Generates
kubeconfigfiles for cluster administration. - Deploys the
etcddb as a Pod. - Deploys the control plane components as Pods (
apiserver,controller-manager,scheduler). - Starts the
kubeletas a Linux service. - Install addons in the cluster (
corednsandkube-proxy).
Make sure you understand the role of each component in the architecture.
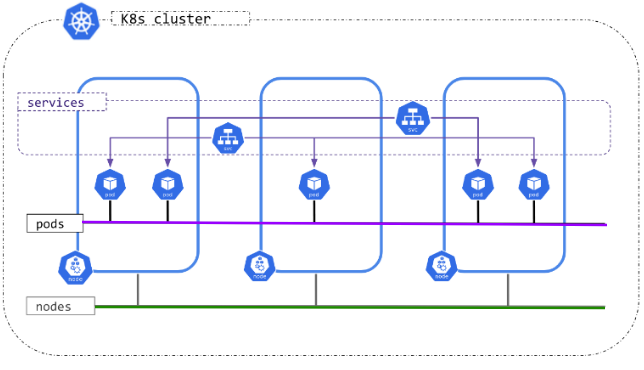
When deploying a Kubernetes cluster, there are 2 layers of networking communication:
- Communication between Nodes (denoted by the green line). This is managed for us by the AWS VPC.
- Communication between Pods (denoted by the purple line). Although the communication is done on top of the VPC, communication between pods using their own cluster-internal IP address is not implemented for us by AWS.
You must deploy a Container Network Interface (CNI) network add-on so that your Pods can communicate with each other. There are many addons that implement the CNI.
We'll install Calico, simply by:
kubectl apply -f https://raw.githubusercontent.com/projectcalico/calico/v3.28.2/manifests/calico.yamlThe AWS cloud provider provides the interface between a Kubernetes cluster and AWS service APIs. This component allows a Kubernetes cluster to provision, monitor and remove AWS resources necessary for operation of the cluster.
Install it by:
kubectl apply -k 'github.com/kubernetes/cloud-provider-aws/examples/existing-cluster/base/?ref=master'Connect to the worker node instance, copy the kubeadm join command that was provided by kubadm init command after your cluster was initialized.
After a successful join, execute kubectl get nodes from your control-plane node to make sure the worker node was joint.
The EBS Container Storage Interface (CSI) driver create and attach EBS volumes as storage for your Pods.
Install the addon from the official project repo.
Add the aws-ebs-csi-driver Helm repository.
helm repo add aws-ebs-csi-driver https://kubernetes-sigs.github.io/aws-ebs-csi-driver
helm repo update
Create a values file as follows:
# ebs-csi-values.yaml

storageClasses:
  - name: ebs-sc
    annotations:
      storageclass.kubernetes.io/is-default-class: "true"
    provisioner: ebs.csi.aws.com
    volumeBindingMode: WaitForFirstConsumer
    parameters:
      csi.storage.k8s.io/fstype: xfs
      type: gp2
      encrypted: "true"
Install the latest release of the driver.
helm upgrade --install aws-ebs-csi-driver -f ebs-csi-values.yaml -n kube-system aws-ebs-csi-driver/aws-ebs-csi-driver- Create (or use some existed) repo for the services source code. You can have a monorepo for both the Polybot and Yolo5 app (as we've done until today), or a dedicated repo per microservice.
- Create a dedicated "PolybotInfra" repo for infrastructure resources (e.g. YAML manifests, Terraform configuration files, etc...).
Your service should be deployed for both Development and Production environments, on the same Kubernetes cluster.
As a principal, the resources related to each environment should be completely independent:
- Two different Telegram tokens for 2 bots.
- Different resources in AWS: S3, SQS, DynamoDB, Secret Manager, etc...
- Different namespaces in Kubernetes (create the
devandprodnamespaces and deploy each env in its own namespace).
Note
While it's possible to separate compute resources in Kubernetes, for this project, we will share EC2 instances and VPC to save costs. This means both environments will use the same underlying infrastructure for compute, but remain logically separated within the cluster.
Deploy the Polybot and Yolo5 microservices in your cluster with proper resource requests and limits, configure readiness and liveness probes, ensure the services terminate gracefully, and set up Horizontal Pod Autoscaler (HPA) for Yolo5.
Note
As this is an exercise, do not request a lot of resources.request.cpu and resources.request.memory, to save compute costs.
Incoming traffic from Telegram into your cluster is done through the Nginx ingress controller:
kubectl apply -f https://raw.githubusercontent.com/kubernetes/ingress-nginx/controller-v1.11.1/deploy/static/provider/aws/deploy.yaml- Create a subdomain alias record in your bot domain that resolved to Network Load Balancer that was created when installed the ingress controller.
- Configure an
Ingressobject to route traffic to yourpolybotservice.
Design an implement full CI/CD pipelines:
- CI server: Choose any you like (Jenkins, GitHub Actions, Azure DevOps, etc).
- Build and Deploy Pipelines: Set up pipelines for both Dev and Prod environments.
- Deployment Strategy:
- Deployment to Dev can be done without any testing.
- Deployment to Prod should be done via a Pull Request, including a Test pipeline.
- Git Workflow: Define a clear and consistent git workflow. You can use the simplified workflow used during the course, or implement a full gitflow workflow.
- Continuous Deployment (CD) with ArgoCD:
- Use ArgoCD to manage your continuous deployment processes.
- Every YAML manifest you manage (Deployments, Services, Ingress, Secrets, ConfigMaps, etc.) should be configured and managed by ArgoCD.
Deploy the following monitoring stack:
- Prometheus for metrics collection:
- Deploy using the Helm chart, which already includes the Node Exporter component to collect cluster Nodes metrics, and kube-state-metrics to collect metrics about the state of your Kubernetes resources.
- As a principal, you should collect metrics from every component deployed in your cluster, for example:
- Logs aggregation stack:
- You should collect and aggregate logs from all your services and applications into a centralized database.
- Implementation is to your choice. Available options include:
- Elasticsearch, Logstash, Kibana (ELK).
- Elasticsearch, FluentBit, Kibana (EFK).
- FluentBit/FluentD, Loki.
- FluentBit/FluentD, CloudWatch.
- Any other common stack that fits your infrastructure and requirements.
- Grafana server with the following minimal required integrations:
- Prometheus with common dashboards.
- AWS CloudWatch with dashboard visualizing metrics about your SQS queue.
- Any other integration that enhance the observability of your service.
Note
Ensure that all servers are configured to persist data stored in EBS volumes (utilizing the EBS SCI driver installed earlier).
You've probably noticed that your cluster is not node-autoscalable by default.
Adding a new worker node requires a manual provisioning of a new EC2 instance and executing the kubeadm join command to enroll the node to the cluster.
In this section, you'll deploy the Cluster Autoscaler in your cluster to autoscale worker nodes.
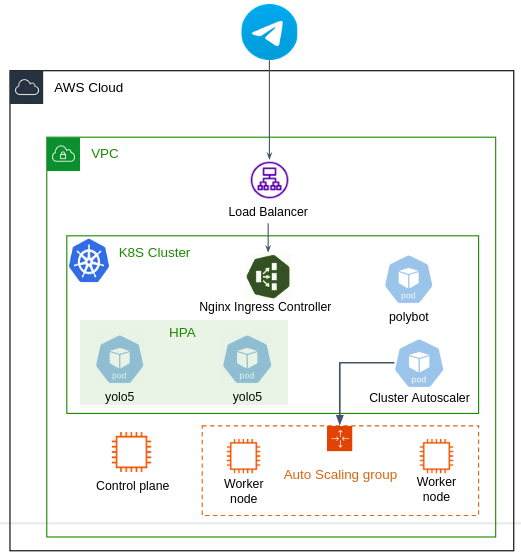
The Cluster Autoscaler utilizes AWS Auto Scaling Groups to scale in/out worker nodes by dynamically adjusting the size of the ASG based on resource demands.
Note
As can be seen, only worker nodes are part of the ASG, while the control-plane is running as a single instance (though can be potentially HA).
However, Cluster Autoscaler doesn't create the ASG for you. You must first create the ASG and define the Launch Template yourself, such that when a new worker node instance is created (or terminated) as part of the ASG, it should automatically join/leave the cluster.
-
Extend your Terraform configuration files to provision the necessary ASG and Launch Template.
- Note that when a new worker instance is being launched, it should automatically run the
kubeadm joincommand to join the cluster. Since the join token is valid for a limited time (and worker nodes can be created anytime), you have to ensure that a valid token is always available. Here are some ideas to handle this:- Periodically generate a join token on the control-plane node and store it in AWS Secrets Manager. Worker nodes can then fetch this token during initialization.
- Create a Lambda function that connects to the control-plane over SSH and generates a new join token. This Lambda function is triggered as part of the worker node initialization process.
- Tag your ASG as detailed below, so the Cluster Autoscaler could identify it (change
<YOUR CLUSTER NAME>accordingly):k8s.io/cluster-autoscaler/enabled=true k8s.io/cluster-autoscaler/<YOUR CLUSTER NAME>=owned
- Note that when a new worker instance is being launched, it should automatically run the
-
Attach the following policy to your cluster roles:
{ "Version": "2012-10-17", "Statement": [ { "Effect": "Allow", "Action": [ "autoscaling:DescribeAutoScalingGroups", "autoscaling:DescribeAutoScalingInstances", "autoscaling:DescribeLaunchConfigurations", "autoscaling:DescribeScalingActivities", "ec2:DescribeImages", "ec2:DescribeInstanceTypes", "ec2:DescribeLaunchTemplateVersions", "ec2:GetInstanceTypesFromInstanceRequirements", "eks:DescribeNodegroup" ], "Resource": ["*"] }, { "Effect": "Allow", "Action": [ "autoscaling:SetDesiredCapacity", "autoscaling:TerminateInstanceInAutoScalingGroup" ], "Resource": ["*"] } ] } -
Install the Cluster Autoscaler by:
helm repo add autoscaler https://kubernetes.github.io/autoscaler
helm install cluster-autoscaler autoscaler/cluster-autoscaler --set autoDiscovery.clusterName=<YOUR-CLUSTER-NAME> --set awsRegion=<YOUR-AWS-REGION>
While changing
<YOUR-CLUSTER-NAME>and<YOUR-AWS-REGION>accordingly. -
Test your cluster node auto-scalability.


