CubeCell-GPS Helium Mapper based on https://github.com/jas-williams/CubeCell-Helium-Mapper.git with the following improvements:
- No longer stopping the GPS after each SEND, allowing for faster GPS Fix next time.
- Added counters on the JOIN and GPS Fix Wait screens so the user could see how long it takes (could be used to compare antennas, like for example the difference between internal and external GPS antenna is clearly visible, but now you can roughly measure in seconds how much faster you get a fix with one GPS antenna vs another)
- Enabled the built in function for storing the network parameters after susccessful join, so it does not need to re-join next time after reboot
- Added Battery Level display on some screens
- Improved movement detection
- Menu mode - short press on the USR button displays a menu, another short press cycles through the options, long press activates the current option
- Screen off mode, activated from the menu - attempt to improve battery life
- Increase/decrease moving update rate from the menu
- Display battery voltage instead of percent by default, option to switch back to percent from the menu
This device is used for mapping the Helium networks LoRaWAN coverage. The initial settings are - send every 5 seconds while moving, every minute when stopped. A quick press on the user button puts the GPS in a sleep mode. The sleep mode decreases the updates to once every 6 hours. Pressing the user button while in sleep mode wakes it up and resumes normal operation.
Revision changes:
- Added Menu mode
- Improved movement detection (min stop cycles before switching to stopped update rate). Added battery level display.
- Added vibration sensor wake up.
- Added Auto Sleep after stopped for too long.
- Added Auto Sleep when wait for GPS is too long.
- Added Air530Z GPS support for board version 1.1
Note: If you prefer to use Arduino IDE, just take the \src\main.cpp file and rename it to "something".ino (for example CubeCell_GPS_Helium_Mapper.ino)
-
Install Serial Driver Find Directions here.
-
Install Visual Studio Code https://code.visualstudio.com/Download
-
Install PlatformIO IDE https://marketplace.visualstudio.com/items?itemName=platformio.platformio-ide
-
Clone this repository and open the folder
Edit file main.cpp in folder \src.
Comment out/uncomment the appropriate line for your board version (for GPS Air530 or Air530Z)
Comment out/uncomment the #define lines for VIBR_SENSOR, VIBR_WAKE_FROM_SLEEP, MAX_STOPPED_CYCLES and edit the values for the timers if desired
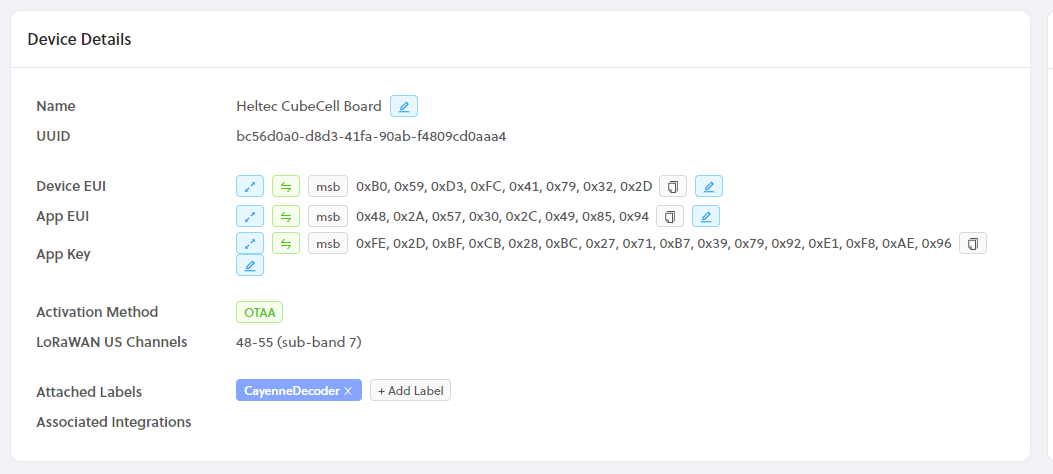
Enter DevEUI(msb), AppEUI(msb), and AppKey(msb) from Helium Console, at the respective places in main.cpp. The values must be in MSB format. From console press the expand button to get the ID's as shown below.
uint8_t devEui[] = { 0x00, 0x00, 0x00, 0x00, 0x00, 0x00, 0x00, 0x00 };
uint8_t appEui[] = { 0x00, 0x00, 0x00, 0x00, 0x00, 0x00, 0x00, 0x00 };
uint8_t appKey[] = { 0x00, 0x00, 0x00, 0x00, 0x00, 0x00, 0x00, 0x00, 0x00, 0x00, 0x00, 0x00, 0x00, 0x00, 0x00, 0x00 };
Modify platformio.ini if you need to change LoRaWAN settings like region.
Click the PlatformIO: Build button
Connect the CubeCell to the computer with USB cable
Click the PlatformIO: Upload button
(Optional) Uncomment the line enabling the DEBUG code and build again.
//#define DEBUG // Enable/Disable debug output over the serial console
Click the PlatformIO: Serial Monitor button
In Helium Console create a new function call it Heltec decoder => Type Decoder => Custom Script
Copy and paste the decoder into the custom script pane
function Decoder(bytes, port) {
  return {
    latitude:
      ((bytes[0] << 24) | (bytes[1] << 16) | (bytes[2] << 8) | bytes[3]) / 1E7,
    longitude:
      ((bytes[4] << 24) | (bytes[5] << 16) | (bytes[6] << 8) | bytes[7]) / 1E7,
    altitude:
      0,
    sats:
      (bytes[9]),
    speed:
      (((bytes[8]))/1.609).toFixed(2),
    battery:
      (bytes[10]/100 + 2).toFixed(2),
    accuracy:
      2.5
  };
}
Create two integrations one for CARGO (optional) and one for MAPPERS. For CARGO use the available prebuilt integration. For MAPPERS use a custom HTTP integration with POST Endpoint URL https://mappers.helium.com/api/v1/ingest/uplink
Go to Flows and from the Nodes menu add your device, decoder function and integrations. Connect the device to the decoder. Connect the decoder to the integrations.
Useful links:
