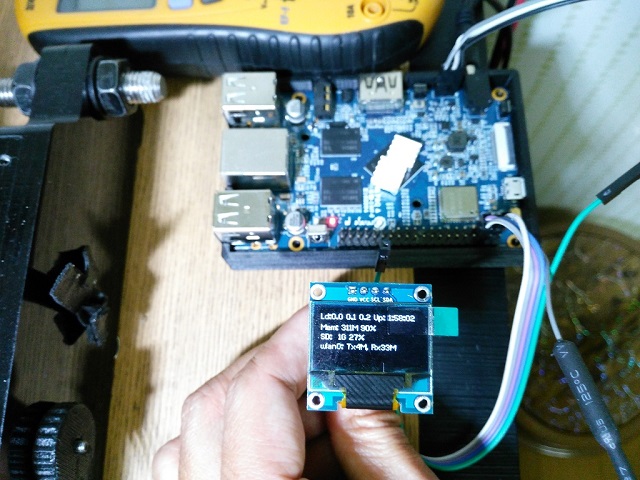
Interfacing OLED matrix displays with the SSD1306 (or SH1106) driver in Python 2 or 3 using I2C on the OrangePi 2. The particular kit I bought can be acquired for a few dollars from Banggood. Further technical details for the SSD1306 OLED display can be found in the datasheet [PDF]. See also the datasheet [PDF] for the SH1106 chipset.
The SSD1306 display is 128x64 pixels, and the board is tiny, and will fit neatly inside the RPi case (the SH1106 is slightly different, in that it supports 132 x 64 pixels).
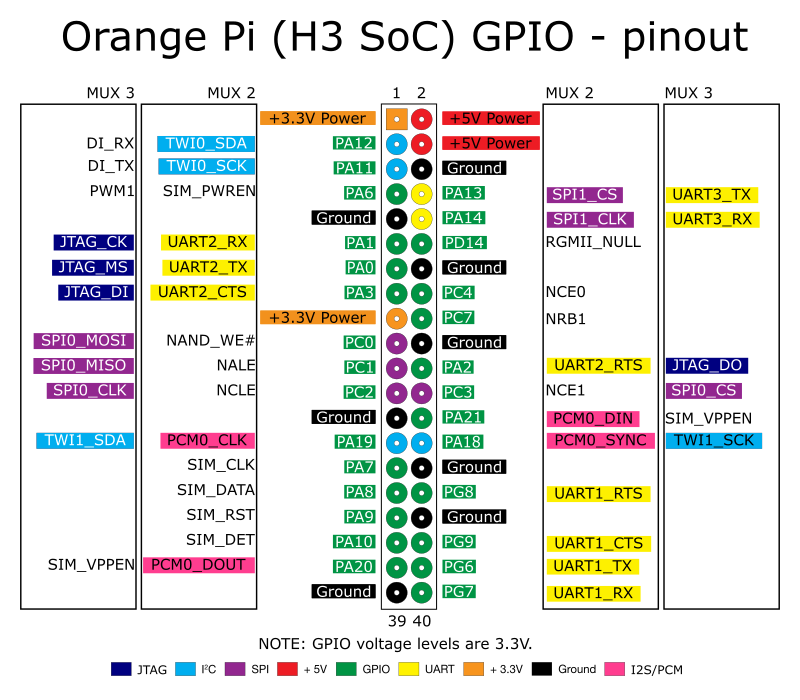
The SSD1306 device is an I2C device, so connecting to the Orange Pi 2 is very straightforward:
For prototyping, the P1 header pins should be connected as follows:
| Board Pin | Name | Remarks | OPi2 Pin | OPi2 Function | Colour |
| 1 | VCC | +3.3V Power | P01-1 | 3V3 | Orange |
| 3 | SDA | Data | PA12-3 | GPIO 2 (SDA) | Blue |
| 5 | SCL | Clock | PA11-5 | GPIO 3 (SCL) | Blue |
| 8 | GND | Ground | P01-6 | GND | Black |
This was tested with OrangePi 2 with kernel 3.4.39 Fedora distribution. Ensure that the I2C kernel module is loaded:
$ lsmod
Module Size Used by i2c_algo_bit 5461 0 gpio_sunxi 8233 0 8189es 887631 0
If you have no kernel modules listed and nothing is showing using dmesg then this implies
the kernel I2C driver is not loaded. Enable the I2C as follows:
- create a file
vim /etc/modules-load.d/i2c.conf - with content
i2c-algo-bit
This will auto load the i2c kernel module on bootup
You can also manually install the module
modprobe i2c-algo-bit
Then reboot.
Then add your user to the i2c group:
$ sudo adduser pi i2c
Install some packages (python2):
$ sudo apt-get install i2c-tools python-smbus python-pip
$ sudo pip install pillow
or (python3):
$ sudo apt-get install i2c-tools python3-smbus python3-pip
$ sudo pip3 install pillow
Next check that the device is communicating properly (if using a rev.1 board, use 0 for the bus not 1):
$ i2cdetect -y 1
       0  1  2  3  4  5  6  7  8  9  a  b  c  d  e  f
  00:          -- -- -- -- -- -- -- -- -- -- -- -- --
  10: -- -- -- -- -- -- -- -- -- -- -- -- -- -- -- --
  20: -- -- -- -- -- -- -- -- -- -- -- -- -- -- -- --
  30: -- -- -- -- -- -- -- -- -- -- -- UU 3c -- -- --
  40: -- -- -- -- -- -- -- -- -- -- -- -- -- -- -- --
  50: -- -- -- -- -- -- -- -- -- -- -- -- -- -- -- --
  60: -- -- -- -- -- -- -- -- -- -- -- -- -- -- -- --
  70: -- -- -- -- -- -- -- --
According to the manual, "UU" means that probing was skipped, because the address was in use by a driver. It suggest that there is a chip at that address. Indeed the documentation for the device indicates it uses two addresses.
Python smbus is needed to run this so its easier to use Python 2 Unless you want to compile smbus for Python 3
dnf install i2c-tools-python
This includes Python smbus for Python 2
dnf install python-devel
Clone the repository to have a local copy
git clone
cd ssd1306
For python2, from the bash prompt, enter:
$ sudo python setup.py install
This will install the Python files in /usr/local/lib/python2.7
making them ready for use in other programs.
Alternatively for python3, type:
$ sudo python3 setup.py install
The screen can be driven with python using the oled/device.py script.
There are two device classes and usage is very simple if you have ever
used Pillow or PIL.
First, import and initialise the device:
from oled.device import ssd1306, sh1106
from oled.render import canvas
from PIL import ImageFont, ImageDraw

# substitute sh1106(...) below if using that device
device = ssd1306(port=1, address=0x3C)  # rev.1 users set port=0
The display device should now be configured for use. The specific ssd1306 or
sh1106 classes both expose a display() method which takes a 1-bit depth image.
However, for most cases, for drawing text and graphics primitives, the canvas class
should be used as follows:
with canvas(device) as draw:
    font = ImageFont.load_default()
    draw.rectangle((0, 0, device.width, device.height), outline=0, fill=0)
draw.text((30, 40), "Hello World", font=font, fill=255)
The canvas class automatically creates an
ImageDraw
object of the correct dimensions and bit depth suitable for the device, so you
may then call the usual Pillow methods to draw onto the canvas.
As soon as the with scope is ended, the resultant image is automatically flushed to the device's display memory and the ImageDraw object is garbage collected.
Run the demos in the example directory:
$ python examples/demo.py
$ python examples/sys_info.py
$ python examples/pi_logo.py
$ python examples/maze.py
- Substitute
python3forpythonin the above examples if you are using python3. python-dev(apt-get) andpsutil(pip/pip3) are required to run thesys_info.pyexample.
See install instructions for the exact commands to use.
- https://learn.adafruit.com/monochrome-oled-breakouts
- https://github.com/adafruit/Adafruit_Python_SSD1306
- http://www.dafont.com/bitmap.php
- http://raspberrypi.znix.com/hipidocs/topic_i2cbus_2.htm
- http://martin-jones.com/2013/08/20/how-to-get-the-second-raspberry-pi-i2c-bus-to-work/
The MIT License (MIT)
Copyright (c) 2016 Richard Hull
Permission is hereby granted, free of charge, to any person obtaining a copy of this software and associated documentation files (the "Software"), to deal in the Software without restriction, including without limitation the rights to use, copy, modify, merge, publish, distribute, sublicense, and/or sell copies of the Software, and to permit persons to whom the Software is furnished to do so, subject to the following conditions:
The above copyright notice and this permission notice shall be included in all copies or substantial portions of the Software.
THE SOFTWARE IS PROVIDED "AS IS", WITHOUT WARRANTY OF ANY KIND, EXPRESS OR IMPLIED, INCLUDING BUT NOT LIMITED TO THE WARRANTIES OF MERCHANTABILITY, FITNESS FOR A PARTICULAR PURPOSE AND NONINFRINGEMENT. IN NO EVENT SHALL THE AUTHORS OR COPYRIGHT HOLDERS BE LIABLE FOR ANY CLAIM, DAMAGES OR OTHER LIABILITY, WHETHER IN AN ACTION OF CONTRACT, TORT OR OTHERWISE, ARISING FROM, OUT OF OR IN CONNECTION WITH THE SOFTWARE OR THE USE OR OTHER DEALINGS IN THE SOFTWARE.

