-
Notifications
You must be signed in to change notification settings - Fork 129
User_Using your own compute workers
In these instructions, we guide you step-by-step to create your own "compute worker" (a server to which submissions of challenge participants are sent to be executed).
- Setting up a server as compute worker
- Hooking up a compute worker to a queue
- Assigning a queue to a competition
- Creating GPU Workers on Google Cloud
Go to "Worker Queue Management":

Select "Add Queue":

Give the queue a name. Select whether you want is public or private (public queues can be used by everybody). For private queues, select which users you want to share them with. You can edit these settings later.

Get the queue key you needed in the previous section. Put in the .env configuration file as per instructions.

You can also set a hostname by adding a CODALAB_HOSTNAME env var.
To set up a server as compute worker, we provide instructions for creating Ubuntu Virtual machines (VM), but you may also use your own machine:
- Creating a Windows Azure Ubuntu VM
- Creating an AWS Ubuntu VM
- Using your own server: you must configure it to have Internet access with a given IP address and allow remote login via ssh.
Then ssh into your machine and run the following commands:
-
Get docker (quick and dirty way; for a full clean installation see Docker Ubuntu instructions):
$ curl https://get.docker.com | sudo sh -
Add yourself to the docker group (so you don't nee to run as root):
$ sudo usermod -aG docker $USER -
Log out of your server and log back in. Then check your installation:
$ docker run hello-world
-
Create and edit the configuration file
.env:$ vim .env
Note: vim is an editor coming with Ubuntu. If you rather use emacs, type first sudo apt-get install emacs.
- Add the following lines in
.env(paste your own key):
BROKER_URL=pyamqp://6ad9ac58-88e3-4a22-9be7-6ed5126ef388:40546f9d-0f2e-4413-a6b2-a1d86cad2b30@localhost/37324ab2-ee78-4e8d-a6ee-6089a159d253
BROKER_USE_SSL=True
To get your queue's key, see previous section. KNOWN BUG: Sometimes the server IP address or URL is replaced by localhost, like in the example above. If you get this, substitute localhost by the IP address or URL of your server.
- Get your worker to start computing (it will start listening to the queue via BROKER_URL and pick up jobs):
Note: this will make a /tmp/codalab directory
docker run \
    --env-file .env \
    --name compute_worker \
    -d \
    --restart unless-stopped \
    -v /var/run/docker.sock:/var/run/docker.sock \
    -v /tmp/codalab:/tmp/codalab \
    codalab/competitions-v1-compute-worker:1.2
-
Get the ID of the docker process
$ docker ps -
Make a submission to your competition and check logs with to confirm it is working:
$ docker logs -f compute_worker -
Should you need to change the queue that your compute worker listens to, edit again
.env, then run:$ docker kill compute_worker -
Then re-run the one line command above.
Remark: to use GPUs, go to the bottom of this guide.
Go to your competition page and click "Edit":

Select the queue that you have created:

It is recommended to clean up your docker images and containers.
- Run the following command:
sudo crontab -e- Add the following line:
@daily docker system prune -afInstall cuda, nvidia, docker and nvidia-docker (system dependent)
In order to use GPU compute workers, you need to replace the command on Step 3 by this one:
sudo mkdir -p /tmp/codalab && nvidia-docker run \
    -v /var/run/docker.sock:/var/run/docker.sock \
    -v /var/lib/nvidia-docker/nvidia-docker.sock:/var/lib/nvidia-docker/nvidia-docker.sock \
    -v /tmp/codalab:/tmp/codalab \
    -d \
    --name compute_worker \
    --env-file .env \
    --restart unless-stopped \
    --log-opt max-size=50m \
    --log-opt max-file=3 \
    codalab/competitions-v1-nvidia-worker:1.0
The default competition Docker image is codalab/codalab-legacy:py3. In order to use GPUs, you should use as a basis the image codalab/codalab-legacy:gpu which contains useful dependencies for GPU usage. Here, we are talking about the containers in which the submission are executed, not the containers of the workers themselves.
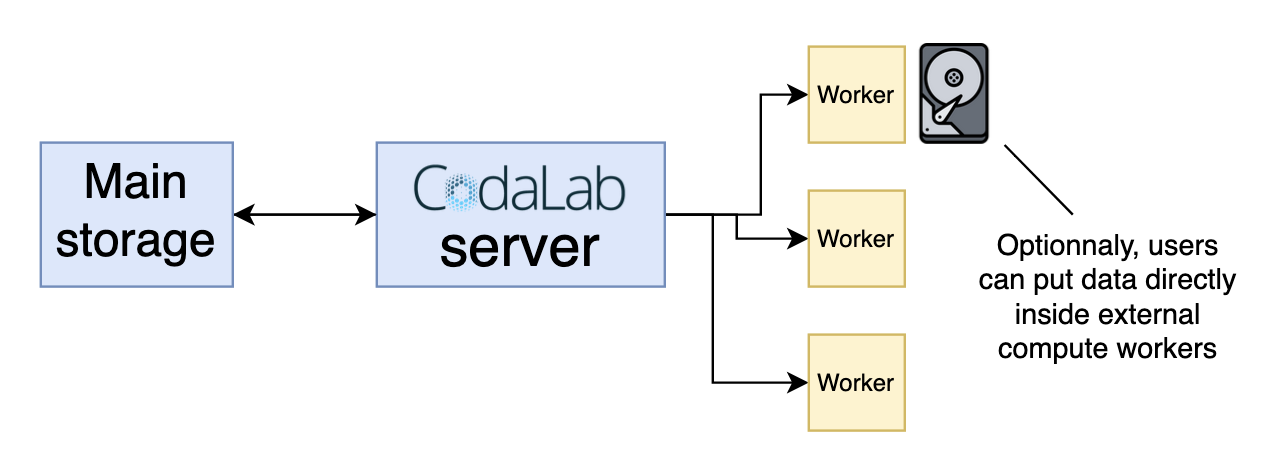
The folder /data is shared between the host (the compute worker) and the container running the submission (a new container is created for each submission). This means that you can put data directly in your worker, in /data, and read-only access it during the computation. You'll need to modify the scoring and/or ingestion programs accordingly.
/!\ If you have several workers in your queue, remember to have the data accessible for each one.

Sometimes it can happen that a participant submission exhausts available shared memory, the following commands added to the worker fixed the memory problems:
# Set shared memory
'--shm-size=8G',
# Set IPC
'--ipc=host',