Build iOS on QEMU
This tutorial will take you through the process of running iOS 12.1 kernel on QEMU.
The system will have all launchd services, a writable secondary disk device, ssh server and an ability to run binaries that are not signed by Apple.
To start the process we first need to prepare a kernel image, a device tree, the main and the secondary disk images. To get all that, we first need to get the update file from Apple: iOS 12.1 update file. This is actually a zip file which we can extract:
$ unzip iPhone_5.5_12.1_16B92_Restore.ipsw
Next, we need to clone the supporting scripts repository:
$ git clone [email protected]:alephsecurity/xnu-qemu-arm64-tools.git
Get the Kernel image Extract the ASN1 encoded kernel image (pyasn1 should be installed first):
$ pip install pyasn1
$ python xnu-qemu-arm64-tools/bootstrap_scripts/asn1kerneldecode.py kernelcache.release.n66 kernelcache.release.n66.asn1decoded
This decoded image now includes the lzss compressed kernel. Let us decompress it:
$ python xnu-qemu-arm64-tools/bootstrap_scripts/decompress_lzss.py kernelcache.release.n66.asn1decoded kernelcache.release.n66.out
Get the divice tree
Extract the device tree from the ASN1 encoded file:
$ python xnu-qemu-arm64-tools/bootstrap_scripts/asn1dtredecode.py Firmware/all_flash/DeviceTree.n66ap.im4p Firmware/all_flash/DeviceTree.n66ap.im4p.out
The following instructions will describe how to create the disk devices and what changes should be made within them to enable the system start with all the functionality mentioned above.
To create a block device that will run on the system we will use ramdisk device available in the iOS 12.1 update file.
The disk devices will be attached to the iOS system by custom block device driver.
Follow the instructions here to create the driver.
Then copy the driver aleph_bdev_drv.bin to your work directory.
$ cp ./xnu-qemu-arm64-tools/aleph_bdev_drv/bin/aleph_bdev_drv.bin ./
Next, decode the ramdisk and resize it. Attach the ramdisk device and the main disk image to the research computer.
$ python xnu-qemu-arm64-tools/bootstrap_scripts/asn1rdskdecode.py ./048-32651-104.dmg ./048-32651-104.dmg.out
$ cp ./048-32651-104.dmg.out ./hfs.main
$ hdiutil resize -size 6G -imagekey diskimage-class=CRawDiskImage ./hfs.main
$ hdiutil attach -imagekey diskimage-class=CRawDiskImage ./hfs.main
$ hdiutil attach ./048-31952-103.dmg
Remove all contents of the ramdisk and sync the ramdisk with the main disk image (the latter will take some time).
$ sudo diskutil enableownership /Volumes/PeaceB16B92.arm64UpdateRamDisk/
$ sudo rm -rf /Volumes/PeaceB16B92.arm64UpdateRamDisk/*
$ sudo rsync -av /Volumes/PeaceB16B92.N56N66OS/* /Volumes/PeaceB16B92.arm64UpdateRamDisk/
$ sudo chown root /Volumes/PeaceB16B92.arm64UpdateRamDisk/System/Library/Caches/com.apple.dyld/dyld_shared_cache_arm64
Remove contents of /private/var. We will put it to a secondary disk later.
$ sudo rm -rf /Volumes/PeaceB16B92.arm64UpdateRamDisk/private/var/*
Get pre-compiled binaries
We will use rootlessJB for pre-compiled binary tools (you can use any other project of your choice).
$ git clone https://github.com/jakeajames/rootlessJB
$ cd rootlessJB/rootlessJB/bootstrap/tars/
$ tar xvf iosbinpack.tar
$ sudo cp -R iosbinpack64 /Volumes/PeaceB16B92.arm64UpdateRamDisk/
$ cd -
Add programs to be executed at system start
Four executables will be added to ״Launch Daemons״ directory to be started on system's load.
- bash - run bash
Create the plist file and save it as /Volumes/PeaceB16B92.arm64UpdateRamDisk/System/Library/LaunchDaemons/bash.plist
<?xml version="1.0" encoding="UTF-8"?>
<!DOCTYPE plist PUBLIC "-//Apple//DTD PLIST 1.0//EN" "http://www.apple.com/DTDs/PropertyList-1.0.dtd">
<plist version="1.0">
<dict>
	<key>EnablePressuredExit</key>
	<false/>
	<key>Label</key>
	<string>com.apple.bash</string>
	<key>POSIXSpawnType</key>
	<string>Interactive</string>
	<key>ProgramArguments</key>
	<array>
		<string>/iosbinpack64/bin/bash</string>
	</array>
	<key>RunAtLoad</key>
	<true/>
	<key>StandardErrorPath</key>
	<string>/dev/console</string>
	<key>StandardInPath</key>
	<string>/dev/console</string>
	<key>StandardOutPath</key>
	<string>/dev/console</string>
	<key>Umask</key>
	<integer>0</integer>
	<key>UserName</key>
	<string>root</string>
</dict>
</plist>
- mount_sec - mount the secondary block device (disk1).
Create the plist file and save it as /Volumes/PeaceB16B92.arm64UpdateRamDisk/System/Library/LaunchDaemons/mount_sec.plist
<?xml version="1.0" encoding="UTF-8"?>
<!DOCTYPE plist PUBLIC "-//Apple//DTD PLIST 1.0//EN" "http://www.apple.com/DTDs/PropertyList-1.0.dtd">
<plist version="1.0">
<dict>
	<key>CFBundleIdentifier</key>
	<string>com.apple.mount_sec</string>
	<key>EnablePressuredExit</key>
	<false/>
	<key>EnableTransactions</key>
	<false/>
	<key>HighPriorityIO</key>
	<true/>
	<key>Label</key>
	<string>mount_sec</string>
	<key>POSIXSpawnType</key>
	<string>Interactive</string>
	<key>ProgramArguments</key>
	<array>
		<string>/sbin/mount</string>
		<string>/private/var</string>
	</array>
	<key>RunAtLoad</key>
	<true/>
	<key>Umask</key>
	<integer>0</integer>
	<key>UserName</key>
	<string>root</string>
</dict>
</plist>
- tcptunnel - opens TCP Tunnel on port 2222 between the host and the guest. SSH will run above this tunnel.
Create the plist file and save it as /Volumes/PeaceB16B92.arm64UpdateRamDisk/System/Library/LaunchDaemons/tcptunnel.plist
<?xml version="1.0" encoding="UTF-8"?>
<!DOCTYPE plist PUBLIC "-//Apple//DTD PLIST 1.0//EN" "http://www.apple.com/DTDs/PropertyList-1.0.dtd">
<plist version="1.0">
<dict>
	<key>CFBundleIdentifier</key>
	<string>com.apple.tcptunnel</string>
	<key>EnablePressuredExit</key>
	<false/>
	<key>EnableTransactions</key>
	<false/>
	<key>HighPriorityIO</key>
	<false/>
	<key>KeepAlive</key>
	<true/>
	<key>Label</key>
	<string>TcpTunnel</string>
	<key>POSIXSpawnType</key>
	<string>Interactive</string>
	<key>ProgramArguments</key>
	<array>
		<string>/bin/tunnel</string>
		<string>2222:127.0.0.1:22</string>
	</array>
	<key>RunAtLoad</key>
	<true/>
	<key>Umask</key>
	<integer>0</integer>
	<key>UserName</key>
	<string>root</string>
</dict>
</plist>
- dropbear - will be used as SSH server.
Create the plist file and save it as /Volumes/PeaceB16B92.arm64UpdateRamDisk/System/Library/LaunchDaemons/dropbear.plist
<?xml version="1.0" encoding="UTF-8"?>
<!DOCTYPE plist PUBLIC "-//Apple//DTD PLIST 1.0//EN" "http://www.apple.com/DTDs/PropertyList-1.0.dtd">
<plist version="1.0">
<dict>
	<key>CFBundleIdentifier</key>
	<string>com.apple.dropbear</string>
	<key>EnablePressuredExit</key>
	<false/>
	<key>EnableTransactions</key>
	<false/>
	<key>HighPriorityIO</key>
	<true/>
	<key>KeepAlive</key>
	<true/>
	<key>Label</key>
	<string>Dropbear</string>
	<key>POSIXSpawnType</key>
	<string>Interactive</string>
	<key>ProgramArguments</key>
	<array>
		<string>/iosbinpack64/usr/local/bin/dropbear</string>
		<string>--shell</string>
		<string>/iosbinpack64/bin/bash</string>
		<string>-R</string>
		<string>-E</string>
		<string>-F</string>
	</array>
	<key>RunAtLoad</key>
	<true/>
	<key>Umask</key>
	<integer>0</integer>
	<key>UserName</key>
	<string>root</string>
</dict>
</plist>
As a side note, you can always convert the binary plist files that you find natively in iOS images to text xml format and back to binary format with:
$ plutil -convert xml1 file.plist
$ vim file.plist
$ plutil -convert binary1 file.plist
For launch daemons, iOS accepts both xml and binary plist files.
Now we need to make sure that we have all the binaries in the system according to their path in ProgramArguments.
/iosbinpack64/bin/bash - part of the iosbinpack64
/sbin/mount - part of the iOS system
/bin/tunnel - follow this tutorial to get the binary and copy it to /bin
/iosbinpack64/usr/local/bin/dropbear - part of the iosbinpack64
Note about the static Trust Cache
At the beginning of this project we wanted to run the iOS system on an unpatched kernel. To run binaries that had not been signed by Apple without patching the kernel, we had to create a static Trust Cache file. A static Trust Cache is a list of signatures that are trusted by the system and allows binaries signed with those signatures to be executed.
Today the kernel is patched to disable the Core Trust altogether. If you are curious about the old approach, please check our blog.
Sign /bin/tunnel
Note that the /bin/tunnel that we've created before is not signed yet. Sign it with jtool.
$ sudo jtool --sign --ent ent.xml --inplace /Volumes/PeaceB16B92.arm64UpdateRamDisk/bin/tunnel
Example of ent.xml that will work in most cases:
<!DOCTYPE plist PUBLIC "-//Apple//DTD PLIST 1.0//EN" "http://www.apple.com/DTDs/PropertyList-1.0.dtd">
<plist version="1.0">
	<dict>
		<key>platform-application</key>
		<true/>
		<key>com.apple.private.security.container-required</key>
		<false/>
	</dict>
</plist>
General changes
-
Replace the
fstabfile
$ sudo cp /Volumes/PeaceB16B92.arm64UpdateRamDisk/etc/fstab /Volumes/PeaceB16B92.arm64UpdateRamDisk/etc/fstab_orig
$ sudo vi /Volumes/PeaceB16B92.arm64UpdateRamDisk/etc/fstab
Remove the content from the file and copy the following
/dev/disk0 / hfs ro 0 1
/dev/disk1 /private/var hfs rw,nosuid,nodev 0 2
-
Prevent from
keybagddaemon to run on system launch
$ sudo rm /Volumes/PeaceB16B92.arm64UpdateRamDisk/System/Library/LaunchDaemons/com.apple.mobile.keybagd.plist
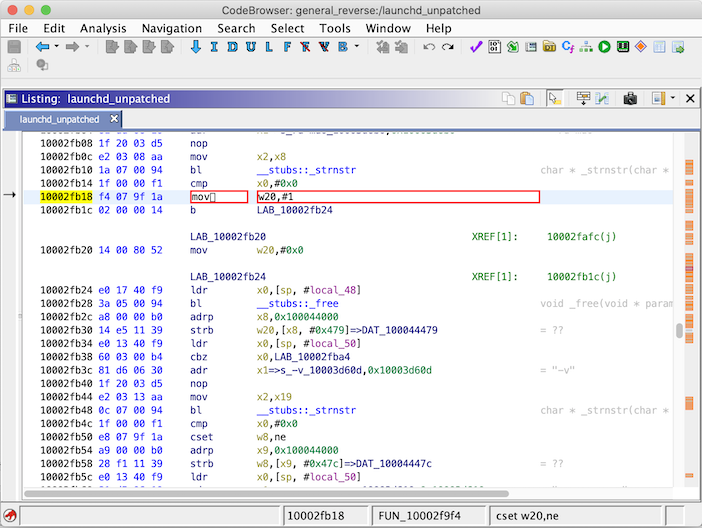
Patch the launchd binary
To get the launchd load the programs we had added before, instead of looking at the instructions in xpcd_cache.dylib, we need to patch the binary file.
We will demonstrate the patch on Ghidra (you can use any other disassembler of your choice).
Import the binary file /Volumes/PeaceB16B92.arm64UpdateRamDisk/sbin/launchd and analyze it.

Patch the instruction at 0x10002fb18 from cset w20,ne to mov w20,#0x01

Save and export the binary
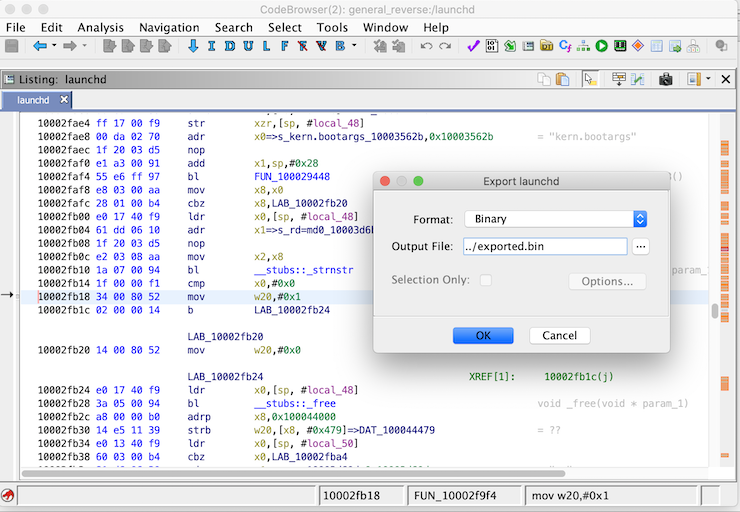
Replace the original launchd with the patched binary
$ sudo mv /Volumes/PeaceB16B92.arm64UpdateRamDisk/sbin/launchd /Volumes/PeaceB16B92.arm64UpdateRamDisk/sbin/launchd.orig
$ sudo cp exported.bin /Volumes/PeaceB16B92.arm64UpdateRamDisk/sbin/launchd
Sign the binary with jtool and keep its identity.
Take the entitlements from the original launchd with jtool (ent.xml from the previous command will also work).
$ sudo jtool --sign --ent ent.xml --ident com.apple.xpc.launchd --inplace /Volumes/PeaceB16B92.arm64UpdateRamDisk/sbin/launchd
Now the disks can be ejected - we're done!
$ hdiutil detach /Volumes/PeaceB16B92.arm64UpdateRamDisk
$ hdiutil detach /Volumes/PeaceB16B92.N56N66OS
As with the main disk let us use the ramdisk structure as well.
$ cp ./048-32651-104.dmg.out ./hfs.sec
$ hdiutil resize -size 6G -imagekey diskimage-class=CRawDiskImage ./hfs.sec
$ hdiutil attach -imagekey diskimage-class=CRawDiskImage ./hfs.sec
$ hdiutil attach ./048-31952-103.dmg
Remove all contents of the ramdisk and sync the ramdisk with /private/var directory from the main disk image.
$ sudo rm -rf /Volumes/PeaceB16B92.arm64UpdateRamDisk/*
$ sudo rsync -av /Volumes/PeaceB16B92.N56N66OS/private/var/* /Volumes/PeaceB16B92.arm64UpdateRamDisk/
Create a directory for the dropbear
$ sudo mkdir /Volumes/PeaceB16B92.arm64UpdateRamDisk/dropbear
Eject the disks
$ hdiutil detach /Volumes/PeaceB16B92.arm64UpdateRamDisk
$ hdiutil detach /Volumes/PeaceB16B92.N56N66OS
We now have all the images and files prepared. Let's get the modified QEMU code:
$ git clone [email protected]:alephsecurity/xnu-qemu-arm64.git
and compile it:
$ cd xnu-qemu-arm64
$ ./configure --target-list=aarch64-softmmu --disable-capstone --disable-pie --disable-slirp
$ make -j16
$ cd -
And all there's left to do is execute:
$ xnu-qemu-arm64/aarch64-softmmu/qemu-system-aarch64 -M iPhone6splus-n66-s8000,kernel-filename=kernelcache.release.n66.out,dtb-filename=Firmware/all_flash/DeviceTree.n66ap.im4p.out,driver-filename=aleph_bdev_drv.bin,qc-file-0-filename=hfs.main,qc-file-1-filename=hfs.sec,kern-cmd-args="debug=0x8 kextlog=0xfff cpus=1 rd=disk0 serial=2",xnu-ramfb=off -cpu max -m 6G -serial mon:stdio
To use the binaries in the iosbinpack64 update the PATH
export PATH=$PATH:/iosbinpack64/usr/bin:/iosbinpack64/bin:/iosbinpack64/usr/sbin:/iosbinpack64/sbin
For an easier workflow, it's worth to symlink the binaries from iosbinpack64/bin, iosbinpack64/usr/bin, etc. into the corresponding /bin, /usr/bin, etc. directories. It is, in fact, a requirement for executing scp, since it doesn't respect the PATH enviornment variable when spawned.
And we have an interactive bash shell with mounted r/w disk and SSH enabled!!
* xnu-ramfb=on for textual framebuffer
* SSH password - alpine // just a reminder:)
❗Because there is no graceful shutdown of the system, the hfs.sec which is mounted to the iOS, will fail to be mounted again after the QEMU is killed.
When the system is restarted (QEMU is killed to be started again) we need to mount and unmount the disk on the the mac.
$ hdiutil attach -imagekey diskimage-class=CRawDiskImage hfs.sec
$ hdiutil detach /Volumes/PeaceB16B92.arm64UpdateRamDisk