-
Notifications
You must be signed in to change notification settings - Fork 25
Python Example IoT 2
This is a more advanced example of using RF Explorer 3G+ IoT, based on python example 1
The main limitation of Example 1 is the selection of frequency range. In that example used default configuration and not actually selected by specific code.
This code configures multiple different scan start/stop frequency ranges, iteratively displaying captured peak signal result on each one of them.
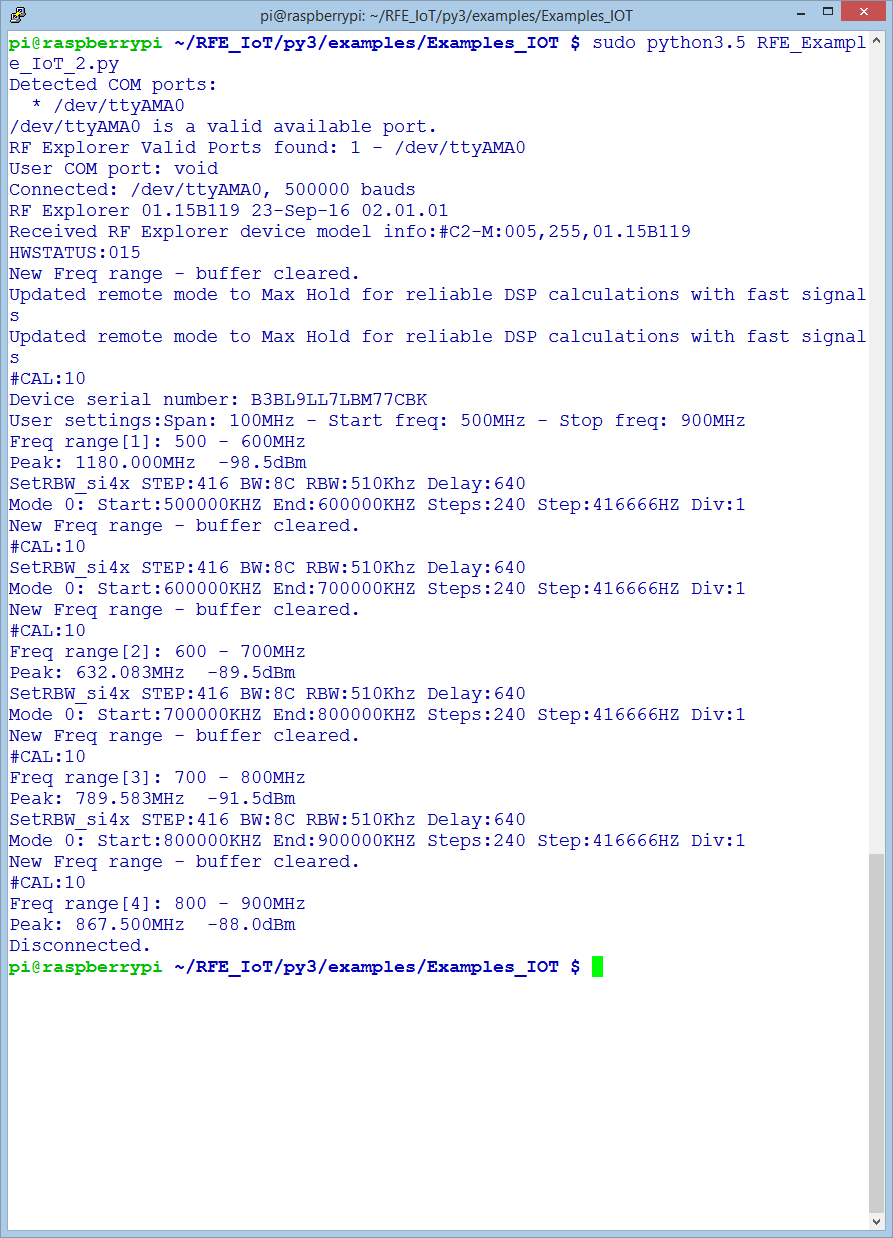
The example begins requesting the default configuration of the analyzer, then set it to 500-600MHz scan, gets one sweep and reconfigures for 600-700MHz, etc - repeat up to 900MHz limit, then close.
- Use the official Raspberry Pi image from RF Explorer download page
- Install latest RF Explorer Python libraries - details here
- Download the example from GITHUB repository link
Open a terminal in your Raspberry Pi and run
cd RFE_IoT/py3/examples
sudo python3.5 RFE_Example_IoT_2.py
Note you must run all python code in Raspberry Pi as superuser, otherwise the internal Raspberry Pi digital pins cannot be updated as required. This is a specific requirement from Raspberry Pi drivers, not RF Explorer. If you forget to use sudo, you will get some error message like this: Error importing RPi.GPIO! This is probably because you need superuser privileges. You can achieve this by using 'sudo' to run your script
As depicted below, you will get automatic connection to the IoT board using /dev/ttyAMA0 UART from the Raspberry Pi.
- Firmware version embedded into the RF Explorer IoT module
- Active connection at 500,000 baud
- RF Explorer IoT Device serial number
- Receiving data scan, for each specific range, displaying amplitude peak captured value for each sweep range.
Initialization details and basic structure is the same as Example 1.
However, the main difference comes in how the main running loop works: now is not limited by time, but with frequency range limit.
Inside the loop, the call to objRFE.UpdateDeviceConfig(StartFreq, StopFreq) allows the python code to reconfigure scan range of the device.
