-
Notifications
You must be signed in to change notification settings - Fork 3
Loom Deployment Guide (Feb 2023)
- Open the Arduino IDE
- Connect the Feather to computer via USB
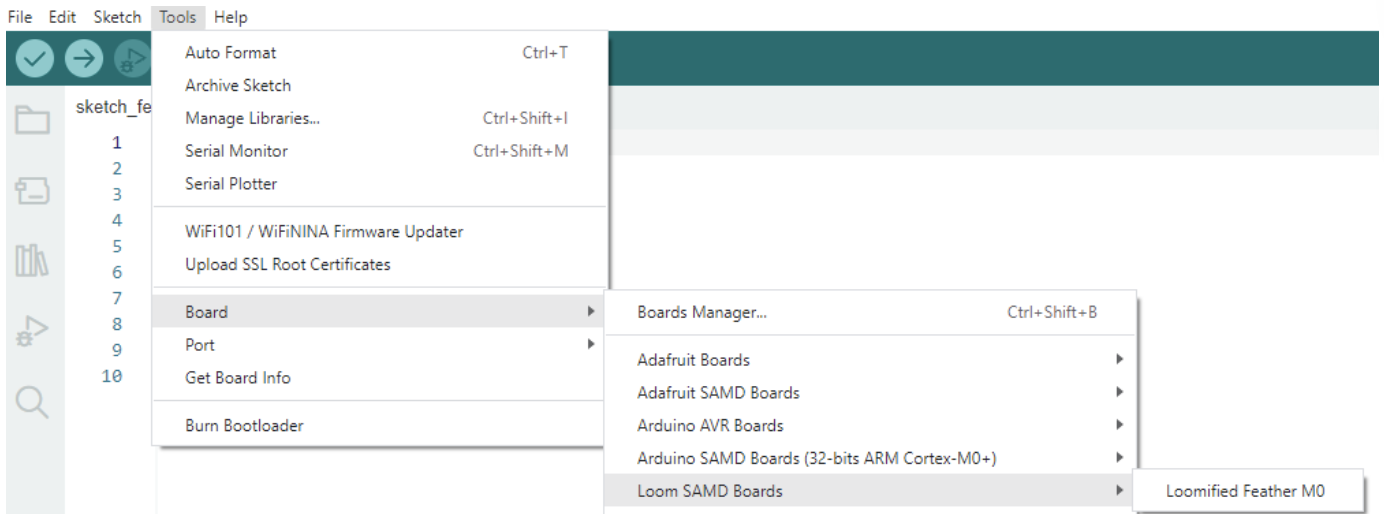
- Go to Tools on the top left
- Select "Board" and set it to “Loomified Feather M0.” If this option doesn’t appear you need to make sure you’ve installed Loom and the Loom boards correctly. https://github.com/OPEnSLab-OSU/Loom-V4/blob/main/README.md
 5. Find "Port" and select the board's port. On Windows this will most likely be called COM.

- Upload the code into the board via the arrow that's under the menu bar.

- Code is now uploaded.
- Reselect the port because it'll reset
- Display the serial monitor by clicking the magnifying button in the top right. If your code prints any text it should show up here.

 Line in code initializing sensors
 Serial monitor output confirming initialization
When your code calls manager.initialize() this should initialize your sensors. The above message should appear in your serial monitor. If the message does not appear check your connections.
NOTE: This message does not necessarily mean your sensors will work perfectly.
- Anywhere where you are clamping down on wires make sure that the jacket is pulled back far enough so that the clamp is on the wire, not the jacket.
 The leftmost wire has enough exposed to make a secure connection, but the rightmost wire does not.
- Having bare wires soldered to through-holes can be risky. If the exposed wires shift in the field you could short two heads. Instead consider soldering a female JST to the through hole.
 Female JST
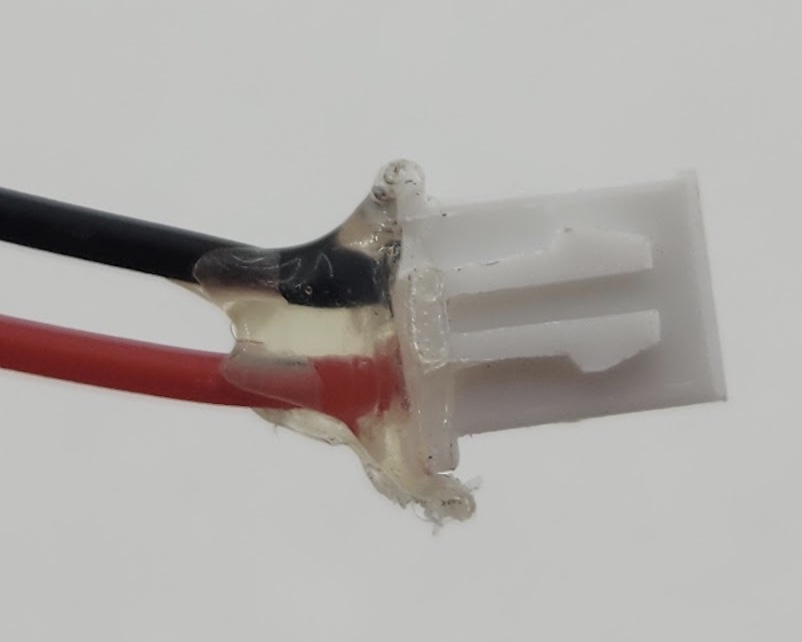
- Use hot glue to secure wires into male JSTs. Sometimes people pull on the wires instead of the JST housing resulting in a broken connection.

JSt w/ hot glue
If your project uses Hypnos’ real time clock (RTC): After you’ve set the RTC via the serial monitor, power off the feather, and plug it back in. The RTC should’ve kept the time. If you are prompted to set the time again you may have a dead battery. Try replacing the coin cell on the back of the Hypnos.
Are you initializing the Hypnos object with the correct version? The version of each Hypnos board is printed on the bottom of the board. The version of Hypnos you are using should be reflected in the constructor line for the Hypnos object. See below.
 Figure 1: Creating a Hypnos Object
 Figure 2: Initializing the Hypnos
 Figure 3: Serial monitor output confirming initialization of Hypnos
If your code calls hypnos.enable() you should see messages in the serial monitor from the “SD manager” and “Hypnos” confirming initialization of the SD Card and the If you don’t see these messages:
- make sure the code calls hypnos.enable() before manager.initialize() like in Figure 2. Is the SD Card working? Sometimes they break.
- Check your connection to the Hypnos. Is the Hypnos receiving power from the feather (see below)?

 The Hypnos pin on the left side of the board with “3v3 +3vR” should connect to the pin on the left side of the arduino with “3v3”
This can be acomplished by stacking the Hypnos on top of the Feather.
In order to do this you must first make sure there are female header rails soldered onto the Feather.

Next you can stack the Hypnos on the Feather like this:

Alternatively, placing both components on a board like this should connect them.

- Is the SD Card inserted into the Hypnos?
- Is there a coin cell in the Hypnos?
- Is the version of Hypnos you are using reflected in the code? (see Figure 3).
- Project Planning
- Prototyping
- Synthesis
- Lab Testing
- Field Testing
- Finalization/Production
- Poster/Presentation
- Publication
- CRES
- Dendrometer
- Djinn
- eDNA Sampler
- eGreenhouse
- Evaporometer
- FloDar
- HyperRail
- Hypnos
- Isotopic Sampler
- Lilypad
- Loom
- Micro-Aggregating Sewer Sampler
- Mooraca
- OPEnSampler
- Pied Piper
- Rag Guard
- Rain Gauge Calibrator
- RainSavor
- RFID Moisture
- Sap Flow Meter
- SitkaNet
- Slide Sentinel
- Smart Rock
- Spool
- WeatherChimes
- Weed Warden
- Wisp
- Archived Project Blogs