-
Notifications
You must be signed in to change notification settings - Fork 3
Loom Power Cycle Function Ordering
Loom’s sleep function, LoomManager::sleep(), used to automate the sleeping process where it would automatically power down all of the modules and power them on when waking. The problem with this is it caused modules to fail to initialize (especially with the use of the Hypnos board) when powering back on. This process is not something that can be universal-- meaning that each program will need it’s own process of powering up modules. This document is meant to help users figure out in which order they need to call functions to successfully power up and down the modules in their own project.
The previous sleep function for Loom would first power down the modules, go on standby, and then after receiving an interrupt signal, power up all of the modules. We need to manually write this process in our main code because Loom no longer does this automatically. This would mean you need to gracefully power down the modules before the sleep function, and power up modules after the sleep function and ensure that communication is back up between each module.
Setting up an interrupt signal was something you needed to do in Loom before, but was never documented until now. The point of the interrupt signal is to wake the board up after it goes to sleep. We need to code this in both the setup and loop functions, as well as create another function that will be used at the start of the code.
You can create functions within your .ino file that can be used throughout the code. This function will contain the following lines:
void wakeISR() {
    detachInterrupt(12); // Turns off the interrupt signal on pin 12
    LPrintln("Alarm went off");
}
After Loom begins serial, parses and prints the config, you will need to register the interrupt signal for Arduino. This will use the wakeISR() function that we created previously. Registering the interrupt signal only requires the following line:
Loom.InterruptManager().register_ISR(12, wakeISR, LOW, ISR_Type::IMMEDIATE);
For more information on the parameters for this function, go to the Interrupt Manager Doxygen page.
This part of code would come after the main part of your loop code (i.e. data collecting, recording, etc.) You would need to set the alarm as well as set the alarm pin again. To do that, you would paste this chunk of code:
Loom.InterruptManager().RTC_alarm_duration(0,0,0,5); // Wakes up the sensors every 5 seconds
Loom.InterruptManager().reconnect_interrupt(12); // Important, make interrupt pin sensitive to alarm signal again
Again, for further information about the parameters, go to the Interrupt Manager Doxygen page.
Loom has two functions that automatically powers up and down modules. These functions will iterate through a set module (component) list and power up or down any modules that are being used. These functions should be used to safely power up or down your components in your code.
This branch of code would come before the sleep function and after the alarm setting functions.
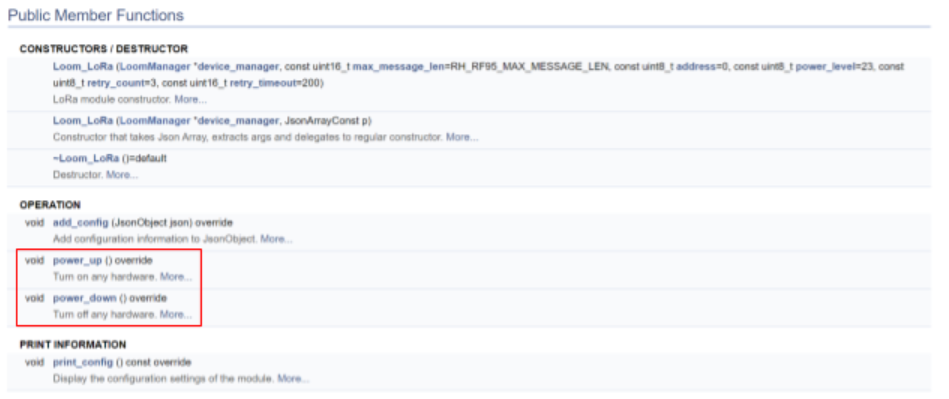
To power down your modules, use the function Loom.power_down(). This function iterates through a list of modules and powers down depending on what is available. Note, not every sensor / module is supported through the power_down and power_up functions. To check if your sensor is supported, go to the Doxygen page and check to see if the power_up and power_down is under the listed operations.
If your sensor does not have these functions listed on the Doxygen, then it is not supported for sleep in Loom. At this point, you would either need to write your own function to power it down, talk to a Loom developer, or submit an issue on Github.
The next step is dependent on how you are powering your peripherals. The most common ways is through the Hypnos board or through a relay.
If you are using the Hypnos board, the next step is to power the Hypnos down. You would do this by pasting the following code:
digitalWrite(5, HIGH); //< Disabling all pins before going to sleep.
digitalWrite(6, LOW);
pinMode(23, INPUT);
pinMode(24, INPUT);
pinMode(10, INPUT);
Refer to the Hypnos documentation for further information or the example Hypnos code in Loom.
If you are using a relay, you have to determine what type of relay you are using. Loom supports the Adafruit non-latching relay. To power down the relay through Loom, you need to set the relay through the function: Loom.Relay().set(). Depending on your setup, you would need to put true or false in the parenthesis after set. Look on the Doxygen for further information.
This branch of code would come after the sleep function. The steps for powering up the modules will be the reverse order of the power down steps.
The first step for powering up is to power the relay or the Hypnos board. If you are using the Hypnos board, you would paste this piece of code:
digitalWrite(5, LOW); //< Enabling all pins after wake up has completed.
digitalWrite(6, HIGH);
pinMode(10, OUTPUT);
pinMode(23, OUTPUT);
pinMode(24, OUTPUT);
Again, for further information refer to the Hypnos board documentation or the example Hypnos code in Loom.
Just like powering down, there’s also a convenient function made that powers up the modules automatically: Loom.power_up(). Once again, check the Doxygen for your sensor to make sure that Loom supports.
