This project adds an easy way to create DIY lighting for Home Assistant, an amazing, extensible, open-source home automation system.
I was frustrated that the built-in MQTT light didn't support transitions (fading between colors/brightnesses), and that it uses multiple separate calls to set the different values (state (on/off), brightness, color), so I decided to make my own version. As of version 0.26, the MQTT JSON light platform has been merged into Home Assistant.
By sending a JSON payload (in an MQTT message), Home Assistant can include whichever fields are necessary, reducing the round trips from 3 to 1. For example, this is a sample payload including all of the fields:
{
  "state": "ON",
  "brightness": 120,
  "color": {
    "r": 255,
    "g": 100,
    "b": 100
  },
  "transition": 5
}To set this system up, you need to configure the MQTT JSON light component in Home Assistant and set up a light to control. This guide assumes that you already have Home Assistant set up and running. If not, see the installation guides here.
-
In your
configuration.yaml, add the following:light: + platform: mqtt_json name: mqtt_json_light_1 state_topic: "home/rgb1" command_topic: "home/rgb1/set" brightness: true rgb: true optimistic: false qos: 0
-
Set the
name,state_topic, andcommand_topicto values that make sense for you. -
Restart Home Assistant. Depending on how you installed it, the process differs. For a Raspberry Pi All-in-One install, use
sudo systemctl restart home-assistant.service(or just restart the Pi).
I'm using ESP8266-01 microcontrollers for my lights because they are so cheap and small. The downside of the size and price is that programming them can be a bit of a hassle. There are many sites that go into detail, so I won't do it here. You'll need an ESP set up to work with the Arduino IDE. See the readme here for instructions.
- Using the Library Manager in the Arduino IDE, install ArduinoJSON and PubSubClient. You can find the Library Manager in the "Sketch" menu under "Include Library" -> "Manage Libraries..."
- Open the appropriate
.inofile. For an RGB light, usemqtt_esp8266_rgb.ino. For a light that only supports brightness, usemqtt_esp8266_brightness.ino. - Set the pin numbers, WiFi SSID and password, MQTT server, MQTT username, and MQTT password to appropriate values.
- Set the
client_idvariable to a unique value for your network. - Set
light_state_topicandlight_command_topicto match the values you put in yourconfiguration.yaml. - Upload to an ESP with the correct connections.
For an RGB LED strip using N-MOSFETs for control, you'll want to wire it similar to this:
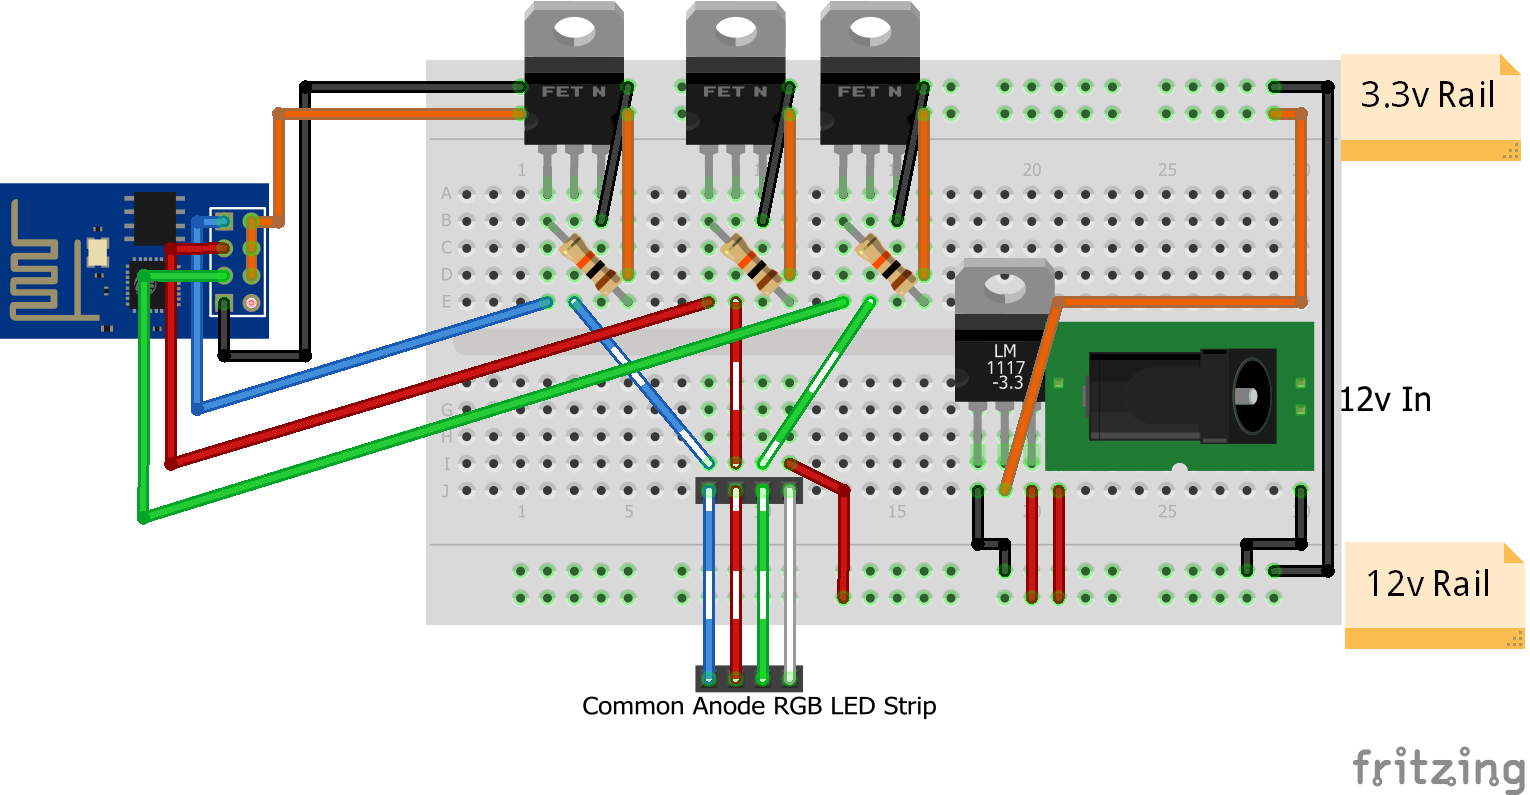
Note that the MOSFETs have pull-up resistors in this setup. This means that the lights may flash on when the module resets, but it was necessary to keep the ESP's pins in the right start state.