This repository demonstrates how to integrate Stripe Payments with Cloudflare Workers using KV storage for securely managing keys, and submitting transactions to Resellerclub. It includes both the front-end (payment form with Stripe Elements) and back-end logic (payment intent creation, checksum generation, and form submission).
- Stripe Payment Integration: Accept payments securely using Stripe's Payment Elements.
- Checksum Validation: Secure your transactions by generating and validating checksums using MD5 hashing.
- Cloudflare Workers: Serverless backend to handle payments and checksum generation.
- Resellerclub Integration: Submit payment data to Resellerclub with the required parameters after confirming payment.
-
Fork this repository to your GitHub account.
-
Clone the repository to your local machine:
git clone https://github.com/JamesShaver/stripepayments.gitcd stripepayments
-
Install the Cloudflare CLI tool
wrangler:npm install -g wrangler -
Authenticate
wranglerwith your Cloudflare account:wrangler login -
Create a new Worker project if you don't have one already:
wrangler init -
Modify the
wrangler.tomlfile to match your Cloudflare Worker project settings. Here's an example:
name = "stripe-cloudflare-worker"
type = "javascript"
account_id = "your-cloudflare-account-id"
workers_dev = true
kv_namespaces = [
  {
    binding = "KV", id = "your-kv-namespace-id"
  }
]
- Add the necessary KV storage entries to your Cloudflare KV namespace. These entries will be used for securely storing Stripe API keys and your payment gateway key:
wrangler kv:key put --binding=KV STRIPE_TEST_PUBLIC "your-stripe-public-key"
wrangler kv:key put --binding=KV STRIPE_TEST_SECRET "your-stripe-secret-key"
wrangler kv:key put --binding=KV RC_PAYMENT_GATEWAY_KEY "your-resellerclub-payment-gateway-key"
Once you've configured the KV storage and set up your wrangler.toml, you can deploy the worker:
wrangler publish
This will deploy your Worker to Cloudflare. Make sure to copy the deployed URL, as you will use it in the next steps.
You can now test the payment flow in Resellerclub by integrating your Worker into the Resellerclub platform.
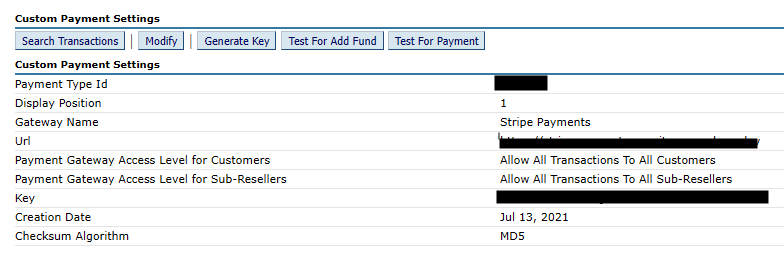
- Log in to your Resellerclub account and go to the Payment Gateway Integration section.
- Enter the following details and save your changes by clicking Submit:
- Add your Cloudflare Worker URL as the endpoint for handling payments.
- Gateway Name: This is the heading for your Payment Gateway and it will be displayed to your Customers / Sub-Resellers on the Payment page within a dropdown of options. You could add for example "Stripe Payments", or "VISA/MasterCard/AMEX" in order to signify that your Customer / Sub-Reseller can pay using those modes if they select this particular option.
- Gateway URL: This is the URL on your Cloudflare Worker to which we will redirect the Customer / Sub-Reseller. This is explained in detail further ahead. Currently, simply fill in some URL. We will change this later to the correct URL.
- Payment Gateway Access Level for Customers / Sub-Resellers: Select appropriate Access
Levels for your Customers / Sub-Resellers.

Once the integration is set up in Resellerclub:
- Perform a test transaction by making a payment.
- The transaction will redirect to the Worker, where the payment is processed via Stripe.
- After the payment is confirmed, the Worker will generate the checksum and redirect the user back to Resellerclub.
To test your Cloudflare Worker locally, you can use wrangler's development mode:
wrangler dev
This will run your Worker locally on http://127.0.0.1:8787 and allow you to test it before deploying,
though you should expect the checksum to fail as it's not going through Resellerclub.
Custom Domains can be attached to your Worker via the Cloudflare dashboard, Wrangler or the API.
A CNAME (Canonical Name) record is used to create an alias for a domain name. It essentially points a subdomain to another domain or subdomain. While this step is optional, it does provide peace of mind to your customers that your payment platform is reputable.
To set up a Custom Domain in the dashboard:
- Log in to the Cloudflare dashboard ↗ and select your account.
- Select Workers & Pages and in Overview, select your Worker.
- Go to Settings > Triggers > Custom Domains > Add Custom Domain.
- Enter the domain you want to configure for your Worker.
- Select Add Custom Domain.
After you have added the domain or subdomain, Cloudflare will create a new DNS record for you. You can add multiple Custom Domains.
To configure a Custom Domain in your wrangler.toml, add the custom_domain=true option on each pattern under routes. For example, to configure a Custom Domain:
routes = [
  { pattern = "shop.example.com", custom_domain = true }
]
To configure multiple Custom Domains:
routes = [
  { pattern = "shop.example.com", custom_domain = true },
  { pattern = "shop-two.example.com", custom_domain = true }
]
Make sure the following environment variables are correctly set in KV Storage:
STRIPE_TEST_PUBLIC: Your Stripe public key.STRIPE_TEST_SECRET: Your Stripe secret key.RC_PAYMENT_GATEWAY_KEY: The Resellerclub payment gateway key.
- Invalid Checksum: If you're encountering an invalid checksum error, make sure the checksum generated by Resellerclub matches the expected checksum in your Worker. The MD5 hash must include the correct values in the correct order.
- Payment Failures: If the payment fails in Stripe, ensure your Stripe API keys are correct and that your Stripe account is in test mode if you are testing.
- Use
wrangler devfor local testing and debugging. - Use the Cloudflare dashboard's Worker Logs feature to view logs in real time if issues arise in production.
This project is licensed under the MIT License. See the LICENSE file for more details.