-
Notifications
You must be signed in to change notification settings - Fork 9.7k
Linux系统翻墙方法
2025年1月15日更新。
一:Linux hiddify免费翻墙软件
Hiddify-Linux-x64.AppImage v2.05 下载1 下载2
首先,下载软件Hiddify-Linux-x64.AppImage。从压缩模式中提取下载的文件,然后使用以下命令检查它是否有权执行。
假设下载的文件位于主文件夹中的下载中,因此运行以下命令。
ls -la ~/Downloads/hiddify-linux-x64.AppImage如果输出如下:
rwxr-xr-x 1 user user 26272960 Sep 30 07:55 ~/Downloads/hiddify-linux-x64.AppImage这意味着它具有 x 或可执行权限,可以运行它。否则,需要在终端中运行命令来添加执行权限。
第一次运行它时可以单击Language更改语言为中文,点击开始会进入配置界面。
点击“+新的配置文件”,打开以下免费账号的网址,找到ss或者v2ray节点的一键导入链接,复制链接,点击“剪贴板添加”。
二:Linux ss/ssr免费翻墙方法
1、Linux使用ss图形客户端Shadowosocks-QT5教程 (推荐)
三:Linux v2ray免费翻墙方法
安装 V2ray
注意: 以下操作建议切换至 root 用户进行
命令行安装
如果你的网络可以直连 Github 那么可以直接执行命令进行安装:
- 安装和更新 V2ray
apt update && apt install -y curl
bash <(curl -L https://raw.githubusercontent.com/v2fly/fhs-install-v2ray/master/install-release.sh)
手动安装
若无法直连或者速度不理想,可以通过 CloudFlare Workers 部署 Github 文件加速,参考项目:gh-proxy
部署流程:Log in/Sign up - Create Worker - 取名 - Deploy - Edit Code - 复制 index.js 到左侧代码框 - Save and deploy
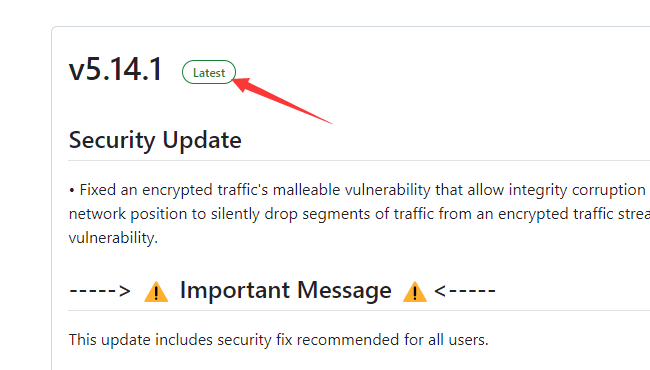
接着打开 V2ray-core Releases 找到最新版本:
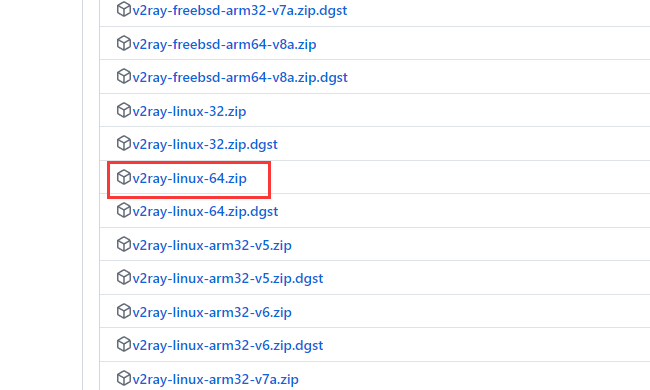
然后找到对应系统和架构的压缩包,右键复制链接;到你部署好的 Github 文件加速里粘贴并下载
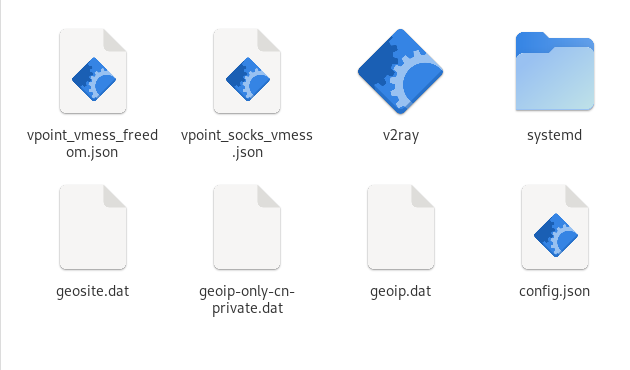
下载完成后进行解压
解压完成后需要将文件移动至指定目录下,创建一下文件夹,然后移动过去:
mkdir /usr/local/share/v2ray /usr/local/etc/v2ray
mv v2ray /usr/local/bin/v2ray
mv geoip.dat /usr/local/share/v2ray/geoip.dat
mv geosite.dat /usr/local/share/v2ray/geosite.dat
mv systemd/system/* /etc/systemd/system
手动安装到此就结束了
配置 V2ray
创建配置文件,然后进行编辑
vim /usr/local/etc/v2ray/config.json配置文件这里提供一个进行参考,该配置为 Vless/Vmess + H2/WS + TLS,详细修改看下注释;也可以从你的 Windows 或移动客户端导出配置文件使用
{
  "log": {
    "access": "/var/log/v2ray/access.log",
    "error": "/var/log/v2ray/error.log",
    "loglevel": "warning"
  },
  "inbounds": [
    {
      "tag": "socks",
      "port": 10808,
      "listen": "0.0.0.0",
      "protocol": "socks",
      "sniffing": {
        "enabled": true,
        "destOverride": [
          "http",
          "tls"
        ]
      },
      "settings": {
        "auth": "noauth",
        "udp": true
      }
    },
    {
      "tag": "http",
      "port": 10809,
      "listen": "0.0.0.0",
      "protocol": "http",
      "sniffing": {
        "enabled": true,
        "destOverride": [
          "http",
          "tls"
        ]
      },
      "settings": {
        "auth": "noauth",
        "udp": true
      }
    }
  ],
  "outbounds": [
    {
      "tag": "proxy",
      "protocol": "vless", // 可选 vless 或 vmess 与服务端一致
      "settings": {
        "vnext": [
          {
            "address": "address", // 域名或服务器 IP 与服务端一致
            "port": 443, // 如地址为域名则设置为 443 不是则为你设置的端口,与服务端一致
            "users": [
              {
                "id": "", // UUID 与服务端一致
                "alterId": 0, // 与服务端一致
                "email": "[email protected]",
                "security": "auto", // 加密方式,与服务端一致
                "encryption": "none"
              }
            ]
          }
        ]
      },
      "streamSettings": {
        "network": "h2",// 可选 h2 和 ws,若服务端为 websocket 则设置为 ws
        "security": "tls",
        "tlsSettings": {
          "allowInsecure": false,
          "serverName": "", // 域名或服务器 IP
          "alpn": [
            "h2" // 若使用 Nginx + Websocket 设置为 http/1.1
          ]
        },
        "httpSettings": { // websocket 设置为 wsSettings
          "path": "/path", // path 路径
          "host": [
            "" // 域名或 IP
          ]
        }
      }
    },
    {
      "tag": "direct",
      "protocol": "freedom",
      "settings": {}
    },
    {
      "tag": "block",
      "protocol": "blackhole",
      "settings": {
        "response": {
          "type": "http"
        }
      }
    }
  ],
  "dns": {
    "hosts": {
      "dns.google": "8.8.8.8"
    },
    "servers": [
      {
        "address": "223.5.5.5",
        "domains": [
          "geosite:cn"
        ],
        "expectIPs": [
          "geoip:cn"
        ]
      },
      "1.1.1.1",
      "8.8.8.8",
      "https://dns.google/dns-query"
    ]
  },
  "routing": {
    "domainStrategy": "IPIfNonMatch",
    "domainMatcher": "mph",
    "rules": [
      {
        "type": "field",
        "outboundTag": "block",
        "domain": [
          "geosite:category-ads-all" // 屏蔽广告域名
        ]
      },
      {
        "type": "field",
        "outboundTag": "direct",
        "domain": [
          "geosite:cn" // 国内域名直连
        ]
      },
      {
        "type": "field",
        "outboundTag": "direct",
        "ip": [
          "geoip:private", // 局域网直连
          "geoip:cn" // 国内 IP 直连
        ]
      }
    ]
  }
}
按照注释修改配置后删除注释,更多模板请移步 V2ray-examples
修改完成后添加开机启动并启动 V2ray
systemctl enable v2ray
systemctl start v2ray
执行 systemctl status v2ray 可以查看进程,这里已经成功启动了:
- 更新最新发行的 geoip.dat 和 geosite.dat
bash <(curl -L https://raw.githubusercontent.com/v2fly/fhs-install-v2ray/master/install-dat-release.sh)由于上文模板设置了 CN 地址直连以及屏蔽广告域名,建议每天执行一次该命令更新预定义域名列表文件,即 geoip.dat 和 geosite.dat
- 移除 V2ray
bash <(curl -L https://raw.githubusercontent.com/v2fly/fhs-install-v2ray/master/install-release.sh) --remove代理设置
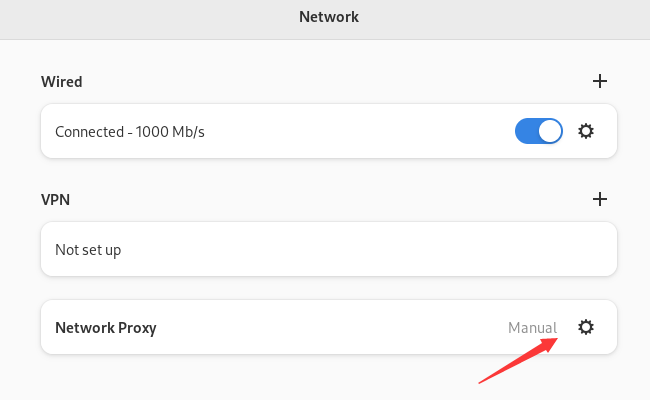
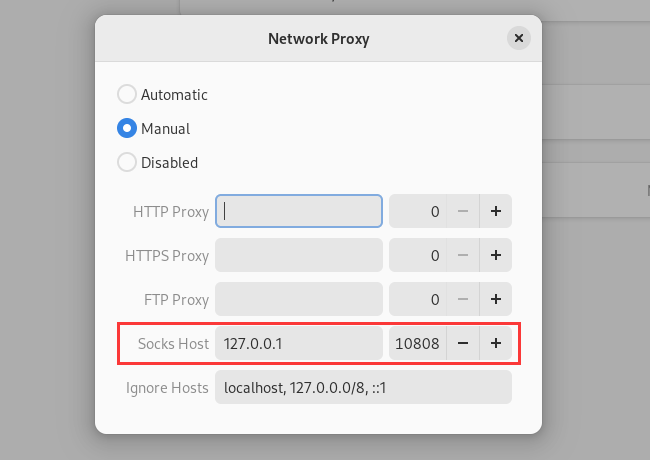
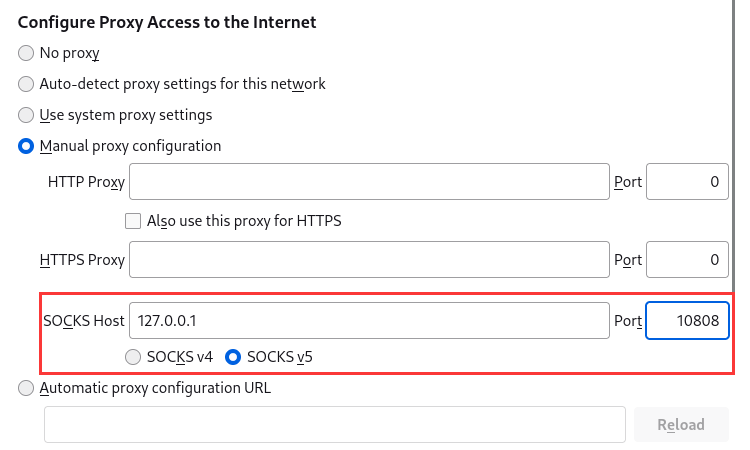
代理参数应与配置文件保持一致,如果你是按照上文配置的话,应该设置为 socks 端口 10808,http 端口 10809
全局代理,如果使用 HTTP 端口设置为 10809
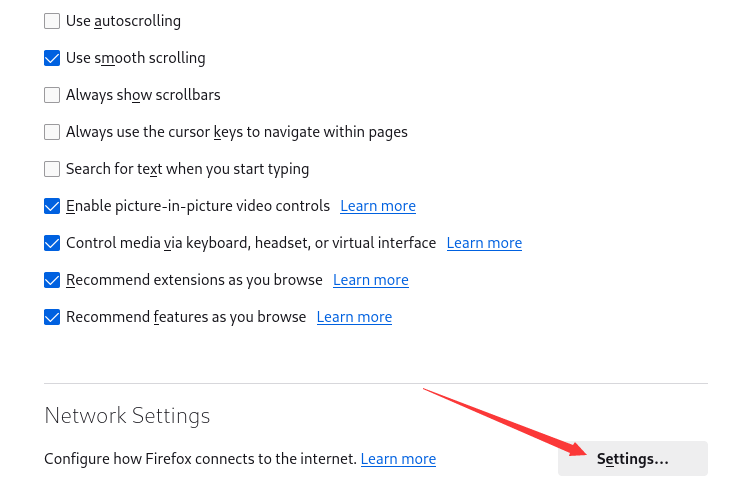
仅 Firefox 代理,如果使用 HTTP 端口设置为 10809
安装 Xanmod 内核开启 BBRV3
附加一个安装 Xanmod 开启 BBRV3 降低延迟,提高系统响应和性能。
Xanmod 内核目前只支持 X86 架构 CPU,且仅支持 Debian 系 如:Debian/Ubuntu
Xanmod 有四中内核,推荐安装 MAIN 和 LTS 内核;均有 4 个版本,根据 CPU 架构和指令集的不同,所安装的版本也不同。
注意: 以下操作建议切换至 root 用户进行
安装必要组件
apt update && apt install -y gnupg注册 PGP 密钥
wget -qO - https://dl.xanmod.org/archive.key | gpg --dearmor -o /usr/share/keyrings/xanmod-archive-keyring.gpg添加存储库
echo 'deb [signed-by=/usr/share/keyrings/xanmod-archive-keyring.gpg] http://deb.xanmod.org releases main' | tee /etc/apt/sources.list.d/xanmod-release.list更新软件包
apt update检测 CPU 支持版本
awk -f <(wget -qO- https://dl.xanmod.org/check_x86-64_psabi.sh)

# 输出结果
CPU supports x86-64-v4
一定要按照检测的结果进行安装,否则会导致进不去系统,无限卡引导界面;可以看到,我这里支持 V4 版本
接下来进行安装,这里我安装 MAIN 内核,如果安装 LTS 内核则修改命令为 linux-xanmod-lts-x64v4
apt install -y linux-xanmod-x64v4安装完成后执行 reboot 重启使内核生效,完成后执行 uname -r 查看内核:
uname -r

# 输出结果
6.7.6-x64v4-xanmod1
执行以下命令开启 bbr3 及 fq_pie 算法,然后重启生效
cat > /etc/sysctl.conf << EOF
net.ipv4.tcp_congestion_control=bbr
net.core.default_qdisc=fq_pie
EOF
完整内核参数参考:
cat > /etc/sysctl.conf << EOF
vm.swappiness = 1
net.ipv4.tcp_congestion_control = bbr
net.core.default_qdisc = fq_pie
fs.file-max = 1000000
fs.inotify.max_user_instances = 8192
net.ipv4.tcp_syncookies = 1
net.ipv4.tcp_fin_timeout = 30
net.ipv4.tcp_tw_reuse = 1
net.ipv4.ip_local_port_range = 1024 65000
net.ipv4.tcp_max_syn_backlog = 16384
net.ipv4.tcp_max_tw_buckets = 6000
net.ipv4.route.gc_timeout = 100
net.ipv4.tcp_syn_retries = 1
net.ipv4.tcp_synack_retries = 1
net.core.somaxconn = 32768
net.core.netdev_max_backlog = 32768
net.ipv4.tcp_timestamps = 0
net.ipv4.tcp_max_orphans = 32768
EOF
在终端执行 modinfo tcp_bbr 可以查看 BBR3 状态:
name:           tcp_bbr
filename:       (builtin)
version:        3
description:    TCP BBR (Bottleneck Bandwidth and RTT)
license:        Dual BSD/GPL
file:           net/ipv4/tcp_bbr
author:         David Morley <[email protected]>
author:         Arjun Roy <[email protected]>
author:         Kevin Yang <[email protected]>
author:         Yousuk Seung <[email protected]>
author:         Priyaranjan Jha <[email protected]>
author:         Soheil Hassas Yeganeh <[email protected]>
author:         Yuchung Cheng <[email protected]>
author:         Neal Cardwell <[email protected]>
author: Van Jacobson <[email protected]>四:高速机场(付费)
w1.v2free.cyou是海外人士运营的高速翻墙服务,2020年开始已稳定运行3年。支持Windows/MAC/iOS/安卓/Linux/路由器等各平台高速翻墙:解锁大多数流媒体(Netflix、TVB、HKTV、ViuTV等),1080P高清视频、4K高清视频秒开,超低延迟。任意套餐的高速节点都支持访问openAI ChatGPT。
节点位置有台湾、香港、韩国、日本、美国、新加坡等,付费套餐节点包括v2ray节点和SS节点。截至2023年9月14日,节点共100个左右。
试用套餐5元(5天)、月付套餐A 20元、月付套餐B 39元、月付套餐C 58元、年付套餐A 168元、年付套餐A2 218元等,套餐购买
详细介绍及购买方法:https://github.com/Alvin9999/new-pac/wiki/V2free%E6%9C%BA%E5%9C%BA
有问题也可以问在线客服。
Google(搜索类) 动态网(新闻及网址导航类) YouTube(视频类)干净世界(视频类) 新唐人电视台(视频新闻娱乐类) 大纪元(新闻类) 希望之声 (广播电台类) 阿波罗新闻网(新闻类) 禁书网(新闻书籍类) 神韵(文化艺术类) 神韵作品(文化艺术类) 维基百科 (百科类) ChatGPT官网(AI类) DuckDuckGo AI Chat(AI类) 美国之音(新闻类) 自由亚洲电台(新闻类)
YouTube频道推荐:
文昭谈古论今 | 新唐人电视台 | 江峰时刻 | 天亮时分 | 时事金扫描 | Leonard | 人民报 | 文昭思绪飞扬 | 信不信由你
视频推荐:
神韵视频推荐:
有问题可以发邮件至海外邮箱[email protected]

