-
Notifications
You must be signed in to change notification settings - Fork 207
Critical flows ‐ Instructions
- Checkout with normal credit card
- Save card at checkout
- Checkout with saved card
- Checkout failures (with various cards)
- Checkout with SCA card
- Checkout failure with SCA card
- Checkout with Payment Request
- Add a new payment method
- Delete a saved payment method
- Purchase subscription product
- Purchase free trial subscription
- Purchase multiple subscriptions (same schedule)
- Purchase multiple subscriptions (differing schedules)
- Renew subscription
- Change payment method to new card
- Change payment method to saved card
- Set default payment method
- Change default payment method
- Checkout with iDEAL
- Checkout with Sofort
- Checkout with giropay
- Checkout with EPS
- Checkout with Bancontact
- Checkout with Przelewy24
- Checkout with SEPA (Direct debit payment)
- Checkout with Multibanco
- Checkout with Alipay
- Checkout with Boleto
- Checkout with OXXO
-
Create a new site, install WooCommerce, and finish the setup wizard using United States address as a store address without selecting Stripe on Business Details step.
-
If you don't have one already, create a Stripe account. You don't have to enter details to verify the account because we only use test data for testing.
-
Follow the instructions in the docs Connecting to a Stripe account to manually install and set up the Stripe Payment Gateway.
Note: Since 8.0.0, you have to use the "Create or connect an account" button, and this will take you through the live flow. There's a the GH issue #2936 to update this. In the meantime, follow these steps:
- Click on the "Create or connect an account" button.
- Select or create an account.
- On the left sidebar, click "Return to WooCommerce Inc."

- Enable Test mode and save

- Go to Edit account keys > Test and manually enter the test keys from your account

-
Import test products to your store. Instructions. CSV with sample products to import.
-
Create a page with the Classic Checkout block on it.
- Go to Pages > Add New.
- Under the available blocks, select the "Classic Checkout" one.
- Publish the page.

-
Create a page with the Classic cart block on it.
- Go to Pages > Add New.
- Under the available blocks, select the "Classic Cart" one.
- Publish the page.
- As a merchant, go to Stripe settings > Payment Methods tab > Express checkouts, at
siteurl/wp-admin/admin.php?page=wc-settings&tab=checkout§ion=stripe&panel=methods.
- Enable Apple Pay / Google Pay.
- If the Updated Checkout Experience is enabled, enable Link too.
- Go to the Payment Request's customization options, under Express checkouts > Apple Pay / Google Pay > Customize at
siteurl/admin.php?page=wc-settings&tab=checkout§ion=stripe&panel=methods&area=payment_requests. - Under Show express checkouts on, enable all options: Checkout, Product page, and Cart.
- Ensure that the store is accessible via public HTTPS URL (e.g. with Jurassic Ninja).
- Add a credit card to Chrome Payment settings. It can be a Stripe test card: 4242 4242 4242 4242, any cardholder name, valid expiration date and any CVV will work.
Note: Link is only available when the Updated Checkout Experience is enabled.
Follow the instructions from the official documentation to set up webhooks.
- Add a product to the cart and proceed to checkout.
- Fill in form details and checkout using one of the test cards (e.g. 4242 4242 4242 4242).
- Do not save card details.
- Place the order.
- Confirm the order is submitted successfully.
This flow applies to:
| Stripe's experience | WC's block checkout | WC's shortcode checkout |
|---|---|---|
| Legacy | ✔ | ✔ |
| Updated (UPE) | ✔ | ✔ |
-
Log in to the store as a shopper.
-
Add a product to the cart and proceed to checkout.
-
Fill in form details and checkout using one of the test cards (e.g. 4242 4242 4242 4242).
-
Check the "Save payment information" checkbox.
Block checkout Classic checkout 

-
Place the order.
-
Confirm the order is submitted successfully.
-
Confirm the card was saved in the store. It must be listed under My account > Payment methods.
This flow applies to:
| Stripe's experience | WC's block checkout | WC's shortcode checkout |
|---|---|---|
| Legacy | ✔ | ✔ |
| Updated (UPE) | ✔ | ✔ |
- Save a card in the store. Follow the testing instructions under Save card at checkout if in doubt.
- Add a product to the cart and proceed to checkout.
- Select the previously saved card from the list and place the order.
- Confirm the order is submitted successfully.
This flow applies to:
| Stripe's experience | WC's block checkout | WC's shortcode checkout |
|---|---|---|
| Legacy | ✔ | ✔ |
| Updated (UPE) | ✔ | ✔ |
Follow the steps from Checkout with normal credit card but using the following test cards:
| Card number | Expected error message | Reason |
|---|---|---|
| 4000000000000002 | The card was declined. | declined |
| 4000000000009995 | The card was declined. | insufficient funds |
| 4000000000009987 | The card was declined. | declined (lost) |
| 4000000000000069 | The card has expired. | expired |
| 4000000000000127 | The card's security code is incorrect. | CVC incorrect |
| 4000000000000119 | An error occurred while processing the card. | processing error |
| 4242424242424241 | The card number is invalid. | invalid number |
This flow applies to:
| Stripe's experience | WC's block checkout | WC's shortcode checkout |
|---|---|---|
| Legacy | ✔ | ✔ |
| Updated (UPE) | ✔ | ✔ |
- Add a product to the cart and proceed to checkout.
- Use one of the SCA test cards (e.g. 4000002760003184).
- Place the order.
- Confirm that the 3D Secure verification dialog is displayed.
- Click on "Complete" to complete the authorization.
- Confirm the order is submitted successfully.
This flow applies to:
| Stripe's experience | WC's block checkout | WC's shortcode checkout |
|---|---|---|
| Legacy | ✔ | ✔ |
| Updated (UPE) | ✔ | ✔ |
- Add a product to the cart and proceed to checkout.
- Use the SCA failing card with the number 4000008260003178.
- Place the order.
- On the 3D Secure verification dialog that's displayed, click on "Complete" to complete the authorization.
- Confirm an error message saying "Your card has insufficient funds." is displayed.
- Use a SCA successful card, like 4000002500003155.
- Place the order.
- On the 3D Secure verification dialog that's displayed, click on "Fail" to mimick a failed authorization.
- Confirm that an error message saying "We are unable to authenticate your payment method. Please choose a different payment method and try again." is displayed.
- Place the order again.
- On the 3D Secure verification dialog, click on "Complete".
- Confirm the order is submitted successfully.
This flow applies to:
| Stripe's experience | WC's block checkout | WC's shortcode checkout |
|---|---|---|
| Legacy | ✔ | ✔ |
| Updated (UPE) | ✔ | ✔ |
This table will guide you on how to load payment request buttons for specific payment options such as Google Pay, Apple Pay, or Link.
| Browser + Wallet | Payment Button |
|---|---|
| Safari + Apple Pay enabled | Apple Pay |
| Chrome + Link authenticated | Link |
| Chrome + Google Pay enabled and Link not authenticated | Google Pay |
| Chrome on iOS 16 + Apple Pay and Google Pay enabled | Apple Pay |
| Any browser + No active Apple Pay or Google Pay | Link |
Notes: Payment Request buttons ( Apple Pay, Google Pay, Link ) will be disabled for subscriptions with free trial if the product isn't virtual or downloadable. This is a limitation of checkout flow and not an issue.
- Go to product page and select product options (quantity and other params if required by product).
- Click Pay now button.
- Pick saved card from Chrome payment UI.
- Order should be completed successfully.
| Stripe's experience | Single product page |
|---|---|
| Legacy | ✔ |
| Updated (UPE) | ✔ |
- Add several products to cart and go the cart page.
- Adjust cart settings if needed.
- Click Pay now button.
- Pick saved card from Chrome payment UI.
- Order should be completed successfully.
This flow applies to:
| Stripe's experience | WC's block cart | WC's shortcode cart |
|---|---|---|
| Legacy | ✔ | ✔ |
| Updated (UPE) | ✔ | ✔ |
- Set up Payment Request as described above.
- Add a 3DS test card like 4000002500003155 to Chrome Payment settings. Any cardholder name, valid expiration date and any CVV will work.
- Try to pay with that card using the Payment Request button.
- Order should be completed successfully.
- As a shopper, navigate to My account > Payment methods
- Click on the "Add payment method" button.
- Fill the form in with card number
4242424242424242, expiration date in future, and any CVC code.
- Click on the "Add payment method" button.
- Confirm a "Payment method successfully added" success message is displayed.
- Confirm the payment method you just added is listed under My account > Payment methods

This flow applies to:
| Stripe's experience | Payment methods page |
|---|---|
| Legacy | ✔ |
| Updated (UPE) | ✔ |
- Follow the steps under Add a new payment method if none is already saved.
- Go to My account > Payment methods.
- Locate the payment method you just added. Click on its "Delete" button.
- Confirm a "Payment method deleted" success message is displayed.
- Confirm the payment method is not listed anymore.

This flow applies to:
| Stripe's experience | Payment methods page |
|---|---|
| Legacy | ✔ |
| Updated (UPE) | ✔ |
Note: Webhooks must be set up for this flow.
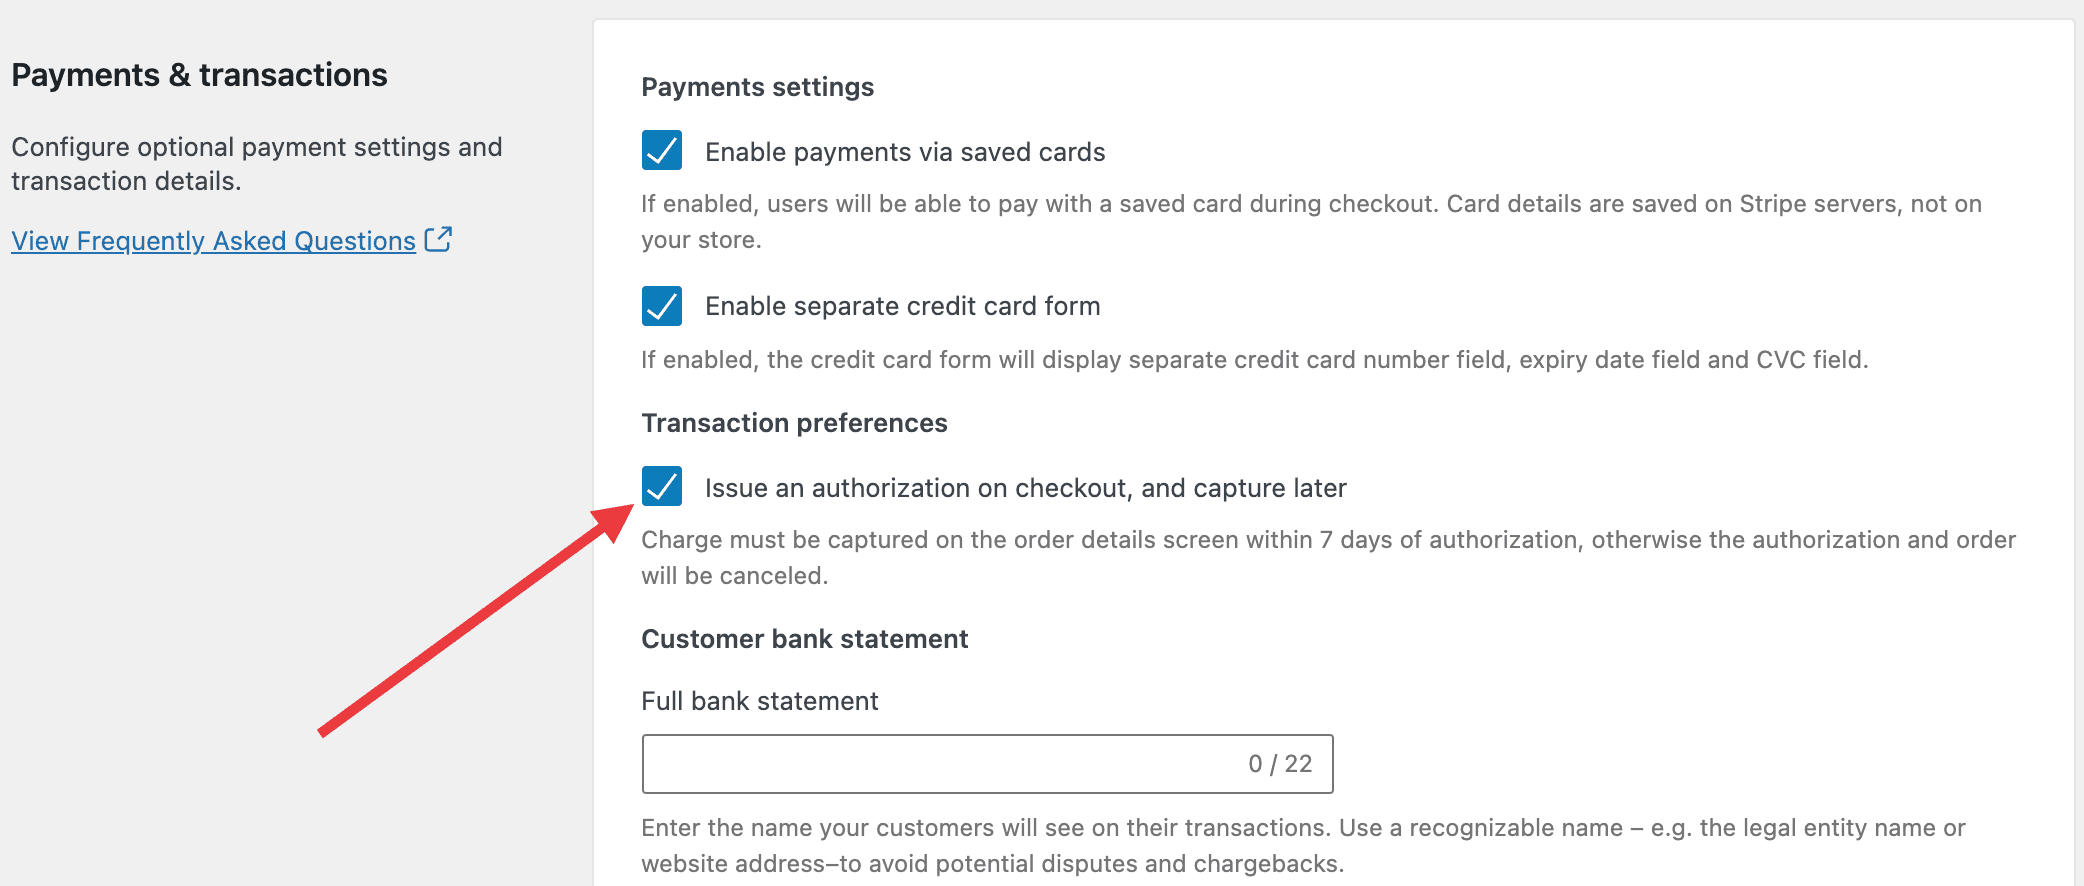
- As a Merchant, go to WooCommerce > Settings > Payments > Stripe > Settings tab > Payments & transactions.
- Check off the checkbox for Issue an authorization on checkout, and capture later to enable capture later.
- Save the settings.
- Follow normal card checkout flow as a Shopper to make a purchase. Take a note of the order number created.
- Using Merchant account go to the WooCommerce > Orders page and open the order created above. The order should have the status
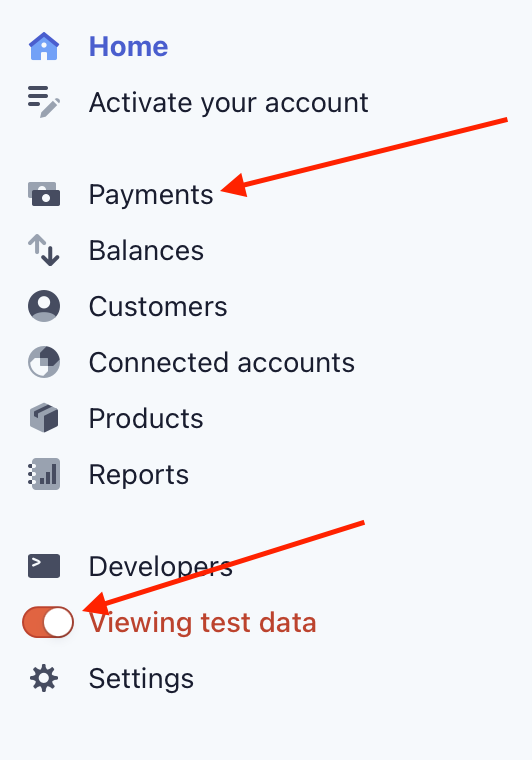
On Hold. - Go to your Stripe's account dashboard
- Make sure Viewing test data is enabled and navigate to the Payments page.
- Locate the payment for the order you just made.

- Open the order details, click the Capture button, and capture the full amount.

- Go back to the order detail screens in your WooCommerce store and observe that the payment should now be captured (the order notes will say Stripe charge complete (Charge ID: ch_abc...)), and the order status should be set to Processing.
- Go to the order page for an order purchased with the Stripe Payment Gateway. You might need to create one using steps from the normal card checkout flow.
- Click the
Refundbutton to activate the refund UI. - Update
QtyandRefund amountfields to make sure all products and fees are refunded. - Click the
Refund via Stripebutton to issue refund. - After page reload check order status (
Refunded) and notes in the right sidebar. Successful refund notes should be added. - Go to your Stripe's account dashboard.
- Make sure Viewing test data is enabled and navigate to the Payments page.

- Locate the payment for the order you just made.

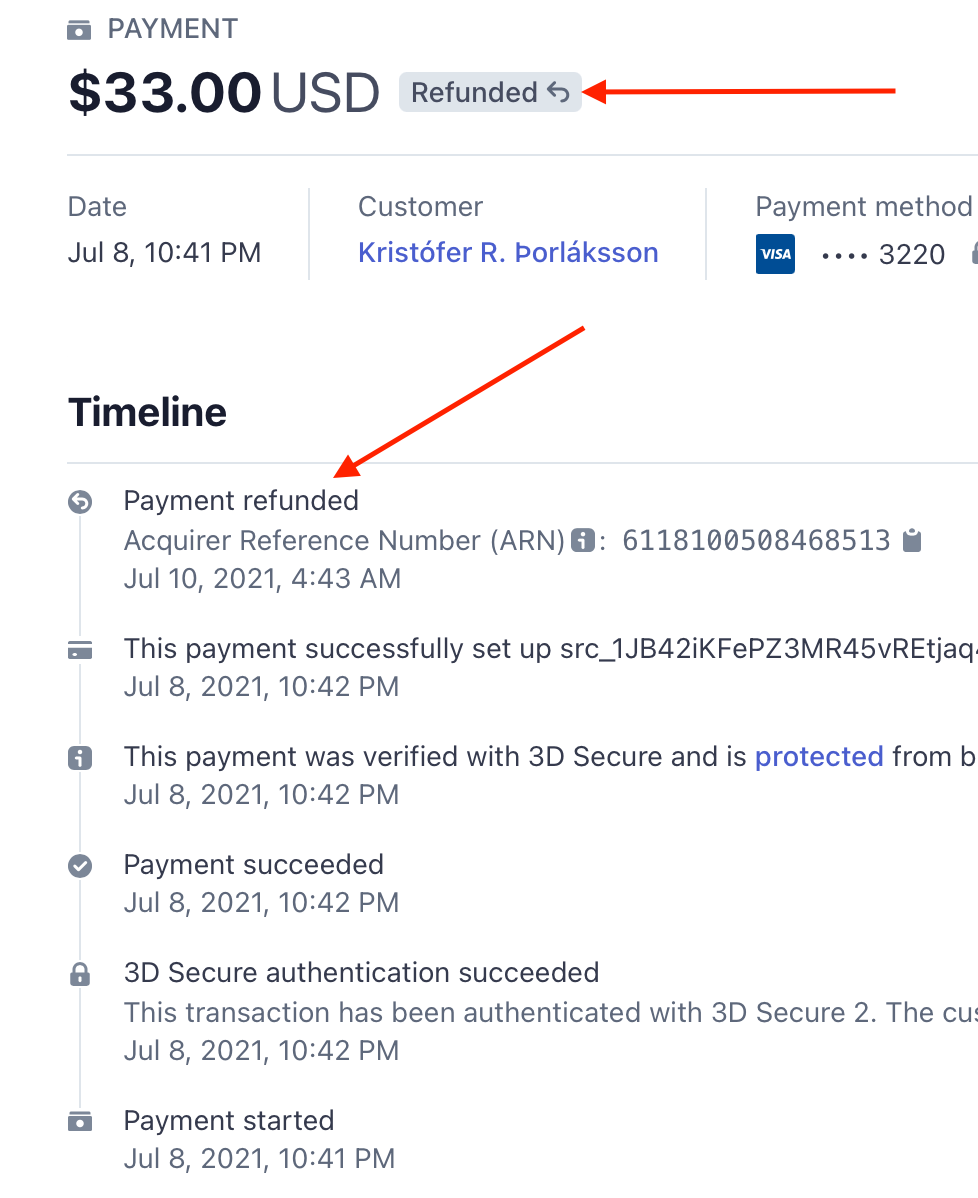
- Check transaction summary, timeline, and payment details. It should reflect status
Refundedand refunded amounts.
- Go to the order page for an order purchased with the Stripe Payment Gateway. You might need to create one using steps from the normal card checkout flow.
- Click
Refundbutton to activate refund UI. - Update
QtyandRefund amountfields to make sure only part (not all) products and fees are refunded. - Click
Refund via Stripebutton to issue refund. - After page reload check order status (
Processing) and notes in the right sidebar. Successful refund notes should be added. - Go to your Stripe's account dashboard.
- Make sure Viewing test data is enabled and navigate to the Payments page.

- Locate the payment for the order you just made.

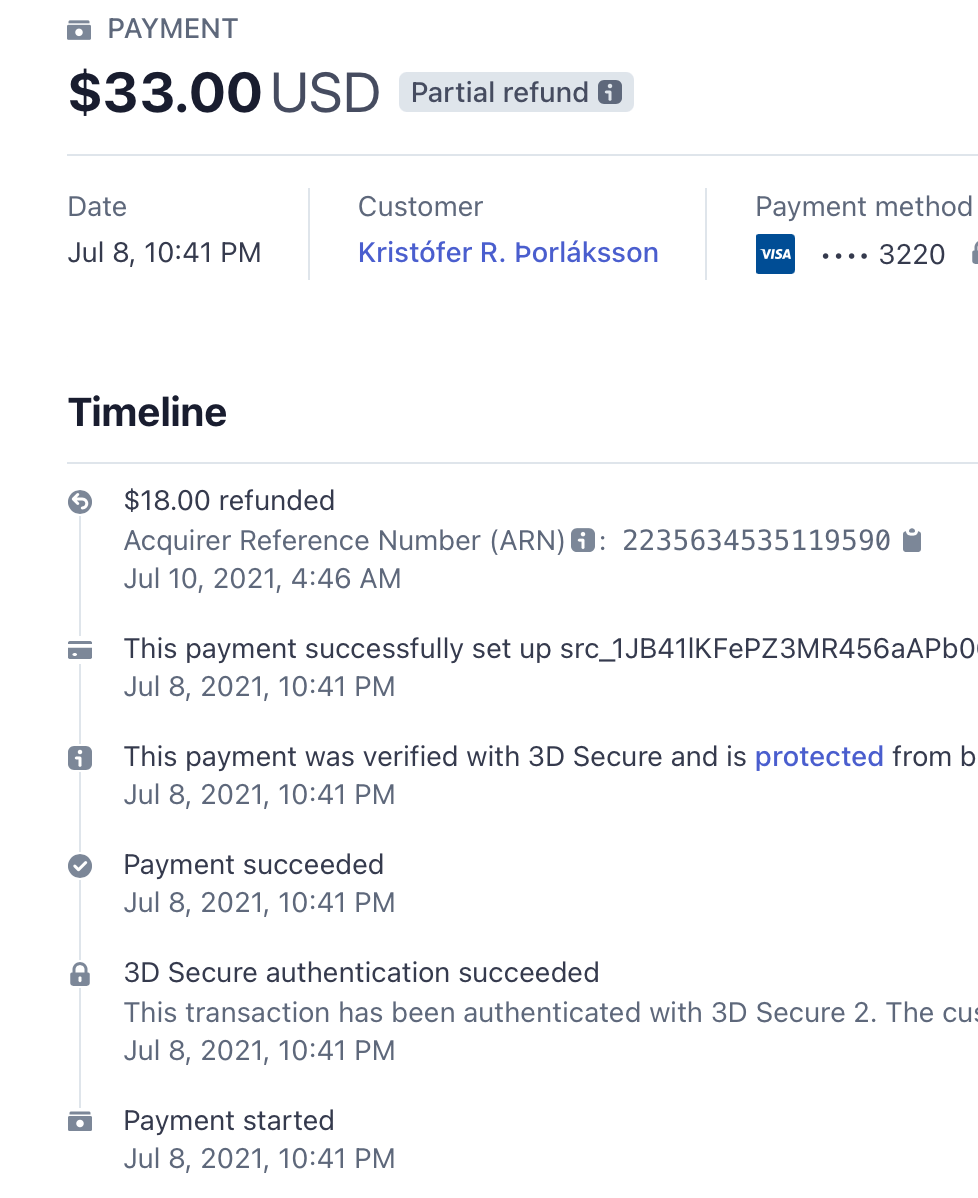
- Check transaction summary, timeline, and payment details. It should reflect status
Partial refundand refunded amounts.
- Repeat steps 2-9. Make sure following partial refunds work well and reflected in your Stripe's account dashboard.
- As a Shopper make a purchase using test card 4000000000005126 and make a note of order number.
- As a Merchant go to the order page for the created order.
- Click
Refundbutton to activate refund UI. - Update
QtyandRefund amountfields to make sure all or part of the products and fees are refunded. - Click
Refund via Stripebutton to issue refund. - After page reload check order status (
Refunded) and notes in the right sidebar. Successful refund notes should be added. - Reload the order page, check that refund failure notes added to the order.
- Go to your Stripe's account dashboard.
- Make sure Viewing test data is enabled and navigate to the Payments page.
- Locate the payment for the order you just made.
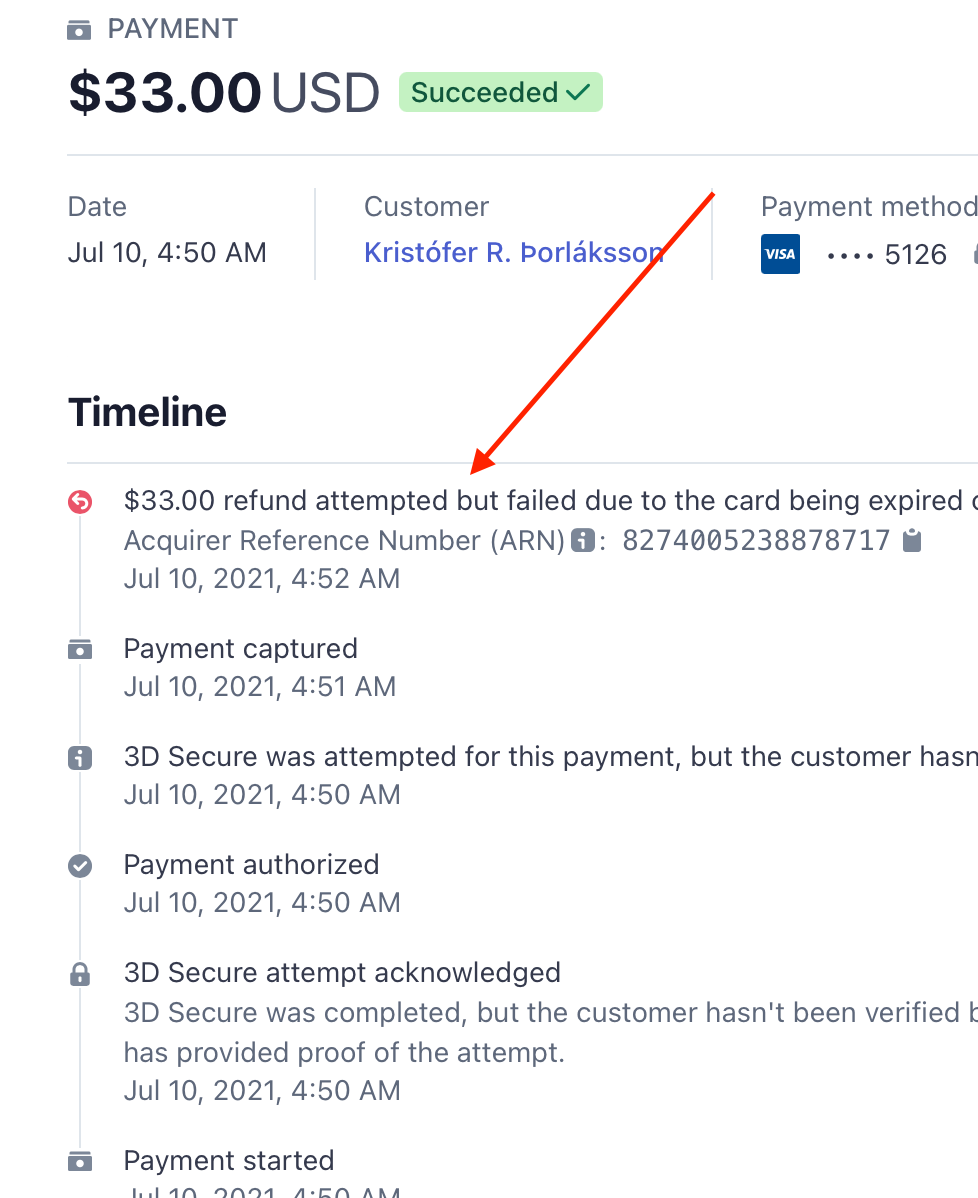
- Observe that the transaction has the
Succeededstatus, but the timeline shows the refund failure.
- As a Merchant create a subscription product (see official documentation for more details).
- As a Shopper purchase the product using a test card.
- Navigate to 'My account -> My Subscription'.
- Ensure the new subscription is listed there:
.
- Ensure 'Subscription' link and 'View' button are opening.
This flow applies to:
| Stripe's experience | WC's block checkout | WC's shortcode checkout |
|---|---|---|
| Legacy | ✔ | ✔ |
| Updated (UPE) | ✔ | ✔ |
- As a Merchant create a subscription product (see official documentation for more details).
- Modify the subscription: set 'Free trial' to e.g. 14 days, click 'Update' button in the top-right block on the product edit page.
- As a Shopper add the product to the cart and start the checkout.
- Ensure the total is '$0.00' and the product price includes e.g. ' with a 14-day free trial'.
- Ensure the order items have 'Recurring totals' section with correct subscription price.
- Complete the checkout and navigate to 'My account -> Subscriptions'.
- Ensure the new subscription is listed.
Note: "Payment Request" option ( Apple Pay, Google Pay, etc. ) will be disabled for subscriptions with free trial if the product isn't virtual or downloadable. This is a limitation of checkout flow and not an issue.
This flow applies to:
| Stripe's experience | WC's block checkout | WC's shortcode checkout |
|---|---|---|
| Legacy | ✔ | ✔ |
| Updated (UPE) | ✔ | ✔ |
- As a Merchant create 2 subscription products (see official documentation for more details).
- The subscription products should use an identical schedule, e.g. both daily, both weekly, both monthly, etc.
- As a Shopper add both products to the cart and complete checkout.
- Navigate to 'My account -> Subscriptions'.
- Ensure the listing contains only one new entry, click the 'View' button on the right side of the entry.
- Ensure 'Subscription totals' section lists the subscription products with the correct price.
This flow applies to:
| Stripe's experience | WC's block checkout | WC's shortcode checkout |
|---|---|---|
| Legacy | ✔ | ✔ |
| Updated (UPE) | ✔ | ✔ |
- As a Merchant create 2 subscription products (see official documentation for more details).
- The subscription products should use differing schedules, e.g. one weekly and one monthly.
- As a Shopper add both products to the cart and complete checkout.
- Navigate to 'My account -> Subscriptions'.
- Ensure the listing contains two new entries, click the 'View' button on the right side of each entry.
- Ensure 'Subscription totals' section lists the subscription product with the correct price.
This flow applies to:
| Stripe's experience | WC's block checkout | WC's shortcode checkout |
|---|---|---|
| Legacy | ✔ | ✔ |
| Updated (UPE) | ✔ | ✔ |
- Follow steps from 'Purchase subscription product'.
- As a Shopper, navigate to 'My account -> My Subscription'.
- Note the newly created subscription and click the 'View' button located on the right side of the corresponding list entry.
- Note the content of the 'Related orders' section (after renewing a new entry expected to be listed there).
- Note the 'Renew now' button and click it.
- You expected to land on the checkout page.
- Ensure the 'Complete checkout to renew now.' success message is shown up.
- Complete the checkout and ensure the 'Related orders' section in the subscription has a new entry.
This flow applies to:
| Stripe's experience | Subscription renewal |
|---|---|
| Legacy | ✔ |
| Updated (UPE) | ✔ |
- Follow steps from 'Purchase subscription product'.
- As a Shopper, navigate to 'My account -> Subscriptions' and open the newly created subscription entry.
- Observe a 'Change payment' button for 'Actions'. Click the 'Change payment' button.
- In the second block, select 'Use a new payment method' option.
- Provide 4242424242424242 as the test card number, future expiration date, and a CVC code.
- Click 'Change payment method' button.
- Observe the 'Payment method updated.' success message.
- Ensure the 'Payment' line in the very first block is reflecting the card data you have provided.
- Follow steps from 'Add new payment method'.
- Follow steps from 'Purchase subscription product'.
- As a Shopper, navigate to 'My account -> Subscriptions' and open the newly created subscription entry.
- Observe a 'Change payment' button in 'Actions'.
- Click 'Change payment' button.
- In the second block, select the method created at the first step.
- Click 'Change payment method' button.
- Observe the 'Payment method updated.' success message.
- Ensure the 'Payment' line in the very first block is reflecting the card data you have provided.
Follow steps from 'Change payment method to saved card', except:
- Make 2 purchases of subscription products, so you get 2 entries in the subscription listing.
- Make sure to mark 'Update the payment method used for all of my current subscriptions (optional)' checkbox when changing the payment method.
- Ensure both subscription entries are using the selected payment method.
After completing steps from 'Set default payment method' change payment method again:
- Make sure to mark 'Update the payment method used for all of my current subscriptions (optional)' checkbox when changing the payment method.
- Ensure both subscription entries are using the new payment method.
- As a Merchant create a subscription product (see official documentation for more details).
- As a Merchant navigate to 'WooCommerce -> Settings -> Subscriptions'
- Enable 'Display the auto renewal toggle' and click 'Save changes' button on page bottom.
- As a Shopper add the subscription product to the cart and complete checkout.
- As a Shopper, navigate to 'My account -> Subscriptions' and open the newly created subscription entry.
- Ensure 'Auto renew' toggle is available and enabled.
- Ensure 'Payment' states the selected payment method.
- Copy the subscription ID (#) for your newly created subscription.
- As a Merchant, navigate to 'WooCommerce -> Status -> Scheduled Actions'.
- As a Merchant, use the subscription ID in the 'Search hook, args and claim ID' field, on the top-right corner of the page.
- Search for a 'Pending' hook named 'woocommerce_scheduled_subscription_payment' and which argument states
'subscription_id' => {SUBSCRIPTION_ID}. - Hover over the table row and click 'Run' to simulate an automatic renewal for the newly created subscription.
- As a Shopper, navigate to 'My account -> Subscriptions', and ensure the given subscription is updated and another order entry is attached to it under 'Related orders'.
- Note the 'Next payment date' should remain the same (i.e. one month ahead).
- As a Merchant create a subscription product (see official documentation for more details).
- As a Merchant navigate to 'WooCommerce -> Settings -> Subscriptions'
- Enable 'Accept Manual Renewals', ' Turn off Automatic Payments ' and click 'Save changes' button on page bottom.
- As a Shopper add the subscription product to the cart and complete checkout.
- As a Shopper, navigate to 'My account -> Subscriptions' and open the newly created subscription entry.
- Ensure 'Payment' states 'Via Manual Renewal'.
- Observe a 'Renew now' button displayed for 'Actions'. Click the 'Renew now' button.
- Ensure you are landed to the checkout page and can complete the checkout.
- Navigate to 'My account -> Subscriptions -> View Subscription' and ensure the subscription is updated and a new order entry is attached under 'Related orders'.
- Note the 'Next payment date' should be up-to-date (i.e. two months ahead).
- Go to WooCommerce > Settings > General.
- Select Euro (€) in the Currency drop-down.
- Click Save changes.
- Go to WooCommerce > Settings > Payments > Stripe > Payment Methods tab > iDEAL.
- Toggle the Enable/Disable checkbox to on.
- Click Save changes.
- Add a product to the cart and proceed to checkout.
- Select iDEAL and click Place order.
- You'll be brought to Stripe's iDEAL test payment page. Click Authorize test payment to continue.
- You'll be brought to the store's Order received page. Note the Order number.
- Go to WooCommerce > Orders.
- Find the order you just created (see order number from step 10) and make sure the status is set to Processing.
- Note: If the product you purchased is digital the order should be set to Completed.
This flow applies to:
| Stripe's experience | WC's block checkout | WC's shortcode checkout |
|---|---|---|
| Legacy | ✘ | ✔ |
| Updated (UPE) | ✔ | ✔ |
Note: Webhooks must be set up for this flow.
Note: You'll need an address in Germany to pay via Sofort. You can use the following one or generate a fake address that will work here.
Street: Leipziger Strasse 36
City: Osnabrück
State: Niedersachsen
Zip Code: 49074
Phone Number: 05416327741
- Go to WooCommerce > Settings > General.
- Select Euro (€) in the Currency drop-down.
- Click Save changes.
- Go to WooCommerce > Settings > Payments > Stripe > Payment Methods tab > Sofort.
- Toggle the Enable/Disable checkbox to on.
- Click Save changes.
- Add a product to the cart and proceed to checkout.
- Enter the address you generated here as the billing details.
- Select SOFORT and click Place order.
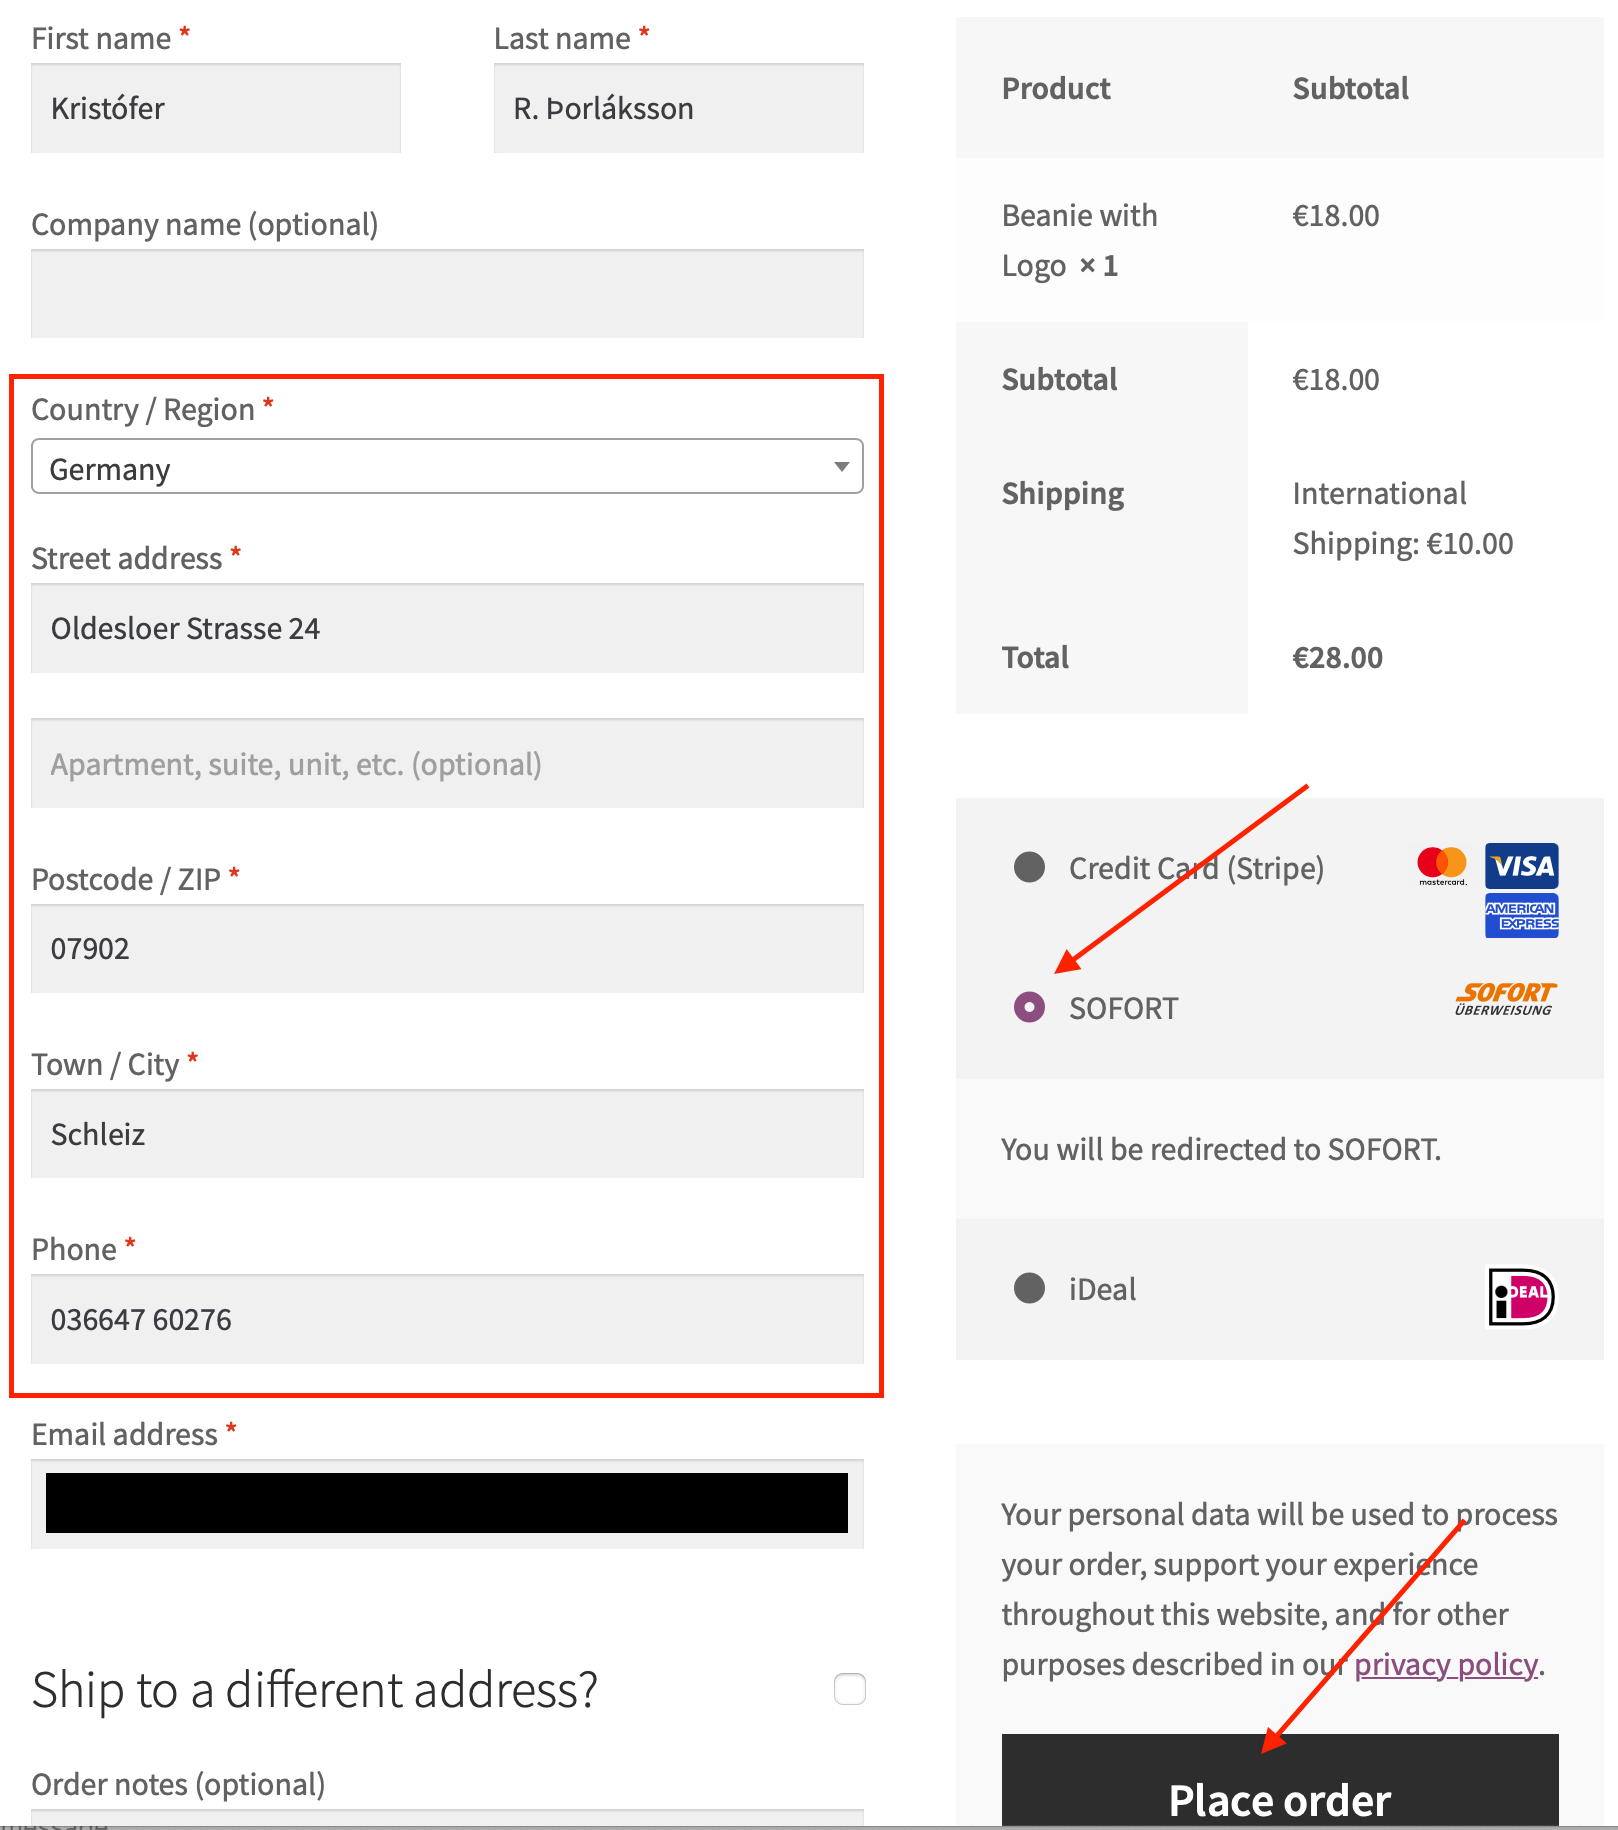
- You'll be brought to Stripe's Sofort test payment page. Click Authorize test payment to continue.
- You'll be brought to the store's Order received page. Note the Order number.
- Go to WooCommerce > Orders.
- Find the order you just created (see order number from step 11) and make sure the status is set to On Hold.
- Wait 3 minutes.
- Reload the WooCommerce > Orders page.
- Find the order you just created (see order number from step 11) and make sure the status is set to Processing.
- Note: If the product you purchased is digital the order should be set to Completed.
This flow applies to:
| Stripe's experience | WC's block checkout | WC's shortcode checkout |
|---|---|---|
| Legacy | ✘ | ✔ |
| Updated (UPE) | ✔ | ✔ |
- Go to WooCommerce > Settings > General.
- Select Euro (€) in the Currency drop-down.
- Click Save changes.
- Go to WooCommerce > Settings > Payments > Stripe > Payment Methods tab > Giropay.
- Toggle the Enable/Disable checkbox to on.
- Click Save changes.
- Add a product to the cart and proceed to checkout.
- Select Giropay and click Place order.
- You'll be brought to Stripe's giropay test payment page. Click Authorize test payment to continue.
- You'll be brought to the store's Order received page. Note the Order number.
- Go to WooCommerce > Orders.
- Find the order you just created (see order number from step 10) and make sure the status is set to Processing.
- Note: If the product you purchased is digital the order should be set to Completed.
This flow applies to:
| Stripe's experience | WC's block checkout | WC's shortcode checkout |
|---|---|---|
| Legacy | ✘ | ✔ |
| Updated (UPE) | ✔ | ✔ |
- Go to WooCommerce > Settings > General.
- Select Euro (€) in the Currency drop-down.
- Click Save changes.
- Go to WooCommerce > Settings > Payments > Stripe > Payment Methods tab > EPS.
- Toggle the Enable/Disable checkbox to on.
- Click Save changes.
- Add a product to the cart and proceed to checkout.
- Select EPS and click Place order.
- You'll be brought to Stripe's EPS test payment page. Click Authorize test payment to continue.
- You'll be brought to the store's Order received page. Note the Order number.
- Go to WooCommerce > Orders.
- Find the order you just created (see order number from step 10) and make sure the status is set to Processing.
- Note: If the product you purchased is digital the order should be set to Completed.
This flow applies to:
| Stripe's experience | WC's block checkout | WC's shortcode checkout |
|---|---|---|
| Legacy | ✘ | ✔ |
| Updated (UPE) | ✔ | ✔ |
- Go to WooCommerce > Settings > General.
- Select Euro (€) in the Currency drop-down.
- Click Save changes.
- Go to WooCommerce > Settings > Payments > Stripe > Payment Methods tab > Bancontact.
- Toggle the Enable/Disable checkbox to on.
- Click Save changes.
- Add a product to the cart and proceed to checkout.
- Select Bancontact and click Place order.
- You'll be brought to Stripe's Bancontact test payment page. Click Authorize test payment to continue.
- You'll be brought to the store's Order received page. Note the Order number.
- Go to WooCommerce > Orders.
- Find the order you just created (see order number from step 10) and make sure the status is set to Processing.
- Note: If the product you purchased is digital the order should be set to Completed.
This flow applies to:
| Stripe's experience | WC's block checkout | WC's shortcode checkout |
|---|---|---|
| Legacy | ✘ | ✔ |
| Updated (UPE) | ✔ | ✔ |
- Go to WooCommerce > Settings > General.
- Select Euro (€) in the Currency drop-down.
- Click Save changes.
- Go to WooCommerce > Settings > Payments > Stripe > Payment Methods tab > Przelewy24.
- Toggle the Enable/Disable checkbox to on.
- Click Save changes.
- Add a product to the cart and proceed to checkout.
- Select Przelewy24 (P24) and click Place order.
- You'll be brought to Stripe's Przelewy24 test payment page. Click Authorize test payment to continue.
- You'll be brought to the store's Order received page. Note the Order number.
- Go to WooCommerce > Orders.
- Find the order you just created (see order number from step 10) and make sure the status is set to Processing.
- Note: If the product you purchased is digital the order should be set to Completed.
This flow applies to:
| Stripe's experience | WC's block checkout | WC's shortcode checkout |
|---|---|---|
| Legacy | ✘ | ✔ |
| Updated (UPE) | ✔ | ✔ |
Note: Webhooks must be set up for this flow.
- Go to WooCommerce > Settings > General.
- Select Euro (€) in the Currency drop-down.
- Click Save changes.
- Go to WooCommerce > Settings > Payments > Stripe > Payment Methods tab > Direct debit payment.
- Toggle the Enable/Disable checkbox to on.
- Click Save changes.
- Add a product to the cart and proceed to checkout.
- Select SEPA Direct Debit.
- Enter
DE08370400440532013003as the IBAN Number and click Place order. - You'll be brought to the store's Order received page. Note the Order number.
- Go to WooCommerce > Orders.
- Find the order you just created (see order number from step 10) and make sure the status is set to On hold.
- Wait 3 minutes.
- Reload the WooCommerce > Orders page.
- Find the order you just created (see order number from step 10) and make sure the status is set to Processing.
- Note: If the product you purchased is digital the order should be set to Completed.
This flow applies to:
| Stripe's experience | WC's block checkout | WC's shortcode checkout |
|---|---|---|
| Legacy | ✘ | ✔ |
| Updated (UPE) | ✔ | ✔ |
Note: Webhooks must be set up for this flow.
- Go to WooCommerce > Settings > General.
- Select Euro (€) in the Currency drop-down.
- Click Save changes.
- Go to WooCommerce > Settings > Payments > Stripe > Payment Methods tab > Multibanco.
- Toggle the Enable/Disable checkbox to on.
- Click Save changes.
- Add a product to the cart and proceed to checkout.
- Select Multibanco and click Place order.
- You'll be brought to Stripe's Multibanco test payment page. Click Return to site to continue.
- You'll be brought to the store's Order received page. Note the Order number.
- Go to WooCommerce > Orders.
- Find the order you just created (see order number from step 10) and make sure the status is set to Processing.
- Note: If the product you purchased is digital the order should be set to Completed.
- Open the order details page for the order you just created.
- Make sure there are 3 notes associated with the order:
- "Awaiting Multibanco payment Order status changed from Pending payment to On hold."
- "Order status changed from On hold to Processing."
- "Stripe charge complete (Charge ID: py_xxx)"
This flow applies to:
| Stripe's experience | WC's block checkout | WC's shortcode checkout |
|---|---|---|
| Legacy | ✘ | ✔ |
| Updated (UPE) | ✘ | ✔ |
- Go to WooCommerce > Settings > Payments > Stripe > Payment Methods tab > Alipay.
- Toggle the Enable/Disable checkbox to on.
- Click Save changes.
- Add a product to the cart and proceed to checkout.
- Select Alipay and click Place order.
- You'll be brought to Stripe's Alipay test payment page. Click Authorize test payment to continue.
- You'll be brought to the store's Order received page. Note the Order number.
- Go to WooCommerce > Orders.
- Find the order you just created (see order number from step 10) and make sure the status is set to Processing.
- Note: If the product you purchased is digital the order should be set to Completed.
This flow applies to:
| Stripe's experience | WC's block checkout | WC's shortcode checkout |
|---|---|---|
| Legacy | ✘ | ✔ |
| Updated (UPE) | ✔ | ✔ |
Note: Webhooks must be set up for this flow.
Note: You'll need to set Brazil as your country in the Stripe account. If it's not possible you'll need to create a new account and set Brazil and use the account for this test.
- Go to WooCommerce > Settings > General.
- Select Brazilian real (R$) in the Currency drop-down.
- Click Save changes.
- Go to WooCommerce > Settings > Payments > Stripe > Payment Methods tab > Boleto.
- Toggle the Enable/Disable checkbox to on.
- Click Save changes.
- Add a product to the cart (> R$5.00) and proceed to checkout.
- Type in a valid Brazilian address.
- Select Boleto, use
81200558022in the CPF/CNPJ field and click Place order. - A modal containing a voucher must show up. Close it.
- You'll be brought to the store's Order received page. Note the Order number.
- Go to WooCommerce > Orders.
- Find the order you just created (see order number from step 11) and make sure the status is set to On hold.
- Wait 3 minutes.
- Reload the WooCommerce > Orders page.
- Find the order you just created (see order number from step 11) and make sure the status is set to Processing.
- Note: If the product you purchased is digital the order should be set to Completed.
This flow applies to:
| Stripe's experience | WC's block checkout | WC's shortcode checkout |
|---|---|---|
| Legacy | ✘ | ✔ |
| Updated (UPE) | ✔ | ✔ |
Note: Webhooks must be set up for this flow.
Note: You'll need to set Mexico as your country in the Stripe account. If it's not possible you'll need to create a new account and set Mexico and use the account for this test.
- Go to WooCommerce > Settings > General.
- Select Mexican peso ($) in the Currency drop-down.
- Click Save changes.
- Go to WooCommerce > Settings > Payments > Stripe > Payment Methods tab > OXXO.
- Toggle the Enable/Disable checkbox to on.
- Click Save changes.
- Add a product to the cart (> $10.00) and proceed to checkout.
- Type in a valid Mexican address.
- Select OXXO and click Place order.
- A modal containing a voucher must show up. Close it.
- You'll be brought to the store's Order received page. Note the Order number.
- Go to WooCommerce > Orders.
- Find the order you just created (see order number from step 11) and make sure the status is set to On hold.
- Wait 3 minutes.
- Reload the WooCommerce > Orders page.
- Find the order you just created (see order number from step 11) and make sure the status is set to Processing.
- Note: If the product you purchased is digital the order should be set to Completed.
This flow applies to:
| Stripe's experience | WC's block checkout | WC's shortcode checkout |
|---|---|---|
| Legacy | ✘ | ✔ |
| Updated (UPE) | ✔ | ✔ |