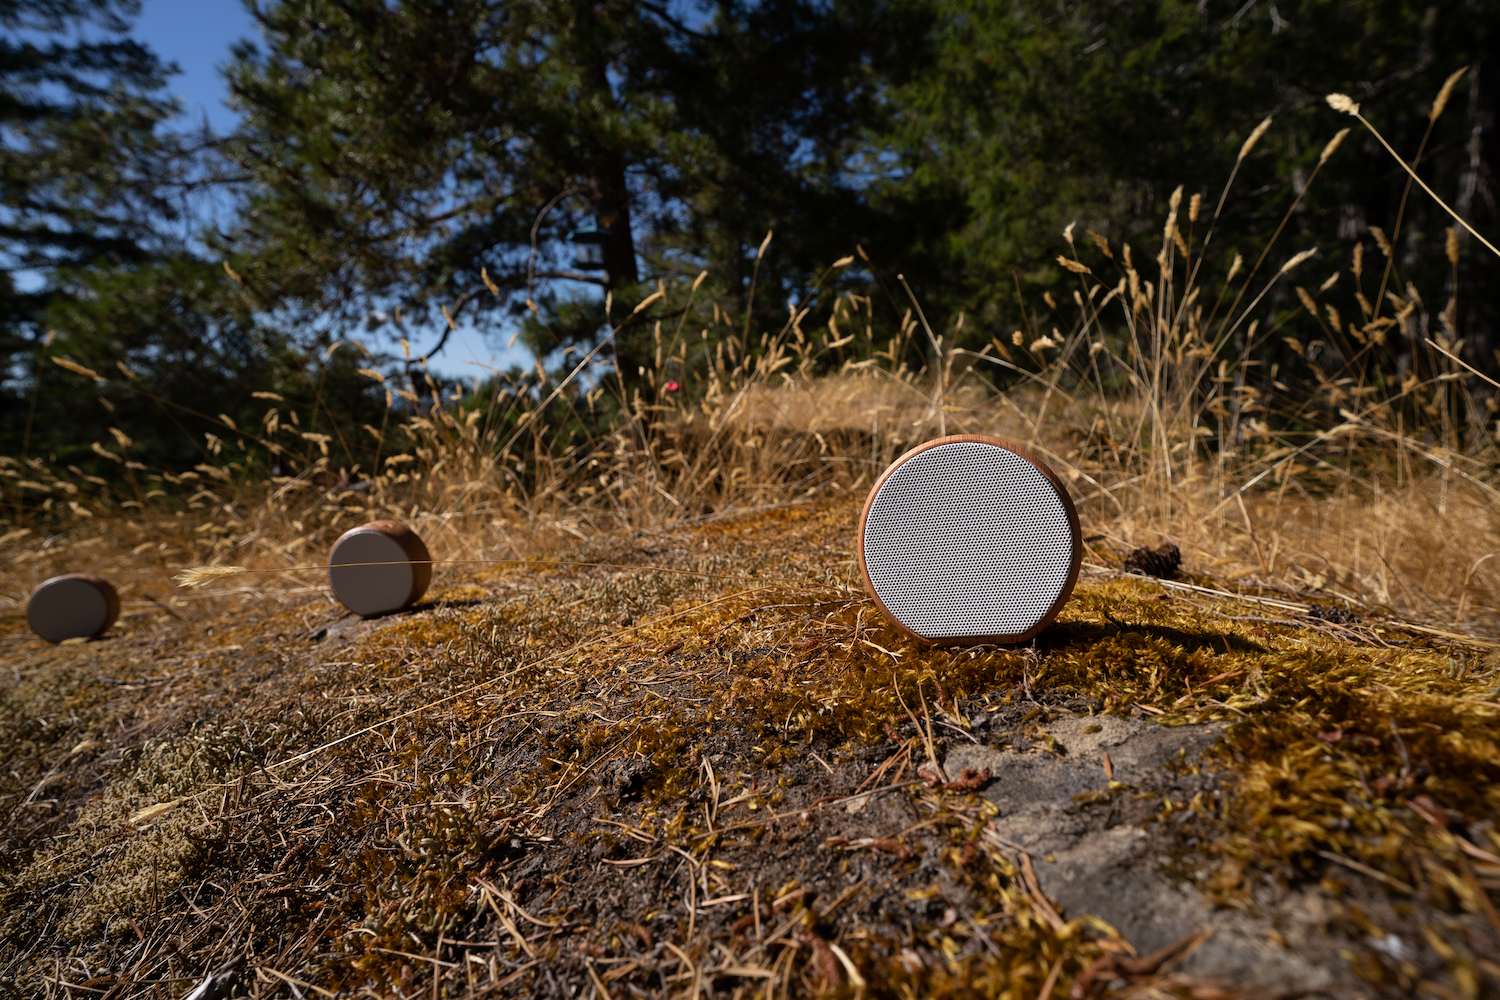
Hello! You're the lucky owner of at least one Alles speaker. This guide will help you get started.
That's ok! You can run a software speaker too. Skip down to the section Setup and then do Alles on your computer to run a software version of the speaker. You can then keep following this guide no problem.
Read here on how to get your Alles PCB into a speaker shell!
Each Alles speaker has four buttons up top and a USB micro receptacle on back.
Before getting going, let's make sure the speaker is charged or charging. Simply plug the included USB cable between the speaker and any USB charge point, like a phone charger. (If you hook it into a computer, the speaker will show up as a USB device for debugging and upgrades, but you don't have to worry about that for now -- all control happens wirelessly.) The battery will last "a few hours" making constant music and longer with sparse or silence. It shouldn't take more than an hour or so to charge. If the power button does not make any noise, it's probably a dead battery.
The row of buttons up top, facing the speaker, are power, volume + and -, and WiFi setup (the play/pause). Volume can be set with those buttons or using alles.volume() from your compositions. Using alles.volume() will override whatever you set with the buttons.
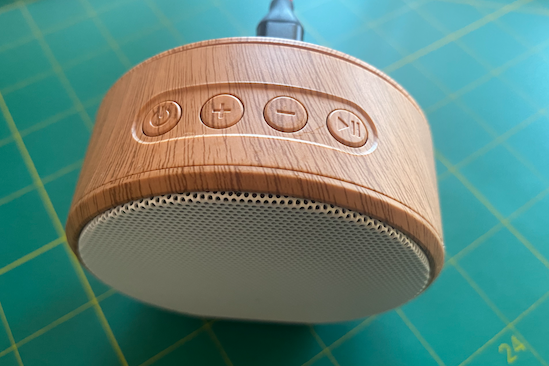
The power button turns the speaker off and on. When you turn it on, it will re-join the network and mesh.
The WiFi button will forget the WiFi details, if any were stored, and put the device into WiFi setup mode. This is the default if no WiFi has yet been set.
If this is your first time using the speaker, you'll need to tell it which WiFi network to join. You can easily change this later, but once you set it, you don't need to set it again.
Press the power button. You'll start to hear a "chime noise" repeating. This is the "searching for WiFi" sound, and will play until it finds a WiFi point, or the power button is hit again, or if two minutes goes by, at which point it'll shut off again.
If you've already set a WiFi network, after about a few seconds the chime noise will end and you'll hear a "bleep" tone and then silence. That means the WiFi network has been joined and everything is ready to go.
If you haven't set WiFi yet, now open your nearest mobile phone or any WiFi device with a browser. Go to join a new WiFi network on your device and you'll see a network listed called alles-synth-XXXXXX where XXXXXX is a unique string per speaker (useful when you have many speakers!). Join that network. On most devices (iPhones, Androids especially) after a few seconds, a browser window will appear with a login page. This is like when you join a hotel's network or other captive portal. If the page never appears, try going to http://10.10.0.1 in your browser after joiining the network.

Wait a few seconds for the login page to populate with all the nearby WiFi stations it finds. After you see the one you want the speaker to join, tap it and carefully enter its password. This should be the same network as the computer you're going to control Alles from. After a few moments, the speaker should stop chiming, indicating it has succesfully joined the network and saved the details to its internal storage.
If this doesn't seem to work, try again by hitting the WiFi button (play/pause) and the process will repeat again.
It's helpful to make sure your Alles speaker has the latest firmware. If you have a recent speaker, you can do this wirelesly. If you have an older one, it's slightly more complicated but only takes a few minutes of setup (and you can do it wirelessly going forward.) See the guide on upgrading a hardware Alles speaker
You send the mesh (group of speakers) explicit messages that define the state of oscillators. You can control anything you can imagine, with high precision and millisecond accuracy. You can control up to 64 oscillators on each of any number of speakers in a mesh. You do this from either a programming language like Python (what we use) or an environment like Max/MSP (or Max for Ableton Live). Python is built-in on Macs and pretty easy to use once you get the hang of it. And then you can write small programs to make interesting sounds! For this tutorial, we'll use Python. But there's also a Max patch you can download that shows you how to access all the same parameters as we're changing in Python. So it's up to you!
So let's start python. Open your terminal, on a Mac, that's Terminal.app, on Windows I suggest using WSL, and on Linux whatever you've installed. Clone this repository if you haven't already. (git clone https://github.com/shorepine/alles.git) Also make sure to update the submodules, so cd alles; git submodule update --init --recursive. Make sure you are in the directory containing the repository. And type python3. If on Mac, if you've never done this sort of thing before, you may have to accept a small download of tools from Apple the first time you run Python. Let that finish. Then you'll see a prompt like >>>.
Start by importing the Python module needed to control the mesh: import alles
alles.drums() should play a test pattern out of all the currently turned-on speakers. They should all be in sync and playing the same thing.
Try to set the volume of the speaker with alles.volume(2) -- that can be up to 10 or so. The default is 1. You can also use the + and - buttons on the speaker, but anything you set with alles.volume() will override the buttons.
When you want the speakers to be quiet, or if things are acting funny, use alles.reset(). That resets all speakers to defaults. Sometimes lots of experiments will get your oscillators in a weird state and alles.reset() is your escape hatch. You can also do alles.reset(osc=5) to do just one oscillator for example.
Let's set a simple sine wave first
alles.send(osc=0, wave=alles.SINE, freq=220, amp=1)What we're doing here should be pretty straightforward. I'm telling oscillator 0 to be a sine wave at 220Hz and amplitude 1. You can also try alles.PULSE, or alles.SAW_DOWN, etc.
Why can't you hear anything yet? It's because you haven't triggered the note on for this oscillator. We accept a parameter called vel (velocity) that can turn a note on or off (vel=0.) So now that we've set up the oscillator, we just turn it on by alles.send(osc=0, vel=1). Note the oscillator remembers all its state and setup. To turn off the note, just do alles.send(osc=0, vel=0).
You can also make oscillators louder with amp or vel over 1.
Make sure to try alles.reset() to stop everything too.
You can also always use note, (MIDI note value) instead of freq.
alles.send(osc=0, wave=alles.SINE, note=57, vel=1)Now let's make a lot of sine waves!
import time
alles.reset()
for i in range(16):
    alles.send(osc=i, wave=alles.SINE, freq=110+(i*80), vel=((16-i)/32.0))
    time.sleep(0.5) # Sleep for 0.5 seconds
Neat! You can see how simple / powerful it is to have control over lots of oscillators. You have up to 64. Let's make it more interesting. A classic analog tone is the filtered saw wave. Let's make one.
alles.send(osc=0,wave=alles.SAW_DOWN,filter_freq=2500, resonance=5, filter_type=alles.FILTER_LPF)
alles.send(osc=0, vel=1, note=40)
Sounds nice. But we want that filter freq to go down over time, to make that classic filter sweep tone. Let's use a breakpoint! A breakpoint is a simple list of (time, value) - you can have up to 8 of those pairs, and up to 3 different sets to control different things. They're just like ADSRs, but more powerful. You can control amplitude, frequency, duty cycle, feedback, filter frequence, or resonance with a breakpoint. It gets triggered when the note does. So let's make a breakpoint that turns the filter frequency down from its start at 2500 to 1250 after 100 milliseconds. And when the note goes off, taper the frequency to 0 after 25 millseconds.
alles.send(osc=0,wave=alles.SAW_DOWN,filter_freq=2500, resonance=5, filter_type=alles.FILTER_LPF)
alles.send(osc=0, bp0="100,0.5,25,0", bp0_target=alles.TARGET_FILTER_FREQ)
alles.send(osc=0, vel=1, note=40)
Great. You can add multiple targets together, for example, if you want a breakpoint to control both filter frequency and resonance, use bp0_target=alles.TARGET_FILTER_FREQ+alles.TARGET_RESONANCE. Give it a go!
We also have LFOs, which are implemented as one oscillator modulating another. You set the lower-frequency oscillator up, then have it control a parameter of another audible oscillator. Let's make the classic 8-bit duty cycle pulse wave modulation, a favorite:
alles.send(osc=1, wave=alles.SAW_DOWN, freq=0.5, amp=0.75)
alles.send(osc=0, wave=alles.PULSE, duty=0.5, freq=220, mod_source=1, mod_target=alles.TARGET_DUTY)
alles.send(osc=0, vel=0.5)
You see we first set up the modulation oscillator (a saw wave at 0.5Hz, with amplitude 0.75-- this indicates the "depth" of the LFO). Then we set up the oscillator to be modulated, a pulse wave with mod source of oscillator 1 and mod target of duty cycle. The initial duty cycle will start at 0.5 and be multiplied by the state of oscillator 1 every tick, to make that classic thick saw line from the C64 et al. The modulation will re-trigger every note on. Just like breakpoints, you can modulate duty cycle, amplitude, frequency, filter frequency, resonance or feedback! And if you want to modulate more than one thing, like frequency and duty, just add them together:
alles.send(osc=1, wave=alles.TRIANGLE, freq=5, amp=0.25)
alles.send(osc=0, wave=alles.PULSE, duty=0.5, freq=110, mod_source=1, mod_target=alles.TARGET_DUTY+alles.TARGET_FREQ)
alles.send(osc=0, vel=0.5)
There's a lot more parameters and things to play with. Check out the Alles README for the full list, or look at alles.message in Python:
# alles.message():
(osc=0, wave=-1, patch=-1, note=-1, vel=-1, amp=-1, freq=-1, duty=-1, feedback=-1, timestamp=None, reset=-1, phase=-1, \
        client=-1, retries=1, volume=-1, filter_freq = -1, resonance = -1, bp0="", bp1="", bp2="", bp0_target=-1, bp1_target=-1, bp2_target=-1, mod_target=-1, \
        debug=-1, mod_source=-1, eq_l = -1, eq_m = -1, eq_h = -1, filter_type= -1, algorithm=-1, ratio = -1, algo_source=None)
alles.py has some helpful presets, if you want to use them, or add to them. To make that filter bass, just do alles.preset(1, osc=0) and then alles.send(osc=0, vel=1, note=40) to hear it. Here's another one:
alles.preset(0, osc=2) # will set a simple sine wave tone on oscillator 2
alles.send(osc=2, note=50, vel=1.5) # will play the note at velocity 1.5
alles.send(osc=2, vel=0) # will send a "note off" -- you'll hear the note release
alles.send(osc=2, freq=220.5, vel=1.5) # same but specifying the frequency
alles.reset()Do you have multiple Alleses? I hope so, that's where all the real fun is. Whether they are physical hardware speakers or the Alles desktop program running on your computer, all the speakers on the same network are able to be controlled in one big mesh. They learn about how many they are, know how to stay in sync, and get a number we call client associated with them after a few seconds of being on. Generally the first speaker you turn on will have a client of 0, and the next 1, and so on. If you turn off a speaker, the rest will eventually fill in that gap and re-order themselves.
When you are sending messages to Alles, if you don't specify client, all speakers receive the same message and play them at the exact same time. But it's more interesting to have different speakers play different types of sounds in sync. That example above, where we played 16 sine waves, is a good example. Let's adapt that to play a different sine wave on each speaker.
A quick way to know how many speakers are currently live in the mesh is to run alles.sync(). After a few seconds, you'll see a list spit out like
{0: {'reliability': 1.0, 'avg_rtt': 124.0, 'ipv4': 1, 'battery': ('charged', 4)},
 2: {'reliability': 1.0, 'avg_rtt': 67.3, 'ipv4': 5, 'battery': ('charged', 4)},
 1: {'reliability': 1.0, 'avg_rtt': 293.5, 'ipv4': 3, 'battery': ('charged', 4)}}
This shows you the battery status and other timing details of each one. You can use len(alles.sync()) to get a quick count for your compositions. Like so:
import time
alles.reset()
speakers = len(alles.sync())
for i in range(16):
    alles.send(osc=i, wave=alles.SINE, freq=110+(i*80), vel=((16-i)/32.0), client=i % speakers)
    time.sleep(0.5) # Sleep for 0.5 seconds
I've added the client parameter to the message, and asked it to play each sine wave on client ID i (0-16) mod (remainder / %) speakers, which for me is 3. That just means sine wave 0 is played on speaker 0, sine wave 1 on speaker 1, wave 2 on 2, wave 3 on 0 again, wave 4 on 1, and so on in a round robin. Try it out!
There's some other helpful tricks in client. If you give client a number greater than 255, you can address groups of speakers. This is helfpul if you have a lot, and you want to send a message to half of the speakers, or every third speaker. 257 will be every 2nd speaker, 258 every third speaker, and so on.
Those deep into synth lore already know why Alles is called that: we initially built it to be a multi-channel version of the "Alles Machine", a Bell Labs synth from the 70s/80s invented by Hal Alles. It was built as a bank of oscillators and envelopes with filters, just like ours. Except we can program oscillators to go anywhere in space and have a lot more of them.
Additive synthesis is simply adding together oscillators to make more complex tones. You can modulate the breakpoints of these oscillators over time, for example, changing their pitch or time without artifacts, as the synthesis is simply playing sine waves back at certain amplitudes and frequencies (and phases.) It's well suited to certain types of instruments.
We have analyzed the partials of a group of instruments and stored them as presets baked into the speaker. Each of these patches are comprised of multiple sine wave oscillators, changing over time. The PARTIALS type has the presets:
alles.send(osc=0,vel=1,note=50,wave=alles.PARTIALS,patch=5) # a nice organ tone
alles.send(osc=0,vel=1,note=55,wave=alles.PARTIALS,patch=5) # change the frequency
alles.send(osc=0,vel=1,note=50,wave=alles.PARTIALS,patch=6,ratio=0.2) # ratio slows down the partial playback
There are 17 presets stored in each speaker, so patch can be between 0 and 16.
Our partial breakpoint analyzer also emits "noise-excited bandwidth enhancement", which means it tries to emulate tones that are hard to generate with sine waves alone by modulating the amplitude of a sine wave with a filtered noise signal. You can try that out on the patches by adding feedback, like so:
alles.send(osc=0,vel=1,note=50,wave=alles.PARTIALS,patch=6,feedback=0) # no bandwidth
alles.send(osc=0,vel=1,note=50,wave=alles.PARTIALS,patch=6,feedback=0.5) # more bandwidth
Below, in the advanced section, you'll learn how to analyze your own audio and play partials back from your host, to multiple speakers. Endless possibilities!
As well as doing partial additive synthesis, Alles is also great at doing frequency modulation of sine waves. We call it ALGO. This is a type of synthesis you've heard quite a bit of, and is fun to play with. You can experiment most easily by trying one of the 201 presets we've baked into Alles. Give it a go like
alles.send(wave=alles.ALGO,osc=0,patch=0,note=50,vel=1)
alles.send(wave=alles.ALGO,osc=0,patch=1,note=50,vel=1)
The patch lets you set which preset. It can be from 0 to 200. Another fun parameter is ratio, which for ALGO patch types indicates how slow / fast to play the patch's envelopes. Really cool to slow them down!
alles.send(wave=alles.ALGO,osc=0,note=40,vel=1,ratio=0.5,patch=8) # half speed
alles.send(wave=alles.ALGO,osc=0,note=40,vel=1,ratio=0.05,patch=8)  # reaaall sloooow
alles.send(wave=alles.ALGO,osc=0,note=30,vel=1,ratio=0.1,patch=19) # love this one
Let's make the classic FM bell tone ourselves, without a preset. We'll just be using two operators (two sine waves), one modulating the other.
alles.reset()
alles.send(wave=alles.SINE,ratio=0.2,amp=0.1,osc=0,bp0_target=alles.TARGET_AMP,bp0="1000,0,0,0")
alles.send(wave=alles.SINE,ratio=1,amp=1,osc=1)
alles.send(wave=alles.ALGO,algorithm=0,algo_source="-1,-1,-1,-1,1,0",osc=2)
Let's unpack that last line: we're setting up a ALGO "oscillator" that controls up to 6 other oscillators. We only need two, so we set the algo_source to mostly -1s (not used) and have oscillator 1 modulate oscillator 0. You can have the operators work with each other in all sorts of crazy ways. For this simple example, we just use the DX7 algorithm #1 (but we count from 0, so it's algorithm 0). And we'll use only operators 2 and 1. Therefore our algo_source lists the oscillators involved, counting backwards from 6. We're saying only have operators 2 and 1, and have oscillator 1 modulate oscillator 0.
What's going on with ratio? And amp? Ratio, for FM synthesis operators, means the ratio of the frequency for that operator and the base note. So oscillator 0 will be played a 20% of the base note, and oscillator 1 will be the frequency of the base note. And for amp, that's something called "beta" in FM synthesis, which describes the strength of the modulation. Note we are having beta go down over 1,000 milliseconds using a breakpoint. That's key to the "bell ringing out" effect.
Ok, we've set up the oscillators. Now, let's hear it!
alles.send(osc=2, note=60, vel=3)You should hear a bell-like tone. Nice. Another classic two operator tone is to instead modulate the higher tone with the lower one, to make a filter sweep. Let's do it over 5 seconds.
alles.reset()
alles.send(osc=0,ratio=0.2,amp=0.5,bp0_target=alles.TARGET_AMP,bp0="0,0,5000,1,0,0")
alles.send(osc=1,ratio=1)
alles.send(osc=2,algorithm=0,wave=alles.ALGO,algo_source="-1,-1,-1,-1,0,1")
Just a refresher on breakpoints; here we are saying to set the beta parameter (amplitude of the modulating tone) to 0.5 but have it start at 0 at time 0, then be at 1.0x of 0.5 (so, 0.5) at time 5000ms. At the release of the note, set beta immediately to 0. We can play it with
alles.send(osc=2,vel=2,note=50)Nice. You can see there's limitless ways to make interesting evolving noises.
Karplus-strong (KS) is a simple technique for synthesizing string instruments. You can play one at a time per speaker. You just need to remember to set the feedback parameter to something useful.
alles.reset()
alles.send(osc=0,wave=alles.KS,note=60,vel=1,feedback=0.996)Alles comes with a set of 67 drum-like and instrument PCM samples to use as well, as they are normally hard to render with additive or FM synthesis. You can use the type PCM and patch numbers 0-66 to explore them. Their native pitch is used if you don't give a frequency or note parameter, but you can change that.
alles.send(osc=0, wave=alles.PCM, vel=1, patch=10) # cowbell
alles.send(osc=0, wave=alles.PCM, vel=1, patch=10, note=70) # higher cowbell!
You can turn on sample looping, helpful for instruments, using feedback:
alles.send(wave=alles.PCM,vel=1,patch=21,feedback=0) # clean guitar string, no looping
alles.send(wave=alles.PCM,vel=1,patch=21,feedback=1) # loops forever until note off
alles.send(vel=0) # note off
alles.send(wave=alles.PCM,vel=1,patch=35,feedback=1) # nice violinMake sure you read the main Alles README for more details!!
There's some real neat tricks Alles can do if you are adventurous. They require some computer setup, but it's not that complicated. We've tested this on recent Mac computers and Linux. Once you've completed the setup, you can build your own software Alles speaker and also generate your own partials from any audio and play them acros the mesh. Very fun!
If you've never done this sort of thing before, I recommend first installing Homebrew on your computer. It's safe and quick to get some necessary dev tools set up. Check if you have it already by typing brew in the Terminal. If not, copy and paste this line:
/bin/bash -c "$(curl -fsSL https://raw.githubusercontent.com/Homebrew/install/HEAD/install.sh)"After that, make sure you're in the root of the Alles repository (like cd Downloads/alles-main/) and install the things you need. (If you've done this stuff before, you need Python 3, swig and ffmpeg, and the Python modules pydub and numpy.)
brew install python3 swig ffmpeg
python3.9 -m pip install pydub numpy --user
tar xvf loris-1.8.tar
cd loris-1.8
CPPFLAGS=`python3-config --includes` PYTHON=`which python3.9` ./configure --with-python
make
sudo make install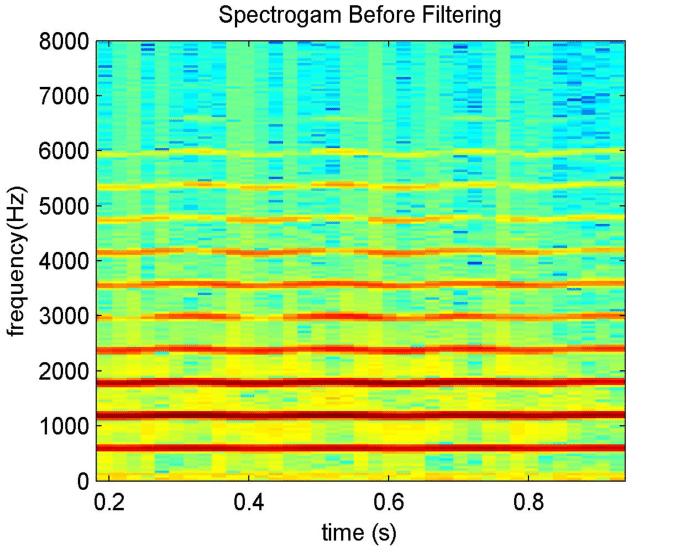
cd ..As part of that setup you installed Loris, which is one of the better sine wave decomposition tools. (There's some others, if you get into this I recommend the great simpl project to A/B test Loris against MQ or SMS.) Loris analyzes PCM audio into sets of partials (think of it as a sine wave over time in a spectrogram), each with a series of breakpoints, each specifying time, frequency, amplitude, bandwidth and phase. The PARTIALS presets you played with above are based on Loris analysis of instrument samples. But you can make your own analyses and control Alles using them.
import partials
(m,s) = partials.sequence("sleepwalk.mp3")
109 partials and 1029 breakpoints, max oscs used at once was 8

partials.play(s, amp_ratio=2, bw_ratio=0)
sleepwalk.mp4
You can see, given any audio file, you can hear a sine wave decomposition version of it across Alles. This particular sound emitted 109 partials, with a total of 1029 breakpoints among them to play back to the mesh. Of those 109 partials, only 8 are active at once. partials.sequence() performs voice stealing to ensure we use as few oscillators as necessary to play back a set.
There's a lot of parameters you can (and should!) play with in Loris. partials.sequence and partials.playtakes the following with their defaults:
def sequence(filename, # any audio filename
                max_len_s = 10, # analyze first N seconds
                amp_floor=-30, # only accept partials at this amplitude in dB, lower #s == more partials
                hop_time=0.04, # time between analysis windows, impacts distance between breakpoints
                max_oscs=alles.OSCS, # max Alles oscs to take up, can be > 64 if using multiple speakers
                freq_res = 10, # freq resolution of analyzer, higher # -- less partials & breakpoints
                freq_drift=20, # max difference in Hz within a single partial
                analysis_window = 100 # analysis window size
                ) # returns (metadata, sequence)

def play(sequence, # from partials.sequence
                osc_offset=0, # start at this oscillator #
                sustain_ms = -1, # if the instrument should sustain, here's where (in ms)
                sustain_len_ms = 0, # how long to sustain for
                time_ratio = 1, # playback speed -- 0.5 , half speed
                pitch_ratio = 1, # frequency scale, 0.5 , half freq
                amp_ratio = 1, # amplitude scale,
                bw_ratio = 1, # bandwidth / noise scale
                round_robin=True # play back one partial per speaker in a round robin
                )
Hopefully you can experiment with this setup and make some great music.
The speakers are great for live performance and installing throughout a forest, but in your studio you may want something hooked into your setup to record or route to different effects. The way to do this is to boot up an Alles speaker (or many!) on your computer directly. If your computer is on the same network as your speakers, the programs will act just like all the other speakers in the mesh, and should stay in sync.
All you have to do is compile the program called alles and run it locally. It's the same code as gets booted on the speaker, just running on your computer instead. If you've followed the setup instructions, just
cd main
make
./alles
Multicast IF is 192.168.1.85. Client tag (not ID) is 1. Listening on 232.10.11.12:9294
Using device ID 2, device Studio 1824c, channel -1  (all)
Now any message sent to the mesh will also play out your default audio output.
Alles on the desktop has some optional startup parameters to help you run them on different networks and set the output to different sound cards. For example, I can have one Alles speaker running on each output of my 18-output USB audio interface!
./alles -h
usage: alles
    [-i multicast interface ip address, default, autodetect]
    [-d sound device id, use -l to list, default, autodetect]
    [-c sound channel, default -1 for all channels on device]
    [-o offset for client ID, use for multiple copies of this program on the same host, default is 0]
    [-l list all sound devices and exit]
    [-h show this help and exit]
If you want to run multiple Alleses on one machine, you can set the IP address and "client offset" like so:
./alles -i 192.168.1.85 -o 100 -c 0
# in a new tab in Terminal.app
./alles -i 192.168.1.85 -o 101 -c 1
# ... and so on
You'll want to set client offset to a number that won't conflict with other devices on your network; here, my assumed client offset is 85 (the last # of the IP address), but I'm adding 100 to it for the first speaker, and 101 to it for the second, and so on. That ensures that another device on my network won't steal it. In practice you'll have a private network (use the -i parameter to set the source IP for it) so this is less of a concern, but something to keep in mind when composing at home.