-
-
Notifications
You must be signed in to change notification settings - Fork 2.3k
Using BMFonts
raylib supports AngelCode sprite fonts (BMFonts).
BMFonts can be created using different programs. The better one is the official Bitmap Font Generator from AngelCode.com. Just download and install.
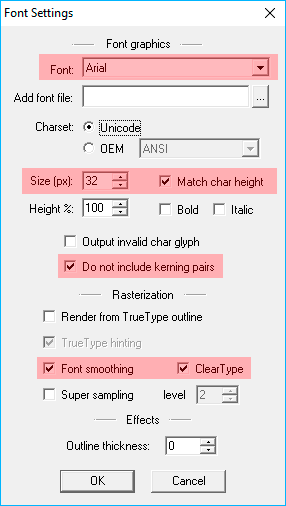
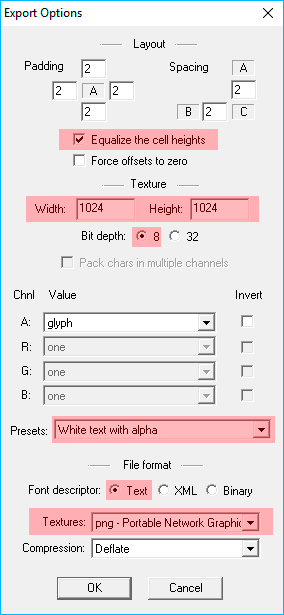
Recommended BMFont settings

Some notes:
-
Recommended to select only characters from
SPACE (32)toÿ (255), anything above this limit will be loaded but it will fail on rendering, improved support for Unicode characters is on the TODO list. -
Be careful when changing font size in BMFont
Font Settings, texture size inExport Settingsalso requires to change to fit new size (BMFont does not change this automatically),Visualizefont on BMFont to make sure everything is ok. -
raylib requires the .png file together with the .fnt text file (not binary) placed in the same folder.
Alternatively, it's possible to use the web tool Littera to generate BMFonts but due to some differences with original software, some exported fonts could not work with raylib.
The following export options for Littera are recommended:
- Included glyphs: Presets: Basic
- Format: Text (.fnt)
- Canvas size: 256 or 512 or 1024
- Power of 2 enabled
- Pack method: 7
Enjoy using SpriteFonts with raylib!
www.raylib.com | itch.io | GitHub | Discord | YouTube
- Architecture
- Syntax analysis
- Data structures
- Enumerated types
- External dependencies
- GLFW dependency
- libc dependency
- Platforms and graphics
- Input system
- Default shader
- Custom shaders
- Coding conventions
- Integration with other libs
- Working on Windows
- Working on macOS
- Working on GNU Linux
- Working on Chrome OS
- Working on FreeBSD
- Working on Raspberry Pi
- Working for Android
- Working for Web (HTML5)
- Working on exaequOS Web Computer
- Creating Discord Activities
- Working anywhere with CMake
- CMake Build Options
- raylib templates: Get started easily
- How To: Quick C/C++ Setup in Visual Studio 2022, GCC or MinGW
- How To: C# Visual Studio Setup
- How To: VSCode
- How To: Eclipse
- How To: Sublime Text
- How To: Code::Blocks
