-
Notifications
You must be signed in to change notification settings - Fork 126
FAQs
Case 1
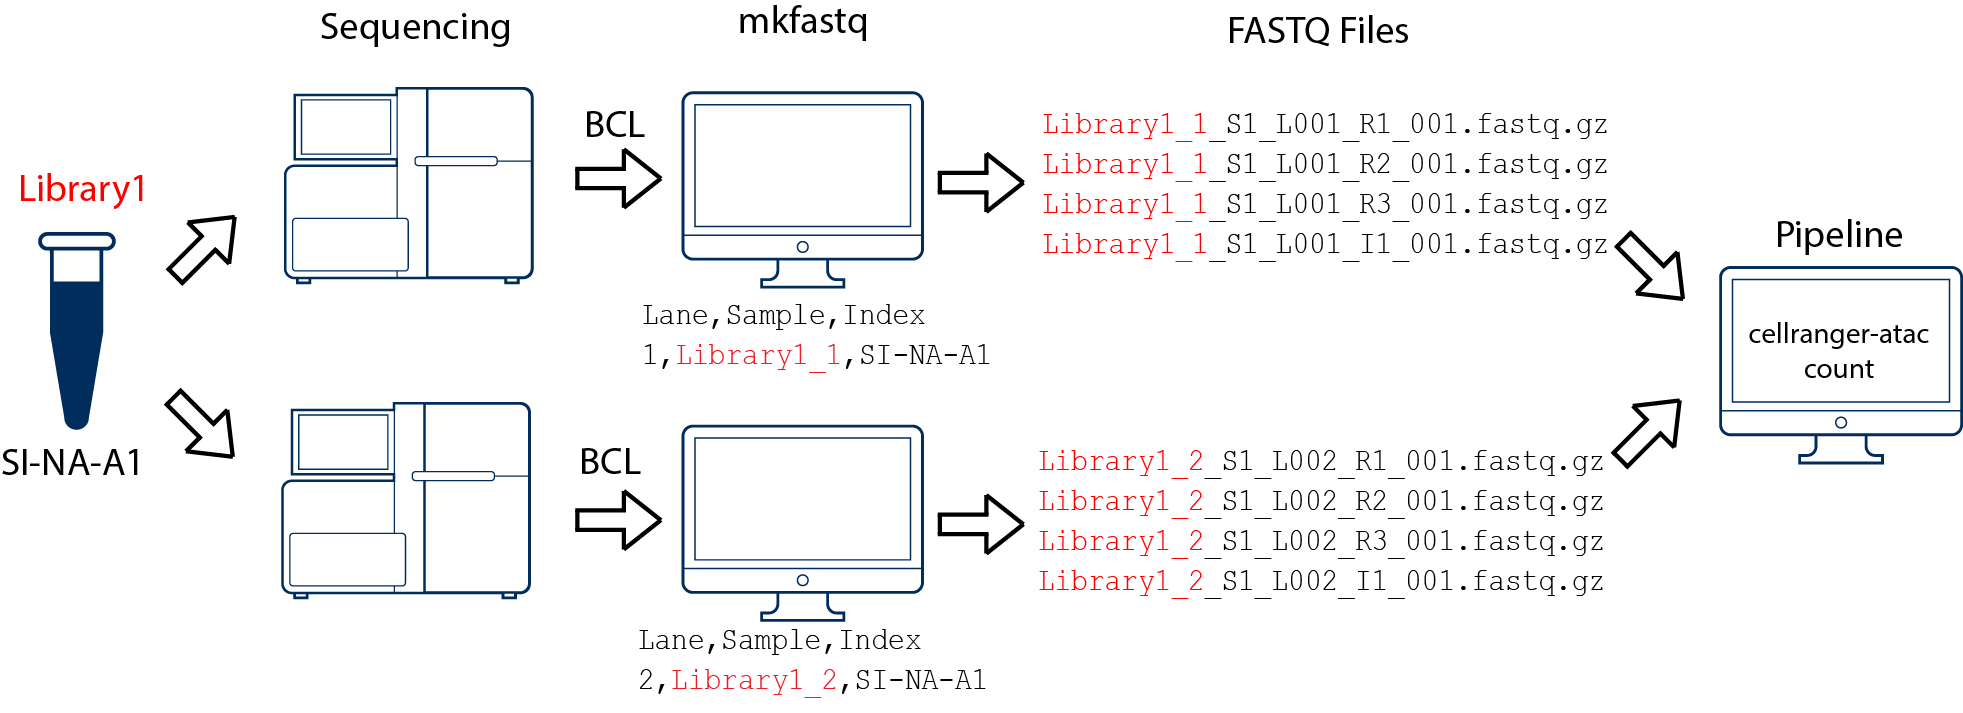
First run cellranger-atac mkfastq to generate the following demultiplexed fastq files:
Second, for each library recognize that R1 and R3 are the sequencing reads, and I1 is 16bp i5 (10x Barcode), and R2 is i7 (sample index).
Third, snaptools provide a module dex-fastq to integrate the 10X barcode into the read name.
$ snaptools dex-fastq \
    --input-fastq=Library1_1_L001_R1_001.fastq.gz \
    --output-fastq=Library1_1_L001_R1_001.dex.fastq.gz \
    --index-fastq-list Library1_1_L001_I1_001.fastq.gz

$ snaptools dex-fastq \
    --input-fastq=Library1_1_L001_R3_001.fastq.gz \
    --output-fastq=Library1_1_L001_R3_001.dex.fastq.gz \
    --index-fastq-list Library1_1_L001_I1_001.fastq.gz

$ snaptools dex-fastq \
    --input-fastq=Library1_2_L001_R1_001.fastq.gz \
    --output-fastq=Library1_2_L001_R1_001.dex.fastq.gz \
    --index-fastq-list Library1_2_L001_I1_001.fastq.gz

$ snaptools dex-fastq \
    --input-fastq=Library1_2_L001_R3_001.fastq.gz \
    --output-fastq=Library1_2_L001_R3_001.dex.fastq.gz \
    --index-fastq-list Library1_2_L001_I1_001.fastq.gz

# combine these two library
$ cat Library1_1_L001_R1_001.fastq.gz Library1_2_L001_R1_001.fastq.gz > Library1_L001_R1_001.fastq.gz
$ cat Library1_1_L001_R3_001.fastq.gz Library1_2_L001_R3_001.fastq.gz > Library1_L001_R3_001.fastq.gz
Four, run the rest of the pipeline using Library1_L001_R1_001.fastq.dex.gz and Library1_L001_R3_001.fastq.dex.gz.
Case 2
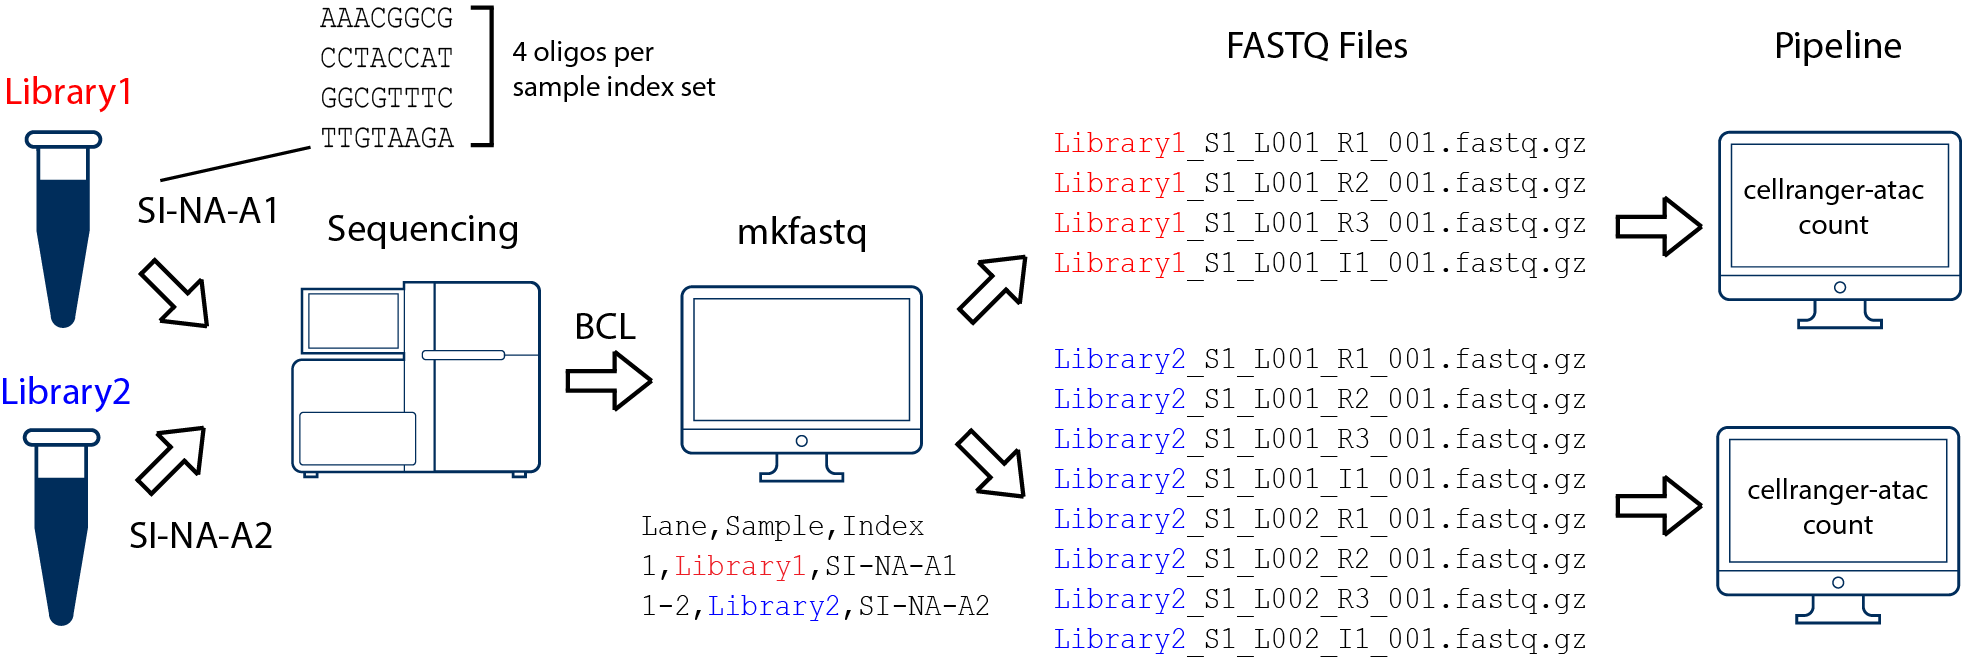
In this example, we have two 10x libraries (each processed through a separate Chromium chip channel) that are multiplexed on a single flow-cell. Note that after running cellranger-atac mkfastq, we run a separate instance of the pipeline on each library as shown in above figure.
Next, for each library integrate the barcode into the read name separately:
$ snaptools dex-fastq \
    --input-fastq=Library1_S1_L001_R1_001.fastq.gz \
    --output-fastq=Library1_S1_L001_R1_001.dex.fastq.gz \
    --index-fastq-list Library1_S1_L001_I1_001.fastq.gz

$ snaptools dex-fastq \
    --input-fastq=Library1_S1_L001_R3_001.fastq.gz \
    --output-fastq=Library1_S1_L001_R3_001.dex.fastq.gz \
    --index-fastq-list Library1_S1_L001_I1_001.fastq.gz
Four, run the rest of the pipeline using Library1_S1_L001_R1_001.fastq.dex.gz and Library1_S1_L001_R3_001.fastq.dex.gz.
There are two ways of installing SnapTools now, snaptools will be available on Anaconda very soon.
- Install from PyPi
$ pip install snaptools==1.2.5- Install from source
$ git clone https://github.com/r3fang/snaptools.git
$ cd snaptools
$ pip install -e . --user
$ ./bin/snaptools
However, you may find the installation failed on MAC OS system because neither of the methods successfully installed dependency pysam and pybedtools. This seems to be a general problem for these two packages on MAC OS. To solve this issue, we recommend to pre-install these two packages and the best way off course is through anaconda
$ conda install -c bioconda pysam
$ conda install -c bioconda pybedtools
$ pip install snaptools==1.2.5snap (Single-Nucleus Accessibility Profiles) file is a hierarchically structured hdf5 file that is specially designed for storing single nucleus ATAC-seq datasets. A snap file (version 4) contains the following sessions: header (HD), cell-by-bin accessibility matrix (AM), cell-by-peak matrix (PM), cell-by-gene matrix (GM), barcode (BD) and fragment (FM).
- HD session contains snap-file version, created date, alignment and reference genome information.
- BD session contains all unique barcodes and corresponding meta data.
- AM session contains cell-by-bin matrices of different resolutions (or bin sizes).
- PM session contains cell-by-peak count matrix. PM session contains cell-by-gene count matrix.
- FM session contains all usable fragments for each cell. Fragments are indexed for fast search. Detailed information about snap file can be found here.
In many cases, you probably already have indexed the reference genome and finished the alignments. In this case, you can skip the first two steps and directly jump to snaptools pre which takes name-sorted bam or bed file as input. Highly recommend to use unfiltered alignment file as input.
For bam file, the cell barcodes need to be integrated into the read name as below:
$ samtools view demo.bam

AAACTACCAGAAAGACGCAGTT:7001113:968:HMYT2BCX2:1:1215:20520:88475	77	*	0	0	*	*	0	0CTATGAGCACCGTCTCCGCCTCAGATGTGTATAAGAGACAGCAGAGTAAC	@DDBAI??E?1/<DCGECEHEHHGG1@GEHIIIHGGDGE@HIHEEIIHH1	AS:i:0	XS:i:0
AAACTACCAGAAAGACGCAGTT:7001113:968:HMYT2BCX2:1:1215:20520:88475	141	*	0	0	*	*	0	0GGCTTGTACAGAGCAAGTGCTGAAGTCCCTTTCTGATGACGTTCAACAGC	0<000/<<1<D1CC111<<1<1<111<111<<CDCF1<1<DHH<<<<C11	AS:i:0	XS:i:0
AAACTACCAGAAAGACGCAGTT:7001113:968:HMYT2BCX2:1:2201:20009:41468	77	*	0	0	*	*	0	0CGGTGCCCCTGTCCTGTTCGTGCCCACCGTCTCCGCCTCAGATGTGTATA	DDD@D/D<DHIHEHCCF1<<CCCGH?GHI1C1DHIII0<1D1<111<1<1	AS:i:0	XS:i:0
AAACTACCAGAAAGACGCAGTT:7001113:968:HMYT2BCX2:1:2201:20009:41468	141	*	0	0	*	*	0	0GAGCGAGGGCGGCAGAGGCAGGGGGAGGAGACCCGGTGGCCCGGCAGGCT	0<00</<//<//<//111000/<</</<0<1<1<//<<0<DCC/<///<D	AS:i:0	XS:i:0

$ snaptools snap-pre  \
	--input-file=demo.bam  \
	--output-snap=demo.snap  \
	--genome-name=mm10  \
	--genome-size=mm10.chrom.sizes  \
	--min-mapq=30  \
	--min-flen=0  \
	--max-flen=1000  \
	--keep-chrm=TRUE  \
	--keep-single=TRUE  \
	--keep-secondary=False  \
	--overwrite=True  \
	--min-cov=100  \
	--verbose=True
for bed file, the barcode should be the 4th column:
$ zcat demo.bed.gz | head

chr2	74358918	74358981	AACGAGAGCTAAAGACGCAGTT
chr6	134212048	134212100	AACGAGAGCTAAAGACGCAGTT
chr10	93276785	93276892	AACGAGAGCTAAAGACGCAGTT
chr2	128601366	128601634	AACGAGAGCTAAAGCGCATGCT
chr16	62129428	62129661	AACGAGAGCTAACAACCTTCTG
chr8	84946184	84946369	AACGAGAGCTAACAACCTTCTG

$ snaptools snap-pre  \
	--input-file=demo.bed.gz  \
	--output-snap=demo.snap  \
	--genome-name=mm10  \
	--genome-size=mm10.chrom.sizes  \
	--min-mapq=30  \
	--min-flen=0  \
	--max-flen=1000  \
	--keep-chrm=TRUE  \
	--keep-single=TRUE  \
	--keep-secondary=False  \
	--overwrite=True  \
	--min-cov=100  \
	--verbose=True
