-
Notifications
You must be signed in to change notification settings - Fork 29
Log search
This document describes how to construct log search system with Hatohol.
Hatohol targets a system that has a large number of hosts. In the system, it is bother that viewing multiple logs because you may need to log in some hosts.
Hatohol improves the case by providing a log search system. The log search system collects logs from all hosts. You can view multiple logs on one log search system.
The log search system stores all logs to Groonga. Groonga is a full-text search engine. Groonga is good for fast update. Log search system requires fast update for real time search. So Groonga is a suitable full-text search engine for log search system.
Log search system should be integrated with [log archive system](Log archive). Because, normally, all logs aren't needed to be searchable.
If you want all logs to be searchable at all times, full-text search engine should have all logs at all times. It requires more system resources.
If your most use case needs searchable logs in only the latest 3 months, you don't need to use resources for logs in the latest 3 months before. If you need to search old logs, you can load the old logs at the time. The old logs can be loaded from log archive system.
To integrate log archive system, monitoring target nodes don't parse log format. (Log archive system requires logs as-is.) Logs are parsed in log parsing nodes. Log parsing nodes parse logs and forward parsed logs to a log search node. A log search node receives parsed logs and stores the logs to Groonga ran at the localhost.
You can search logs from Groonga's administration HTML page. The page can be accessed from Hatohol's administration page.
Here is the log search system:
+-------------+ +-------------+ +-------------+ Monitoring
|Fluentd      | |Fluentd      | |Fluentd      | target
+-------------+ +-------------+ +-------------+ nodes
collects and    collects and    collects and
forwards logs   forwards logs   forwards logs
|                     |               |
| secure connection   |               |
|                     |               |
\/                    \/              \/
+-------------+ +-------------+
|Fluentd      | |Fluentd      | Log parsing nodes
+-------------+ +-------------+
parses and      parses and
forwards logs   forwards logs
|               /
| secure connection
|             /
\/          \/_
+-------------+                   -+
|Fluentd      |                    |
+-------------+                    |
store logs                         |
|                                  |
| localhost (insecure connection)  | Log search node
|                                  |
\/                                 |
+-------------+                    |
|Groonga      |                    |
+-------------+                   -+
/\
|
| HTTP
|
search logs
+-------------+
|Web browser  | Client
+-------------+
You need to set up the following node types:
- Log search node
- Log parsing node
- Monitoring target node
The following subsections describe about how to set up each node type.
You need to set up Fluentd on all nodes. This section describes common set up procedure.
Fluentd recommends to install ntpd to use valid timestamp.
See also: Before Installing Fluentd | Fluentd
Install and run ntpd:
% sudo yum install -y ntp
% sudo chkconfig ntpd on
% sudo service ntpd start
Install Fluentd:
% curl -L http://toolbelt.treasuredata.com/sh/install-redhat.sh | sh
% sudo chkconfig td-agent on
Note: td-agent is a Fluentd distribution provided by Treasure Data, Inc.. Td-agent provides init script. So it is suitable for server use.
Install Groonga:
% sudo rpm -ivh http://packages.groonga.org/centos/groonga-release-1.1.0-1.noarch.rpm
% sudo yum makecache
% sudo yum install -y groonga-httpd
% cd /tmp
% wget http://packages.groonga.org/source/groonga-admin/groonga-admin-0.9.1.tar.gz
% tar xvf groonga-admin-0.9.1.tar.gz
% sudo cp -r groonga-admin-0.9.1/html /usr/share/groonga/html/groonga-admin
% sudo sed -i'' -e 's,/admin;,/groonga-admin;,' /etc/groonga/httpd/groonga-httpd.conf
% sudo chkconfig groonga-httpd on
% sudo service groonga-httpd start
Install the following Fluentd plugins:
% sudo /usr/lib64/fluent/ruby/bin/gem install fluent-plugin-secure-forward
% sudo /usr/lib64/fluent/ruby/bin/gem install fluent-plugin-groonga
Configure Fluentd:
% sudo mkdir -p /var/spool/td-agent/buffer/
% sudo chown -R td-agent:td-agent /var/spool/td-agent/
Create /etc/td-agent/td-agent.conf:
<source>
  type secure_forward
  shared_key fluentd-secret
  self_hostname search.example.com
  cert_auto_generate yes
</source>

<match log>
  type groonga
  store_table Logs

  protocol http
  host 127.0.0.1

  buffer_type file
  buffer_path /var/spool/td-agent/buffer/groonga
  flush_interval 1

  <table>
    name Terms
    flags TABLE_PAT_KEY
    key_type ShortText
    default_tokenizer TokenBigram
    normalizer NormalizerAuto
  </table>

  <table>
    name Hosts
    flags TABLE_PAT_KEY
    key_type ShortText
    # normalizer NormalizerAuto
  </table>

  <table>
    name Timestamps
    flags TABLE_PAT_KEY
    key_type Time
  </table>

  <mapping>
    name host
    type Hosts
    <index>
      table Hosts
      name logs_index
    </index>
  </mapping>

  <mapping>
    name timestamp
    type Time
    <index>
      table Timestamps
      name logs_index
    </index>
  </mapping>

  <mapping>
    name message
    type Text
    <index>
      table Terms
      name logs_message_index
    </index>
  </mapping>
</match>
A log search node expects message tag is log.
Start Fluentd:
% sudo service td-agent start
Install the following Fluentd plugins:
% sudo /usr/lib64/fluent/ruby/bin/gem install fluent-plugin-secure-forward
% sudo /usr/lib64/fluent/ruby/bin/gem install fluent-plugin-forest
% sudo /usr/lib64/fluent/ruby/bin/gem install fluent-plugin-parser
% sudo /usr/lib64/fluent/ruby/bin/gem install fluent-plugin-record-reformer
Configure Fluentd:
% sudo mkdir -p /var/spool/td-agent/buffer/
% sudo chown -R td-agent:td-agent /var/spool/td-agent/
Create /etc/td-agent/td-agent.conf:
<source>
  type secure_forward
  shared_key fluentd-secret
  self_hostname parser1.example.com
  cert_auto_generate yes
</source>

<match raw.*.log.**>
  type forest
  subtype parser

  <template>
    key_name message
  </template>

  <case raw.messages.log.**>
    remove_prefix raw
    format syslog
  </case>
</match>

<match *.log.*.**>
  type record_reformer
  enable_ruby false

  tag ${tag_parts[1]}

  <record>
    host ${tag_suffix[2]}
    type ${tag_parts[0]}
    timestamp ${time}
  </record>
</match>

<match log>
  type secure_forward
  shared_key fluentd-secret
  self_hostname parser1.example.com

  buffer_type file
  buffer_path /var/spool/td-agent/buffer/secure-forward
  flush_interval 1

  <server>
    host search.example.com
  </server>
</match>
A log parsing node expects message tag is the following format:
raw.${type}.log.${host_name}
For example:
raw.messages.log.node1
raw.apache2.log.node2
Start Fluentd:
% sudo service td-agent start
Confirm host name is valid:
% hostname
node1.example.com
If host name isn't valid, you can set host name by the following:
% sudo vi /etc/sysconfig/network
(Change HOSTNAME= line.)
% sudo service network restart
% hostname
node1.example.com
(Confirm your host name.)
% sudo service rsyslog restart
Install the following Fluentd plugins:
% sudo /usr/lib64/fluent/ruby/bin/gem install fluent-plugin-secure-forward
% sudo /usr/lib64/fluent/ruby/bin/gem install fluent-plugin-config-expander
Configure Fluentd:
% sudo mkdir -p /var/spool/td-agent/buffer/
% sudo chown -R td-agent:td-agent /var/spool/td-agent/
% sudo chmod g+r /var/log/messages
% sudo chgrp td-agent /var/log/messages
Create /etc/td-agent/td-agent.conf:
<source>
  type config_expander
  <config>
    type tail
    path /var/log/messages
    pos_file /var/log/td-agent/messages.pos
    tag raw.messages.log.${hostname}
    format none
  </config>
</source>

<match raw.*.log.**>
  type copy

  <store>
    type secure_forward
    shared_key fluentd-secret
    self_hostname node1.example.com

    buffer_type file
    buffer_path /var/spool/td-agent/buffer/secure-forward-parser
    flush_interval 1

    <server>
      host parser1.example.com
    </server>
    <server>
      host parser2.example.com
    </server>
  </store>
</match>
Monitoring target node configuration for log search system can be shared with the configuration for [log archive system](Log archive).
You can share configuration by adding more <store> sub section into
<match raw.*.log.**> section:
<match raw.*.log.**>
  type copy

  <store>
    # ...
  </store>

  <store>
    type secure_forward
    shared_key fluentd-secret
    self_hostname node1.example.com

    buffer_type file
    buffer_path /var/spool/td-agent/buffer/secure-forward-router
    flush_interval 1

    <server>
      host router1.example.com
    </server>
    <server>
      host router2.example.com
    </server>
  </store>
</match>
Start Fluentd:
% sudo service td-agent start
You need to register log search system to Hatohol to integrate log search system with Hatohol. You can log search on Hatohol Web UI after you register log search system to Hatohol.
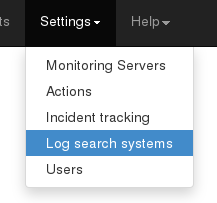
Choose "Log search systems" configuration view from navigation bar:

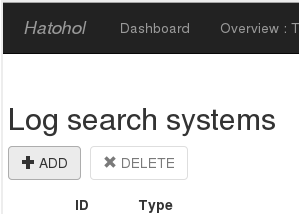
Choose "ADD" button in "Log search systems" configuration view:

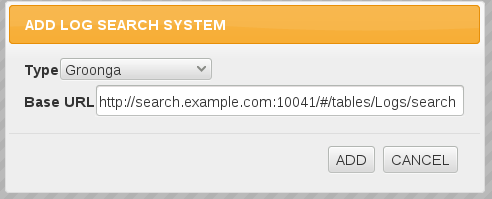
Then you can get a form to register a log search system. You need fill the form with the following configurations:
- Type:
Groonga(Default) - Base URL:
http://search.example.com:10041/#/tables/Logs/search

You can register new log search system to Hatohol by pushing "ADD button.
You can search logs by free word after you register a log search system. You can find log search form at dashboard view:

You're moved to log search system by submitting the log search form.
TODO: Add screen shot for log search system.