A full featured Homeassistant component to drive Meross devices. This component is based on the underlying MerossIot library available here.
My personal goal is to make this component fully compliant with Homeassistant, so that it may be added as the official library to handle Meross devices. However, before pushing a PullRequest to the official Homeassistant repository, I would like to share it to some users. In this way we can test it massively, check it for any bug and make it robust enough to be seamlessly integrated with Homeassistant.
For now, the component has been integrated as a custom component into HACS.
You can install this component in two ways: via HACS or manually. HACS is a nice community-maintained components manager, which allows you to install git-hub hosted components in a few clicks. If you have already HACS installed on your HomeAssistant, it's better to go with that. On the other hand, if you don't have HACS installed or if you don't plan to install it, then you can use manual installation.
If you have HACS, well, it's a piece of cake! Just search for "Meross" (Full name is Meross Cloud IoT) in the default repository of HACS and it'll show up! Clock on Install: when done, proceed with component setup.
-
Download the latest zip release archive from here (or clone the git master branch)
-
Unzip/copy the meross_cloud direcotry within the
custom_componentsdirectory of your homeassistant installation. Thecustom_componentsdirectory resides within your homeassistant configuration directory. Usually, the configuration directory is within your home (~/.homeassistant/). In other words, the configuration directory of homeassistant is where the config.yaml file is located. After a correct installation, your configuration directory should look like the following.└── ... └── configuration.yaml └── secrects.yaml └── custom_components └── meross_cloud └── __init__.py └── common.py └── cover.py └── ...Note: if the custom_components directory does not exist, you need to create it.
Once the component has been installed, you need to configure it in order to make it work. There are two ways of doing so:
- Using the web interface (Lovelace) [recommended]
- Manually editing the configuration.yaml file
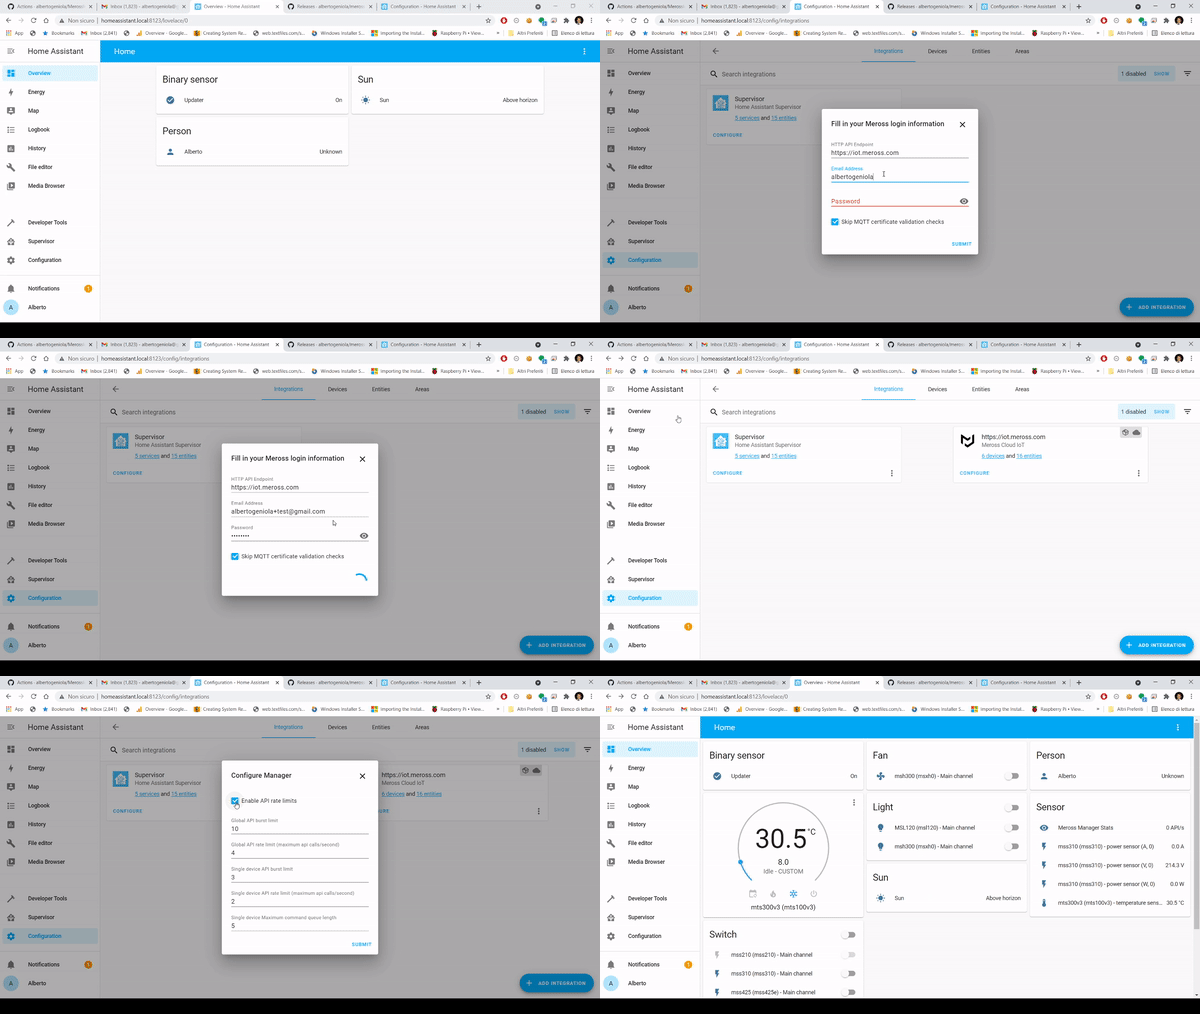
Simply add a new "integration" and look for Meross among the proposed ones. The following animation shows how to do that.
Follow these steps only if the previous configuration method did not work for you.
-
Setup your meross cloud credentials. Edit/create the
secrets.yamlfile, which is located within the config directory as well. Add the following:meross_username: [email protected] meross_password: my_meross_passwordWhere [email protected] is your Meross account email and my_meross_password is the associated password.
-
Enable the component by editing the configuration.yaml file (within the config directory as well). Edit it by adding the following lines:
meross_cloud:
  username: !secret meross_username
  password: !secret meross_password
Note! In this case you do not need to replace meross_username and meross_password. Those are place holders that homeassistant automatically replaces by looking at the secrets.yaml file.
-
Reboot hassio
-
Congrats! You're all set!
This library supports all the Meross devices currently exposed by the Meross IoT library. In particular Bulbs, Switches, Garage Door Openers and Smart Valves/Thermostat are fully supported and perfectly integrated with HomeAssistant.
Since I'm aiming at making this component part of the official HA repo, I've put a lot of effort following HomeAssistant best practices, in particular:
- Asynchronous functions when possible;
- No polling: the library is event-based. It saves bandwidth and makes the UI much more reactive.
- Robust to disconnection: the library handles network disruption;
- Lovelace notification: supports UI persistent event notification;
- PEP8 code styling
- Discovery implementation
- Refactor and improvements based on feedbacks
- Automated test
By buying me a coffee, not only you make my development more efficient, but also motivate me to further improve my work. On the other hand, buying me a beer will certainly make me happier: a toast to you, supporter!


