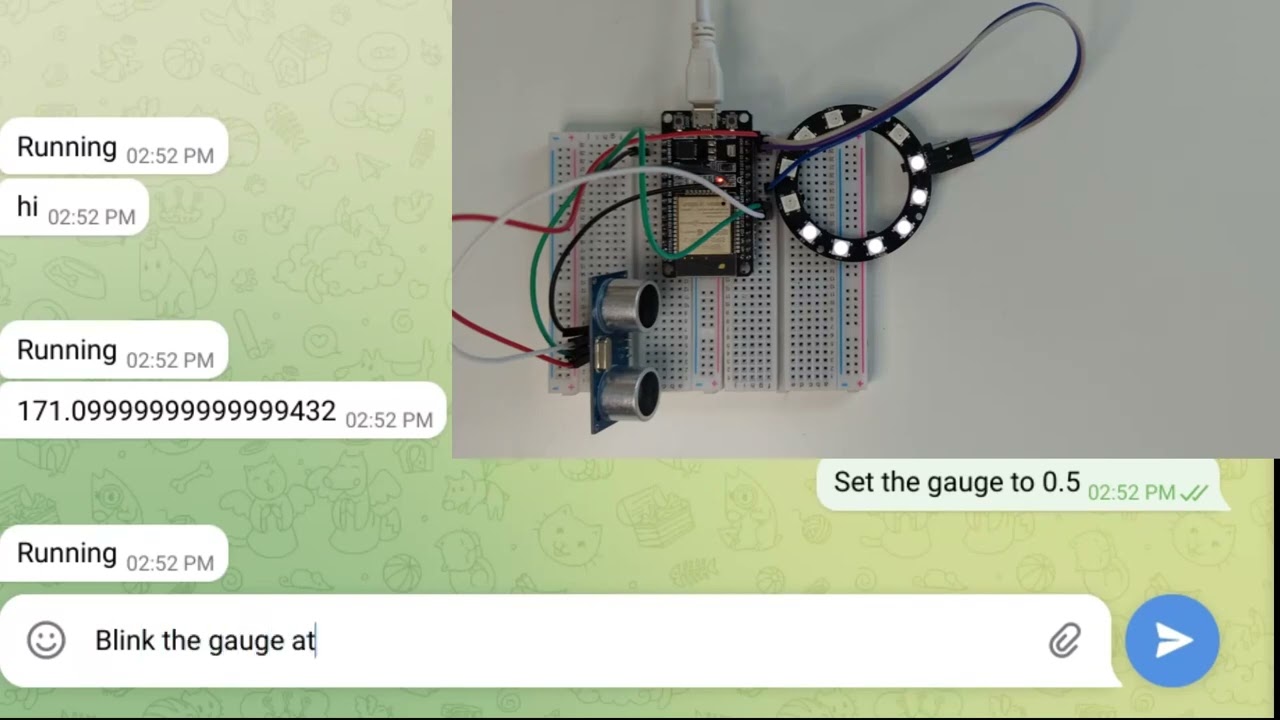
This application uses the device_bot package to give an ESP32 some intelligence.
In the video below, OpenAI simply gets the description for how to control the LedRing. For simplicity we call it a "gauge".
class LedRing:
  pin_/gpio.Pin
  strip_/pixel_strip.PixelStrip

  constructor:
    pin_ = gpio.Pin LED_RING_PIN
    strip_ = pixel_strip.PixelStrip.uart --pin=pin_ 12

  functions -> List:
    return [
      Function
          --syntax="set_gauge(<value>)"
          --description="Sets the gauge to the given value, which must be between 0 and 1."
          --action=:: | args/List |
            value := args[0]
            set_gauge value,
    ]

  set_gauge value/num:
    cut_off := 12 * value
    pixel_values := ByteArray 12: it < cut_off ? 0x10 : 00
    strip_.output pixel_values pixel_values pixel_values

  close:
    pin_.close
It's trivial to add more functions to the application. As long as there
is a Function object that describes the function, OpenAI can use it.
Make sure you have Toit installed. The easiest is to use Jaguar.
Install the dependencies (in this directory; or add --project_root=<DIR>).
- with Jaguar:
jag pkg install - with pure Toit:
toit.pkg install
If you are using Jaguar (preferred), flash it to your device:
jag flash
Create a new Telegram bot by running /newbot. '@BotFather' will as you
for a name and username, then provide the authentication token.
If you want your bot to be able to chat in groups, you need to disable
"Groups Privacy": go into the settings, by running /mybots and select
the bot you just created. Go to the "Group Privacy" section and disable
it.
Create an account at https://platform.openai.com/, and create an API key in the api-keys page.
Take the provided telegram_esp32-example.toit and copy/rename it to
telegram_esp32.toit (or telegram_esp32_<suffix>.toit if you want to
run multiple bots).
Change the credentials in that file, then do the usual Jaguar installation steps:
- optionally start the serial monitor:
jag monitor - run the bot:
jag run telegram_esp32.toit
If you want to install the bot so it runs on boot:
- install the bot:
jag container install bot telegram_esp32.toit
If you have questions, please ask on the Toit Discord.
Create a new application on the Discord Developer Portal.
Go to the 'Bot' tab (on the left) and click on 'Add Bot', followed by 'Yes, do it!'.
Depending on your preferences make the bot public or private. Since you are paying for the OpenAI API calls, you probably want to make it private.
Make sure to enable the priviliged gateway intents. Specifically, you need the 'Message Content Intent' (and maybe 'Server Members Intent' as well).
Click on the 'Reset Token' (next to the Icon) and copy/save the token.
Go to the OAuth2 tab (on the left) and go to URL Generator. Select the 'bot' scope (and no other) with the following permissions:
- Read Messages/View Channels
- Send Messages
- Send Messages in Threads
Copy/save the generated URL.
Take the provided discord_esp32-example.toit and copy/rename it to
discord_esp32.toit (or discord_esp32_<suffix>.toit if you want to
run multiple bots).
Change the credentials in that file, then do the usual Jaguar installation steps:
- optionally start the serial monitor:
jag monitor - run the bot:
jag run discord_esp32.toit
If you want to install the bot so it runs on boot:
- install the bot:
jag container install bot discord_esp32.toit
If you have questions, please ask on the Toit Discord.