Skip to content
New issue

Have a question about this project? Sign up for a free GitHub account to open an issue and contact its maintainers and the community.

By clicking “Sign up for GitHub”, you agree to our terms of service and privacy statement. We’ll occasionally send you account related emails.

Already on GitHub? Sign in to your account

Spring boot 入门之Hello World #193

Open
felix-cao opened this issue Dec 20, 2020 · 2 comments
Open

Spring boot 入门之Hello World #193

felix-cao opened this issue Dec 20, 2020 · 2 comments

Comments

@felix-cao
Copy link
Owner

felix-cao commented Dec 20, 2020

一、环境搭建

1.1、安装 JDK8

使用 sdkman 安装 JDK8

$ sdk install java 8.0.275.open-adpt

详情请阅读 使用 sdkman 安装并维护多个版本的 JDK

1.2、安装 IDEA

详情请阅读 IntelliJ IDEA 2020.3激活破解教程(亲测激活至 2089 年,长期更新)

二、New Project

File ->New Project -> Spring Initializr(图2.1)-> Java Version 8(图2.2)->选择 Dependencies(图2.3)

image
图2.1

image
图2.2

image
图2.3

删除 pom.xml 里的下面, 否则加载很慢

<dependency>
    <groupId>org.springframework.boot</groupId>
    <artifactId>spring-boot-starter-test</artifactId>
    <scope>test</scope>
    <exclusions>
        <exclusion>
            <groupId>org.junit.vintage</groupId>
            <artifactId>junit-vintage-engine</artifactId>
        </exclusion>
    </exclusions>
</dependency>
# ......

<build>
    <plugins>
        <plugin>
            <groupId>org.springframework.boot</groupId>
            <artifactId>spring-boot-maven-plugin</artifactId>
        </plugin>
    </plugins>
</build>

此时,已经有了 Spring 项目的骨架。
SpringBoot 提供的这些“开箱即用”的依赖模块都约定以 spring-boot-starter- 作为命名的前缀,并且皆位于 org.springframework.boot 包或者命名空间下

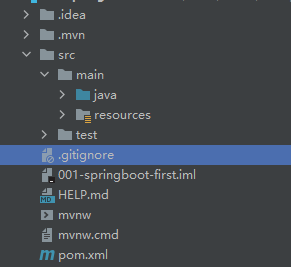
工程目录结构
image

三、Hello World

1.1 新建 HelloController.java

image
输入如下代码

package com.example.demo;

import org.springframework.stereotype.Controller;
import org.springframework.web.bind.annotation.RequestMapping;
import org.springframework.web.bind.annotation.ResponseBody;

@Controller
public class HelloController {
    @RequestMapping("/hello")
    @ResponseBody
    public String HelloPage() {
        return "Hello World";
    }
}

1.2 创建 AppConfig

创建 AppConfig.java

package com.example.demo;

import org.springframework.boot.SpringApplication;
import org.springframework.boot.autoconfigure.SpringBootApplication;

@SpringBootApplication
public class AppConfig {
    public static void main(String[] args){
        SpringApplication.run(AppConfig.class, args);
    }
}

右键 Run AppConfig

127.0.0.0:8080/hello, 跑一跑看看

SpringBootApplication,这个Annotation 是以下三个注解的合体:

所以,如果我们使用如下的 SpringBoot 启动类:

@Configuration
@EnableAutoConfiguration
@ComponentScanpublic
public class AppConfig {
    public static void main(String[] args){
        SpringApplication.run(AppConfig.class, args);
    }
}

四、总结

4.1 Sprint boot skeleton

  • 这里使用 IDEASpring initializr 来创建 Sprint boot 项目 skeleton 骨架,
  • 骨架,就是项目基础架构构建工具,通俗的说,算是大杂烩吧,通过知识点的综合累积,以及实际业务的开发需求,最终通过 Skeleton 来实现减少代码量,提高代码质量,加快项目开发速度。

4.2 重要的文件结构

  • src/main/java 路径下的 AppConfig.java 类 :程序入口
  • src/main/resources 路径下的 application.properties :项目配置文件
  • src/test :单元测试文件路径
    SpringBoot工程代码存放的位置:程序入口文件同级目录及其子目录

4.3 pom.xml

pom 中指定 parent 为以下内容,表示此项目继承了 spring-boot-starter-parentmaven 配置(主要是指定了常用依赖、插件的版本)。

<parent>
    <groupId>org.springframework.boot</groupId>
    <artifactId>spring-boot-starter-parent</artifactId>
    <version>2.3.7.RELEASE</version>
    <relativePath/> <!-- lookup parent from repository -->
</parent>

此外,pom 中默认引入两个依赖包,和一个插件。

<dependencies>
 <dependency>
  <groupId>org.springframework.boot</groupId>
  <artifactId>spring-boot-starter-web</artifactId>
 </dependency>

 <dependency>
  <groupId>org.springframework.boot</groupId>
  <artifactId>spring-boot-starter-test</artifactId>
  <scope>test</scope>
 </dependency>
</dependencies>

<build>
 <plugins>
  <plugin>
   <groupId>org.springframework.boot</groupId>
   <artifactId>spring-boot-maven-plugin</artifactId>
  </plugin>
 </plugins>
</build>
  • spring-boot-starter-web:核心模块,包括自动配置支持、日志和 YAML
  • spring-boot-starter-test:测试模块,包括 JUnitHamcrestMockito
  • spring-boot-maven-pluginspring boot 插件, 提供了一系列 spring boot 相关的 maven 操作。
    • spring-boot:build-info,生成 Actuator 使用的构建信息文件 build-info.properties
    • spring-boot:repackage,默认 goal。在 mvn package 之后,再次打包可执行的 jar/war,同时保留 mvn package 生成的 jar/war.origin
    • spring-boot:run,运行 Spring Boot 应用
    • spring-boot:start,在 mvn integration-test 阶段,进行 Spring Boot 应用生命周期的管理
    • spring-boot:stop,在 mvn integration-test 阶段,进行 Spring Boot 应用生命周期的管理
@felix-cao felix-cao reopened this Dec 20, 2020
@felix-cao felix-cao changed the title Sprint boot 入门之Hello World Spring boot 入门之Hello World Dec 21, 2020
@felix-cao
Copy link
Owner Author

felix-cao commented Dec 27, 2020

Another way

按照官方的例子,先创建 Maven 工程
File ->New Project -> Maven(勾选Create from archetype, 注意要选择正确的 JAVA SDK ) 点 next 后 输入如下信息

image

导入依赖

点击 pom.xml 输入如下信息:

<parent>
    <groupId>org.springframework.boot</groupId>
    <artifactId>spring-boot-starter-parent</artifactId>
    <version>2.3.7.RELEASE</version>
    <relativePath/> <!-- lookup parent from repository -->
</parent>
<dependencies>
 <dependency>
  <groupId>org.springframework.boot</groupId>
  <artifactId>spring-boot-starter-web</artifactId>
 </dependency>
</dependencies>

刷新即可加载 spring-boot-starter-parentspring-boot-starter-web 依赖

image

创建 package 和 HelloWorldService.class

src/main/java 中创建新的包 com.felix.service
com.felix.service 创建新的 java class HelloWorldService, 接下来参考 步骤三

@felix-cao
Copy link
Owner Author

Cannot resolve symbol 'java'

按照 使用 sdkman 安装并维护多个版本的 JDK 方法,安装JDK8时,提示错误

image

其实图中已经提示 “JDK corretto-1.8....”

解决方法:
配置正确的 SDK 路径
File -> Project settings -> Project
File -> Platform settings -> SDKS

Sign up for free to join this conversation on GitHub. Already have an account? Sign in to comment
Labels
None yet
Projects
None yet
Development

No branches or pull requests

1 participant