forked from bigtreetech/BIGTREETECH-TouchScreenFirmware
-
Notifications
You must be signed in to change notification settings - Fork 14
/
README.md_btt
736 lines (494 loc) · 47.4 KB
/
README.md_btt
1
2
3
4
5
6
7
8
9
10
11
12
13
14
15
16
17
18
19
20
21
22
23
24
25
26
27
28
29
30
31
32
33
34
35
36
37
38
39
40
41
42
43
44
45
46
47
48
49
50
51
52
53
54
55
56
57
58
59
60
61
62
63
64
65
66
67
68
69
70
71
72
73
74
75
76
77
78
79
80
81
82
83
84
85
86
87
88
89
90
91
92
93
94
95
96
97
98
99
100
101
102
103
104
105
106
107
108
109
110
111
112
113
114
115
116
117
118
119
120
121
122
123
124
125
126
127
128
129
130
131
132
133
134
135
136
137
138
139
140
141
142
143
144
145
146
147
148
149
150
151
152
153
154
155
156
157
158
159
160
161
162
163
164
165
166
167
168
169
170
171
172
173
174
175
176
177
178
179
180
181
182
183
184
185
186
187
188
189
190
191
192
193
194
195
196
197
198
199
200
201
202
203
204
205
206
207
208
209
210
211
212
213
214
215
216
217
218
219
220
221
222
223
224
225
226
227
228
229
230
231
232
233
234
235
236
237
238
239
240
241
242
243
244
245
246
247
248
249
250
251
252
253
254
255
256
257
258
259
260
261
262
263
264
265
266
267
268
269
270
271
272
273
274
275
276
277
278
279
280
281
282
283
284
285
286
287
288
289
290
291
292
293
294
295
296
297
298
299
300
301
302
303
304
305
306
307
308
309
310
311
312
313
314
315
316
317
318
319
320
321
322
323
324
325
326
327
328
329
330
331
332
333
334
335
336
337
338
339
340
341
342
343
344
345
346
347
348
349
350
351
352
353
354
355
356
357
358
359
360
361
362
363
364
365
366
367
368
369
370
371
372
373
374
375
376
377
378
379
380
381
382
383
384
385
386
387
388
389
390
391
392
393
394
395
396
397
398
399
400
401
402
403
404
405
406
407
408
409
410
411
412
413
414
415
416
417
418
419
420
421
422
423
424
425
426
427
428
429
430
431
432
433
434
435
436
437
438
439
440
441
442
443
444
445
446
447
448
449
450
451
452
453
454
455
456
457
458
459
460
461
462
463
464
465
466
467
468
469
470
471
472
473
474
475
476
477
478
479
480
481
482
483
484
485
486
487
488
489
490
491
492
493
494
495
496
497
498
499
500
501
502
503
504
505
506
507
508
509
510
511
512
513
514
515
516
517
518
519
520
521
522
523
524
525
526
527
528
529
530
531
532
533
534
535
536
537
538
539
540
541
542
543
544
545
546
547
548
549
550
551
552
553
554
555
556
557
558
559
560
561
562
563
564
565
566
567
568
569
570
571
572
573
574
575
576
577
578
579
580
581
582
583
584
585
586
587
588
589
590
591
592
593
594
595
596
597
598
599
600
601
602
603
604
605
606
607
608
609
610
611
612
613
614
615
616
617
618
619
620
621
622
623
624
625
626
627
628
629
630
631
632
633
634
635
636
637
638
639
640
641
642
643
644
645
646
647
648
649
650
651
652
653
654
655
656
657
658
659
660
661
662
663
664
665
666
667
668
669
670
671
672
673
674
675
676
677
678
679
680
681
682
683
684
685
686
687
688
689
690
691
692
693
694
695
696
697
698
699
700
701
702
703
704
705
706
707
708
709
710
711
712
713
714
715
716
717
718
719
720
721
722
723
724
725
726
727
728
729
730
731
732
733
734
735
736
<!-- omit in toc -->
# BigTreeTech TFT Touchscreen
<a href="https://github.com/bigtreetech/BIGTREETECH-TouchScreenFirmware/blob/master/LICENSE"><img alt="license" src="https://img.shields.io/github/license/bigtreetech/bigtreetech-TouchScreenFirmware.svg"></a>
[](https://github.com/bigtreetech/BIGTREETECH-TouchScreenFirmware/graphs/contributors)
<a href="https://github.com/bigtreetech/BIGTREETECH-TouchScreenFirmware/archive/refs/heads/master.zip"><img alt="release date" src="https://img.shields.io/github/last-commit/bigtreetech/BIGTREETECH-TouchScreenFirmware/master.svg?label=release%20date"></a>
[](https://github.com/bigtreetech/BIGTREETECH-TouchScreenFirmware/actions/workflows/buildBinary.yml)
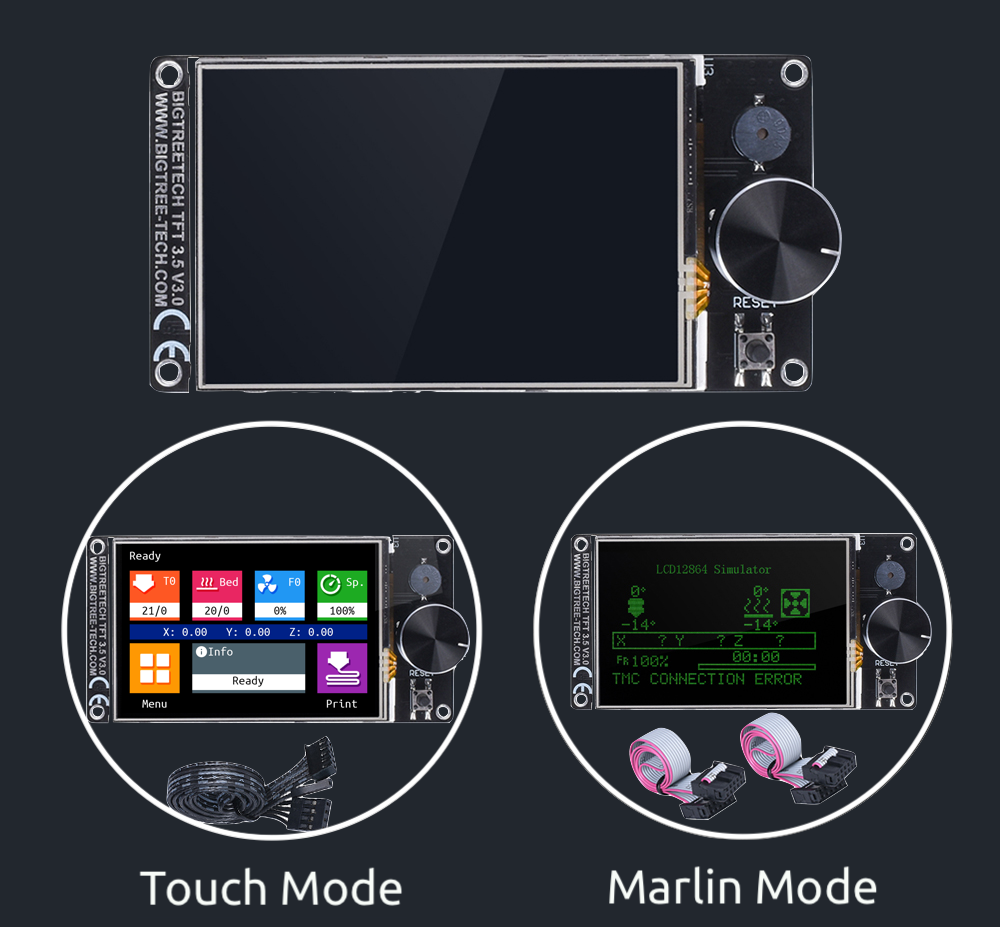
Important information related to BigTreeTech's TFT touchscreen 3D printer controllers
<!-- omit in toc -->
## Table of Contents
- [Supported Screens](#supported-screens)
- [Software Repository](#software-repository)
- [Marlin Dependencies](#marlin-dependencies)
- [Connecting the TFT to the Mainboard](#connecting-the-tft-to-the-mainboard)
- [Touch Mode Setup](#touch-mode-setup)
- [Setting the Baudrate on the TFT Firmware](#setting-the-baudrate-on-the-TFT-firmware)
- [Marlin Mode Setup](#marlin-mode-setup)
- [Menus and Themes](#menus)
- [Firmware Update](#firmware-update)
- [Deployment Files](#deployment-files)
- [Firmware Binary](#firmware-binary)
- [Fonts and Icons](#fonts-and-icons)
- [Configuration File](#configuration-file)
- [Optional - Language Files](#optional---language-files)
- [Configuration](#configuration)
- [Editing the Configuration File](#editing-the-configuration-file)
- [Installation](#installation)
- [Post Installation](#post-installation)
- [Configuration Update](#configuration-update)
- [Touch Screen Calibration](#touch-screen-calibration)
- [Forcing the Touch Screen Calibration](#forcing-the-touch-screen-calibration)
- [Hard Reset](#hard-reset)
- [Resetting to Default Settings](#resetting-to-default-settings)
- [Customization](#customization)
- [Bootscreen and Icons](#bootscreen-and-icons)
- [Firmware](#firmware)
- [Vertical Screen Orientation - Portrait Mode](#vertical-screen-orientation---portrait-mode)
- [Troubleshooting](#troubleshooting)
- [Firmware Update Failed](#firmware-update-failed)
- [Worst Case Scenario](#worst-case-scenario)
- [Version History](#version-history)
- [Appendix](#appendix)
- [Printing from Host](#printing-from-host)
- [Printing from Remote Host](#printing-from-remote-host)
- [Adding Gcode Thumbnails](#adding-gcode-thumbnails)
- [TFT Screen Configuration and Support for RRF](#tft-screen-configuration-and-support-for-rrf)
- [Overview](#overview)
- [Loading the Firmware](#loading-the-firmware)
- [Configuration Changes](#configuration-changes)
- [Implemented Features](#implemented-features)
- [Menu System for Macros](#menu-system-for-macros)
- [Setup of BTT TFT35 E3 V3 with MKS SGEN L Mainboards](#setup-of-btt-tft35-e3-v3-with-mks-sgen-l-mainboards)
- [Connections](#connections)
- [Firmware](#firmware)
- [Show more statistics at the end of the print](#show-more-statistics-at-the-end-of-the-print)
## Supported Screens
Only the TFTs listed below are currently supported. Trying to install the firmware on a TFT which is not supported can harm the hardware.
**BTT TFT**
BTT_TFT24_V1.1
BTT_TFT28_V1.0 and V3.0
BTT_TFT35_V1.0, V1.1, V1.2, V2.0, V3.0, E3_V3.0 and B1_V3.0
BTT_TFT43_V3.0
BTT_TFT50_V3.0
BTT_TFT70_V3.0
**BTT GD TFT**
BTT_GD_TFT24_V1.1
BTT_GD_TFT35_V2.0, V3.0, E3_V3.0 and B1_V3.0
BTT_GD_TFT43_V3.0
BTT_GD_TFT50_V3.0
BTT_GD_TFT70_V3.0
**MKS TFT**
MKS_TFT28_V3.0 and V4.0
MKS_TFT28_NEW_GENIUS
MKS_TFT32_V1.3 and V1.4
MKS_TFT32L_V3.0
MKS_TFT35_V1.0
**MKS GD TFT**
MKS_GD_TFT28_V1.2-4 (V1.2 and V1.4)
**WARNING:** BTT does not officially provide MKS TFT hardware support. MKS TFT is maintained by open source contributors and BTT does not bear any risk of MKS TFT hardware using this firmware.
## Software Repository
Firmware source: https://github.com/bigtreetech/BIGTREETECH-TouchScreenFirmware
Main branch: **Master**
</br>In the **Master** branch you will find:
- The most recent source code updates
- The most recent resources such as precompiled firmwares, themes, configuration and language files
**IMPORTANT NOTE:** The **Master** branch is currently the **ONLY** branch in the project to be used. The other currently existing branches **develop** and **release-xx.27** are outdated and **MUST NOT** be used.
## Marlin Dependencies
Minimum Marlin firmware version: **2.1.1**<br>
Distribution date: **2022-09-22**<br>
Firmware source: https://github.com/MarlinFirmware/Marlin/releases<br>
To use all the features and functionalities supported by the TFT,
the following options must be enabled in Marlin firmware.
**General options which MUST be always activated:**
`EEPROM_SETTINGS` (in Configuration.h)<br>
`BABYSTEPPING` (in Configuration_adv.h)<br>
`AUTO_REPORT_TEMPERATURES` (in Configuration_adv.h)<br>
`AUTO_REPORT_POSITION` (in Configuration_adv.h)<br>
`EXTENDED_CAPABILITIES_REPORT` (in Configuration_adv.h)<br>
`M115_GEOMETRY_REPORT` (in Configuration_adv.h)<br>
`M114_DETAIL` (in Configuration_adv.h)<br>
`REPORT_FAN_CHANGE` (in Configuration_adv.h)<br>
**Options to support printing from onboard media:**
`SDSUPPORT` (in Configuration.h)<br>
`LONG_FILENAME_HOST_SUPPORT` (in Configuration_adv.h)<br>
`AUTO_REPORT_SD_STATUS` (in Configuration_adv.h)<br>
`SDCARD_CONNECTION ONBOARD` (in Configuration_adv.h)<br>
**Options to support dialog with host:**
`EMERGENCY_PARSER` (in Configuration_adv.h)<br>
`SERIAL_FLOAT_PRECISION 4` (in Configuration_adv.h)<br>
`HOST_ACTION_COMMANDS` (in Configuration_adv.h)<br>
`HOST_PROMPT_SUPPORT` (in Configuration_adv.h)<br>
`HOST_STATUS_NOTIFICATIONS` (in Configuration_adv.h)<br>
**Options to support M73 with host:**
`Options to support dialog with host` (as pre requisite)<br>
`SET_PROGRESS_MANUALLY` (in Configuration_adv.h)<br>
`M73_REPORT` (in Configuration_adv.h)<br>
**Options to support ADVANCED_OK with host:**
`ADVANCED_OK` (in Configuration_adv.h)<br>
**Options to support M600 with host & (Un)Load menu:**
`Options to support dialog with host` (as pre requisite)<br>
`NOZZLE_PARK_FEATURE` (in Configuration.h)<br>
`ADVANCED_PAUSE_FEATURE` (in Configuration_adv.h)<br>
`PARK_HEAD_ON_PAUSE` (in Configuration_adv.h)<br>
`FILAMENT_LOAD_UNLOAD_GCODES` (in Configuration_adv.h)<br>
**Options to fully support Bed Leveling menu:**
`Z_MIN_PROBE_REPEATABILITY_TEST` (in Configuration.h)<br>
`G26_MESH_VALIDATION` (in Configuration.h)<br>
`Z_STEPPER_AUTO_ALIGN` (in Configuration_adv.h)<br>
## Connecting the TFT to the Mainboard
### Touch Mode Setup
In order to use the Touch Mode on your screen:
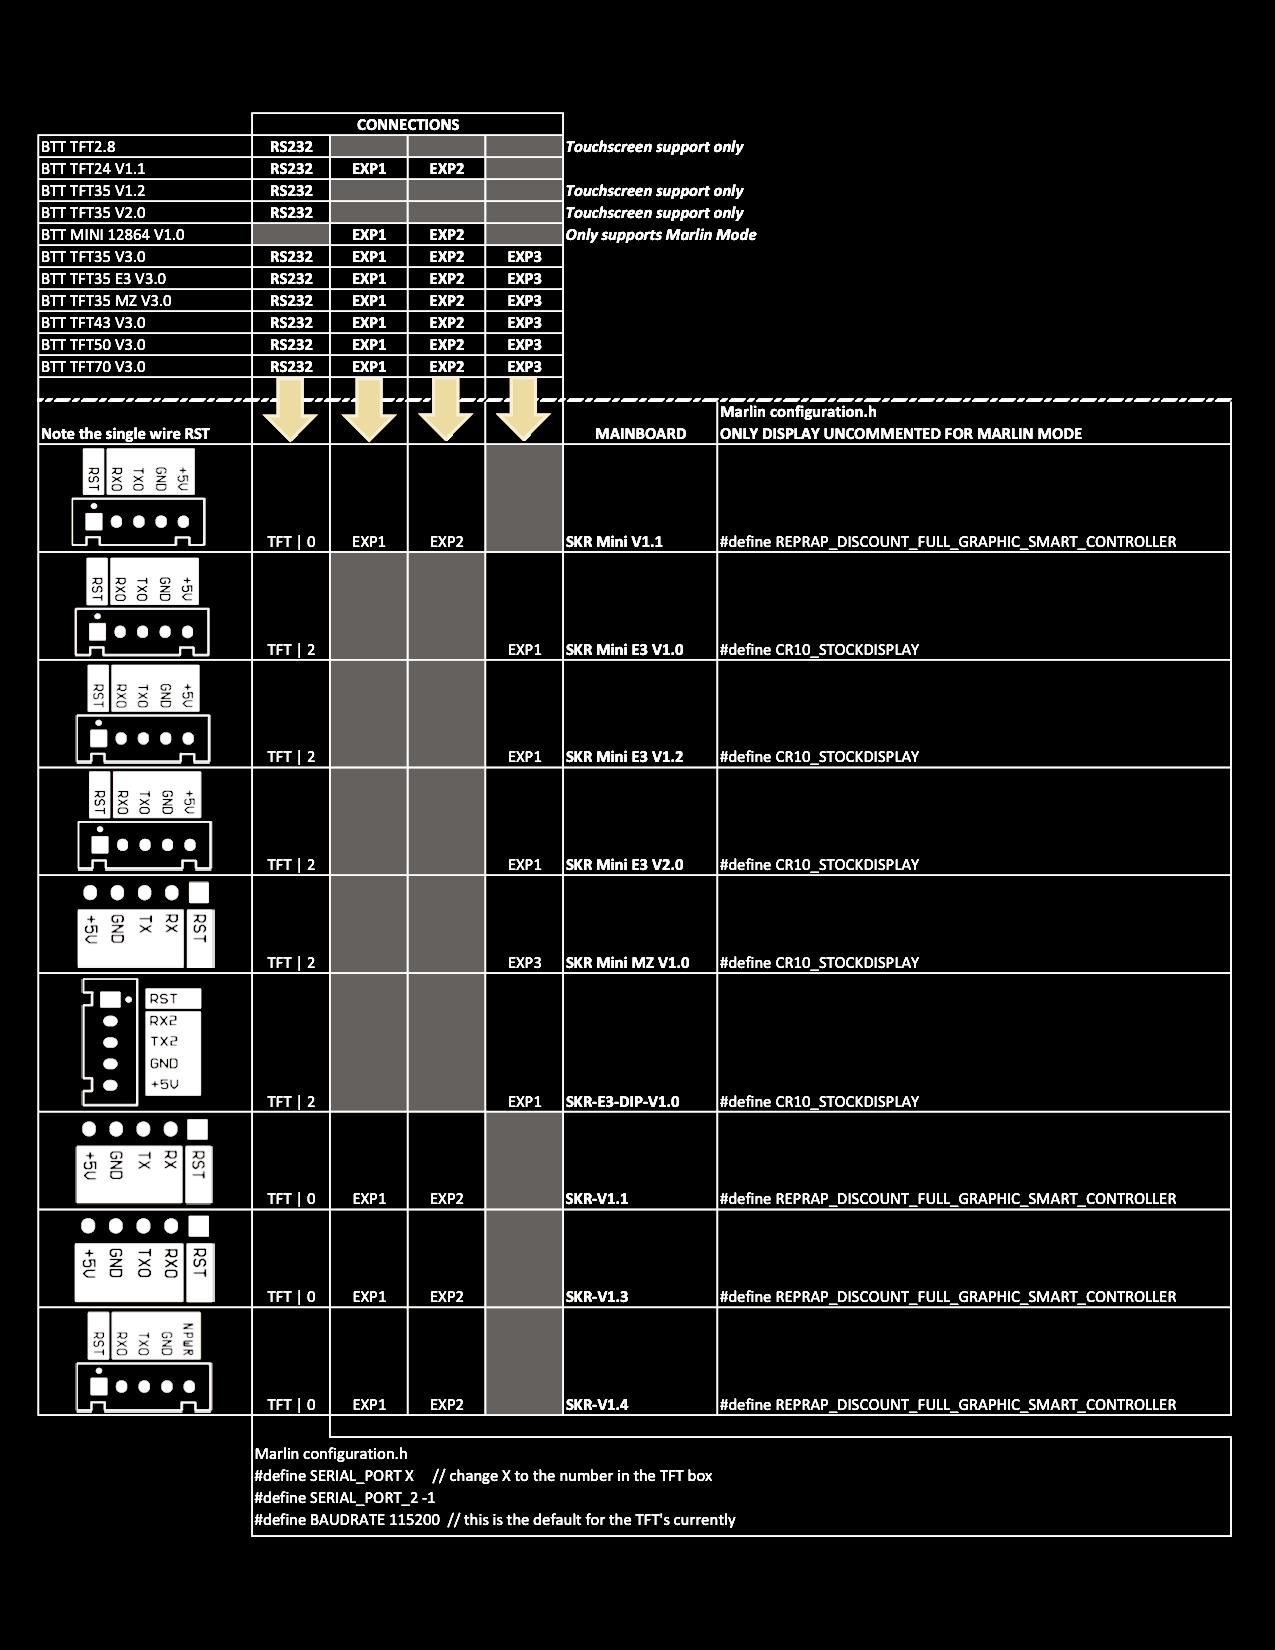
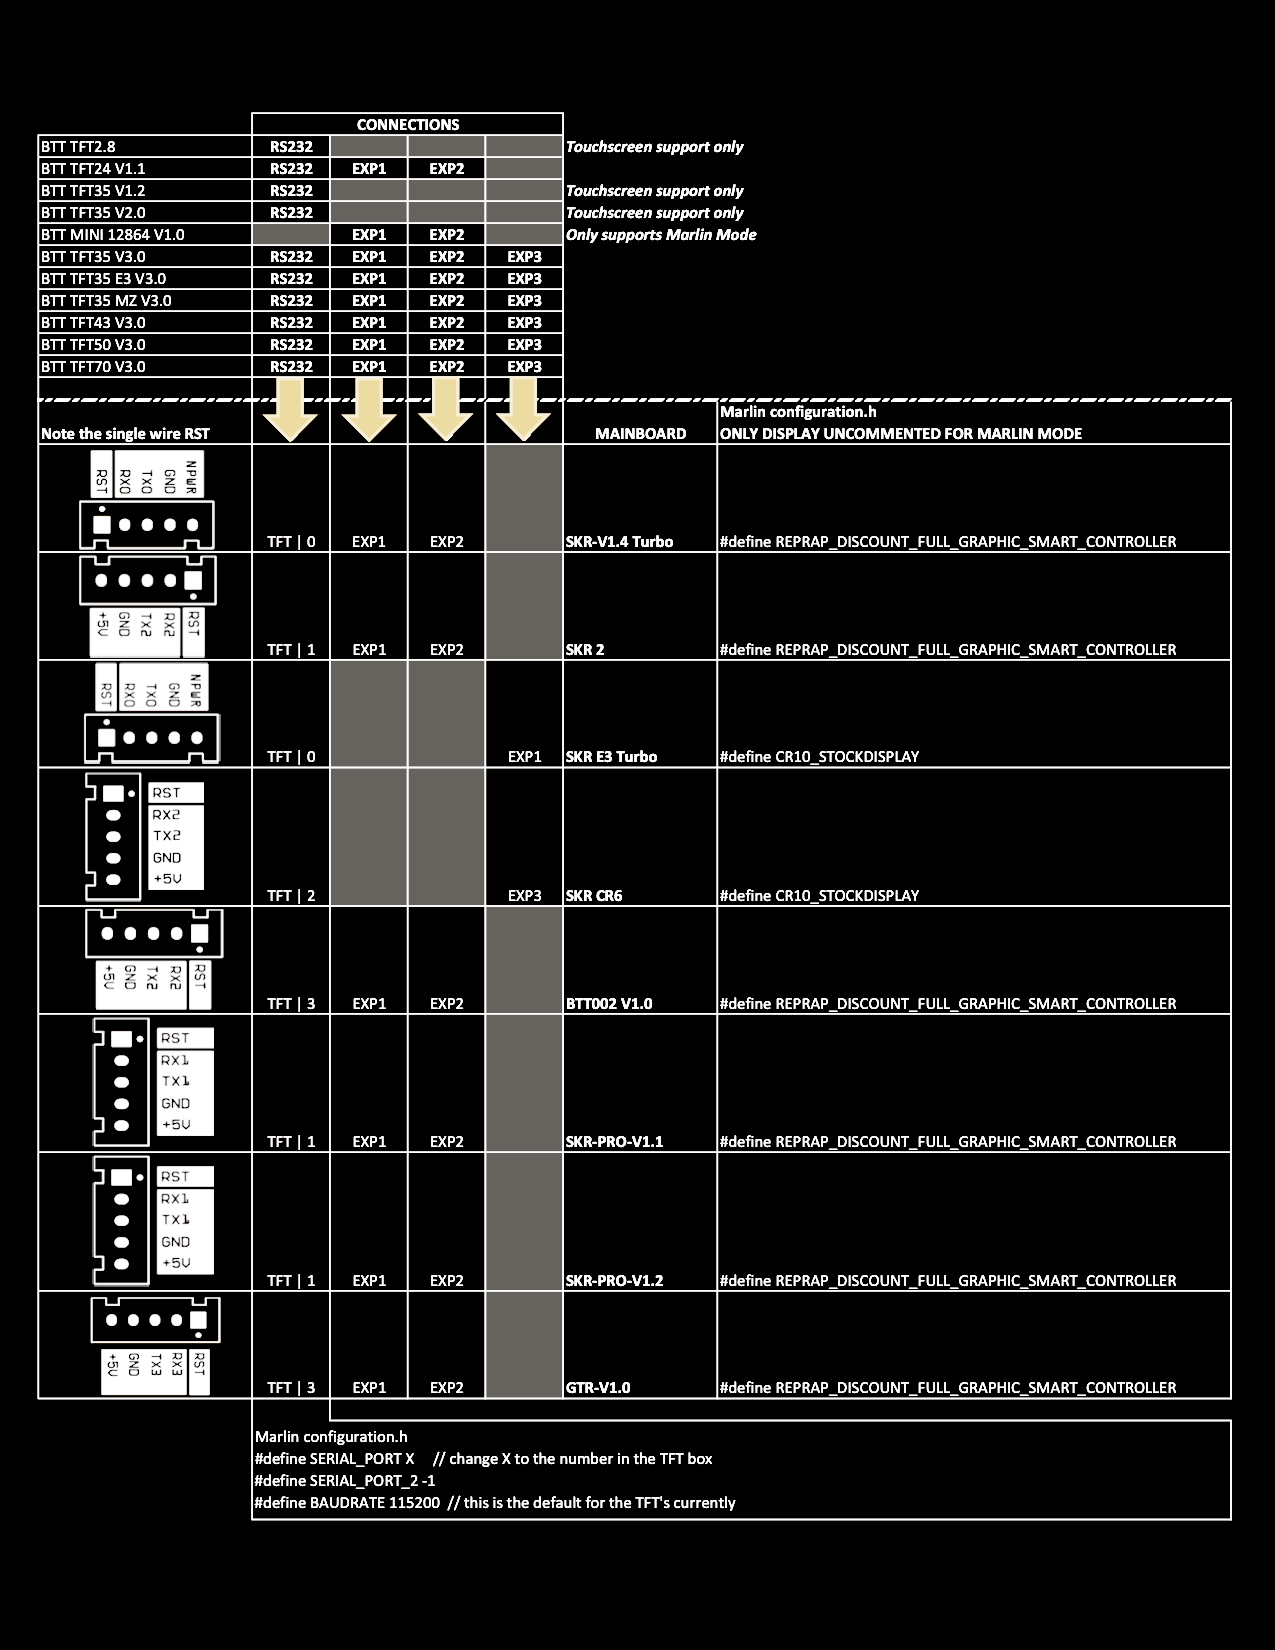
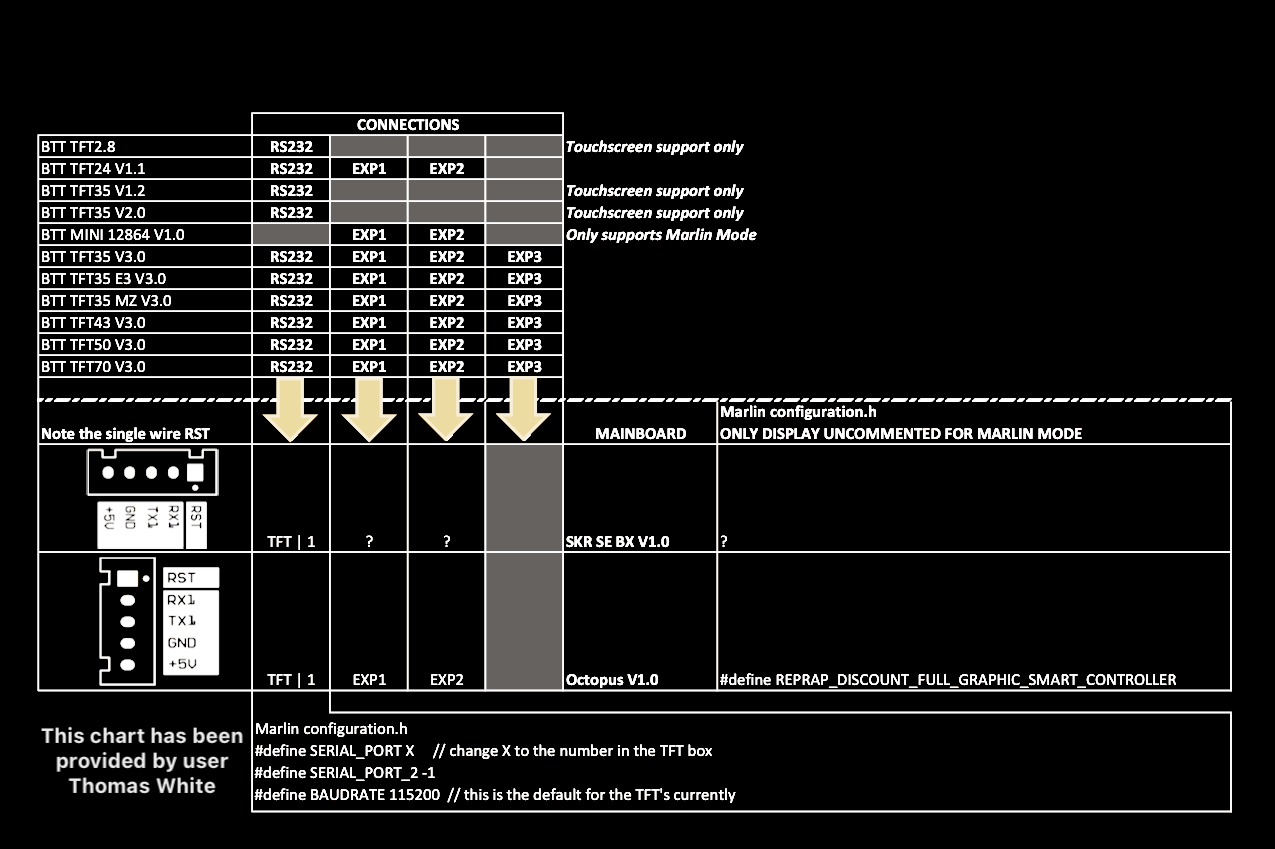
1. Connect the 5pin serial cable according to the manual of your mainboard
2. Define a serial port in Marlin, to activate the port used by the TFT
3. Make sure the same BAUDRATE is defined on both the Marlin and TFT firmwares
In case one of the three points above is not properly done, the message:
No printer attached!
will be shown at the top of the screen. This is because the TFT can not "see" the mainboard through the serial cable.
#### Setting the Baudrate on the TFT Firmware
On TFT firmware, the baudrate can be changed in two ways:
- by menu: After the firmware is installed, the baudrate can be changed from **Menu->Settings->Connection->S. Ports** menu
- by configuration file: Set the parameter `serial_port` in `config.ini` file with the proper baudrate (e.g. `serial_port:P1:6` for baudrate 115200). Please, see [Configuration](#configuration) section for configuring `config.ini` file
### Marlin Mode Setup
In order to use the Marlin Mode (emulation mode) on your screen:
1. In case your TFT does **not** have an EXP connector at all (TFT28 v1 for example), you can not use the Marlin emulator mode.
2. In case your mainboard provides **EXP1 and EXP2**, you have to connect 2 ribbon cables connecting EXP1 and EXP2 of the mainboard to EXP1 and EXP2 of the TFT. In the Marlin firmware of your mainboard, make sure that **ONLY** `REPRAP_DISCOUNT_FULL_GRAPHIC_SMART_CONTROLLER` is activated in `Configuration.h` and that all other controllers are **De**activated (especially `CR10_STOCKDISPLAY`).
3. In case you have an **"E3" mainboard** which provides a **single EXP connector**, you have to connect 1 ribbon cable connecting EXP of the mainboard to **EXP3** of the TFT. In case your TFT does **not** provide an EXP3 connector but only two 10pin connectors (TFT24 v1.1 for example) you will need a "Y-split" cable with one 10pin connector on one side (for the mainboard) and two 10pin connectors on the other side (for the TFT). In the Marlin firmware of your mainboard, make sure that **ONLY** `CR10_STOCKDISPLAY` is activated in `Configuration.h` and that all other controllers are **De**activated (especially `REPRAP_DISCOUNT_FULL_GRAPHIC_SMART_CONTROLLER`).
## Menus
| Status Screen DISABLED | Status Screen ENABLED |
| :----------------------------------------------------------: | :----------------------------------------------------------: |
| 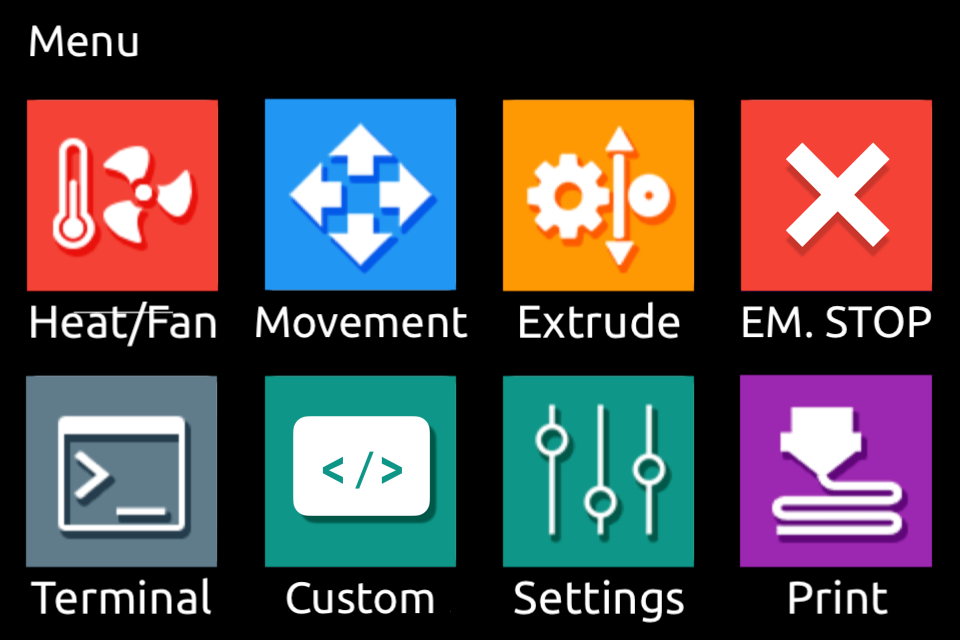 | 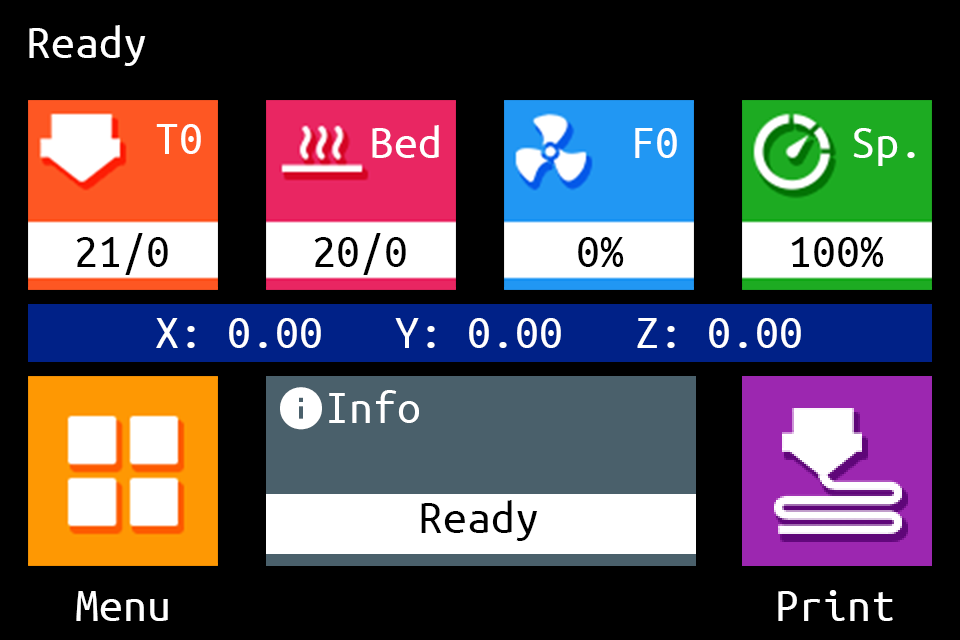 |
| If **status_screen:0** is not defined in **config.ini**, define:<br># UI Settings<br># Status Screen<br># Select the Main Screen flavour<br># Options: [disable: 0, enable: 1]<br>**status_screen:0** | If **status_screen:1** is not defined in **config.ini**, define:<br># UI Settings<br># Status Screen<br># Select the Main Screen flavour<br># Options: [disable: 0, enable: 1]<br>**status_screen:1** |
## Themes
| Unified Menu Theme | The Round Miracle Theme by **[Acenotass](https://github.com/Acenotass)** |
| :----------------------------------------------------------: | :----------------------------------------------------------: |
|  | 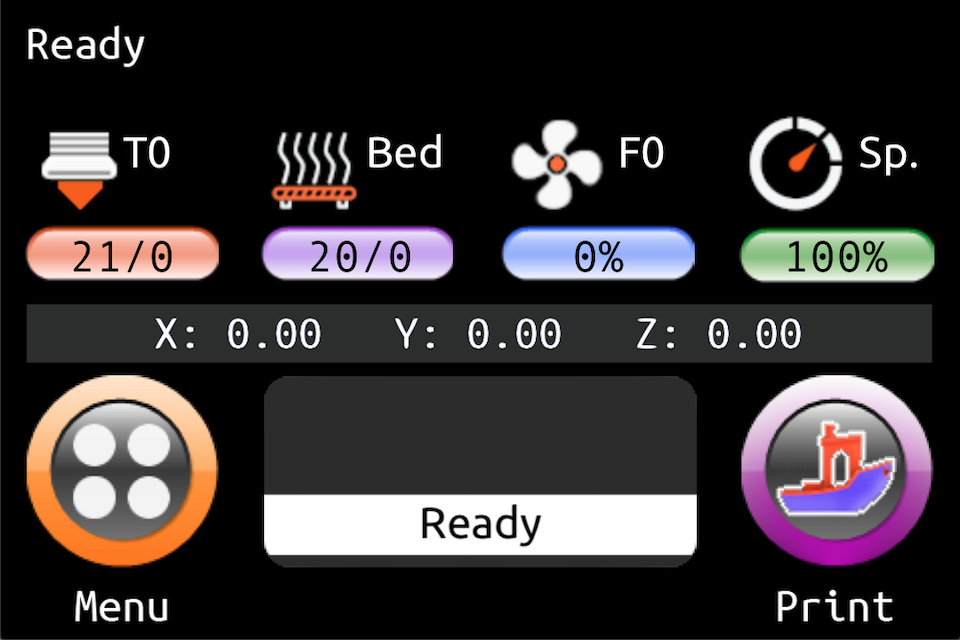 |
| Use firmware, icons, and fonts from the [`Copy to SD Card root directory to update - Unified Menu Material theme`](https://github.com/bigtreetech/BIGTREETECH-TouchScreenFirmware/tree/master/Copy%20to%20SD%20Card%20root%20directory%20to%20update/THEME_Unified%20Menu%20Material%20theme) folder | Use firmware, icons, and fonts from the [`Copy to SD Card root directory to update - The Round Miracle theme`](https://github.com/bigtreetech/BIGTREETECH-TouchScreenFirmware/tree/master/Copy%20to%20SD%20Card%20root%20directory%20to%20update/THEME_The%20Round%20Miracle%20Menu%20Material%20theme) folder |
| Hybrid Red Material Theme by **[AntoszHUN](https://github.com/AntoszHUN)** | Hybrid Mono Material Theme by **[bepstein111](https://github.com/bepstein111)** |
| :----------------------------------------------------------: | :----------------------------------------------------------: |
| 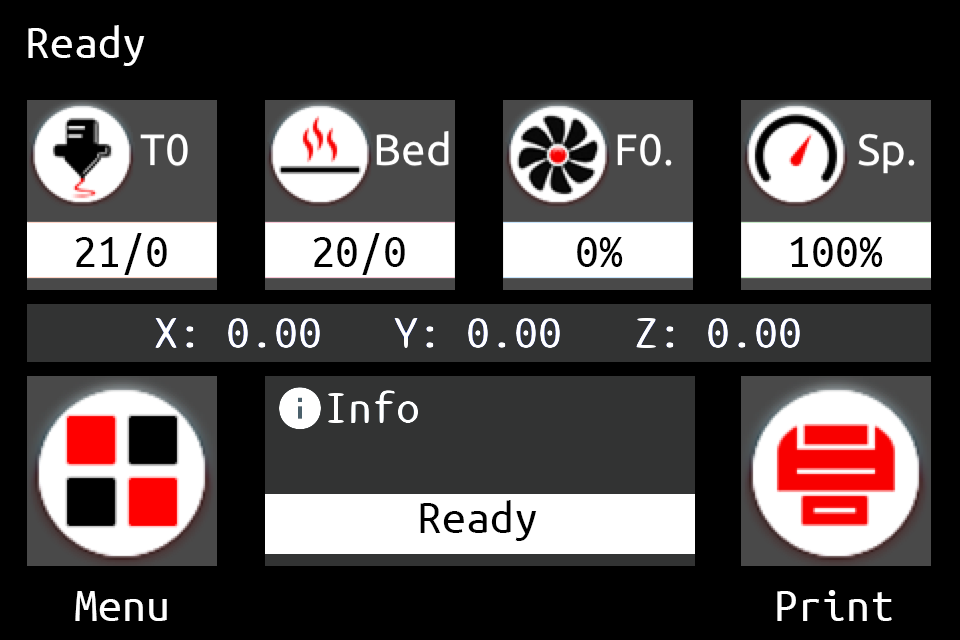 | 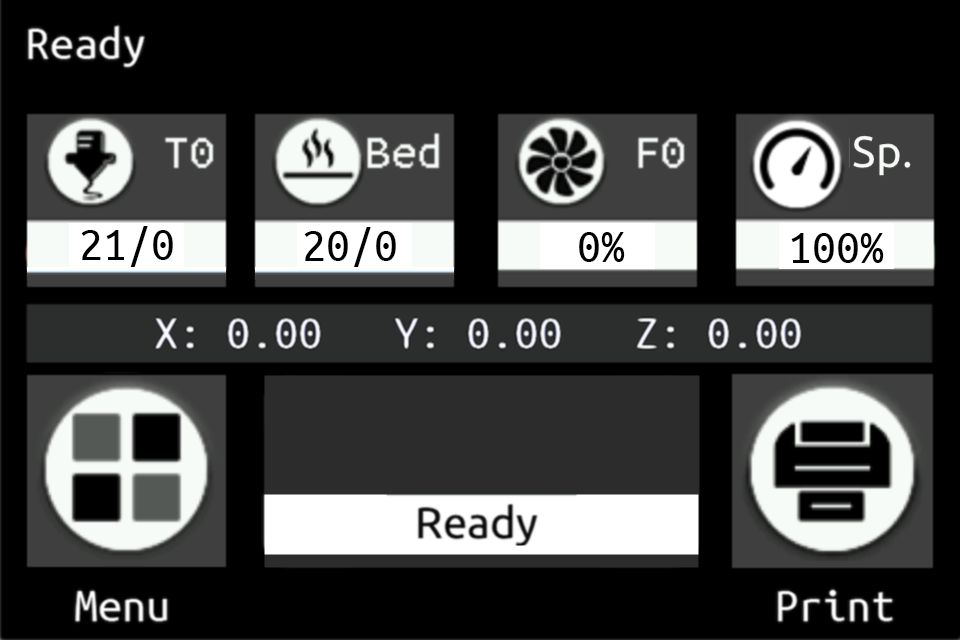 |
| Use firmware, icons, and fonts from the [`Copy to SD Card root directory to update - Hybrid Red Menu Material theme`](https://github.com/bigtreetech/BIGTREETECH-TouchScreenFirmware/tree/master/Copy%20to%20SD%20Card%20root%20directory%20to%20update/THEME_Hybrid%20Red%20Menu%20Material%20theme) folder | Use firmware, icons, and fonts from the [`Copy to SD Card root directory to update - Hybrid Mono Menu Material theme`](https://github.com/bigtreetech/BIGTREETECH-TouchScreenFirmware/tree/master/Copy%20to%20SD%20Card%20root%20directory%20to%20update/THEME_Hybrid%20Mono%20Menu%20Material%20theme) folder |
| Rep Rap Firmware Dark Theme by **[xPew](https://github.com/xPew)** | |
| :----------------------------------------------------------: | ------------------------------------------------------------ |
| 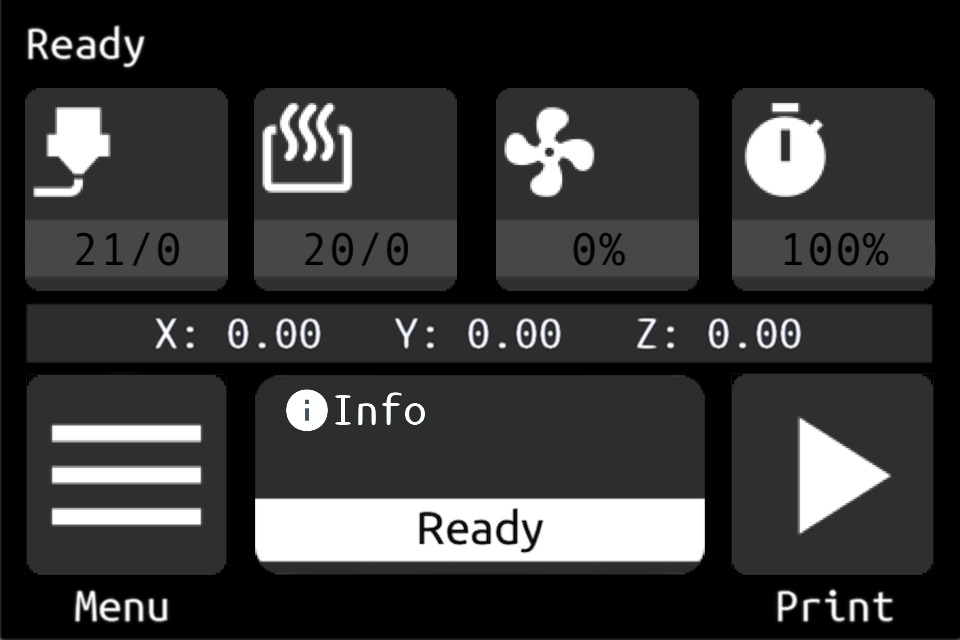 |  |
| Use firmware, icons, and fonts from the [`Copy to SD Card root directory to update - Rep Rap Firmware Dark theme`](https://github.com/bigtreetech/BIGTREETECH-TouchScreenFirmware/tree/master/Copy%20to%20SD%20Card%20root%20directory%20to%20update/THEME_Rep%20Rap%20Firmware%20Dark%20theme) folder | |
## Firmware Update
The TFT firmware update process is based on the following stages:
1. [Deployment Files](#deployment-files): All the resources needed for the firmware update (up to four kinds of resources)
2. [Configuration](#configuration): All the changes needed on configuration file before the firmware installation
3. [Installation](#installation): All the steps needed in order to install the firmware
4. [Post Installation](#post-installation): Post installation process in case of major changes applied by the installed firmware
### Deployment Files
The following sections provide all the resources needed for the firmware update (up to four kinds of resources).
#### Firmware Binary
Precompiled firmwares are available on [`Copy to SD Card root directory to update`](https://github.com/bigtreetech/BIGTREETECH-TouchScreenFirmware/tree/master/Copy%20to%20SD%20Card%20root%20directory%20to%20update) folder.
For **BTT TFTs**, the firmwares use the naming convention `BIGTREE_TFT*_V*.*.*.x.bin`.
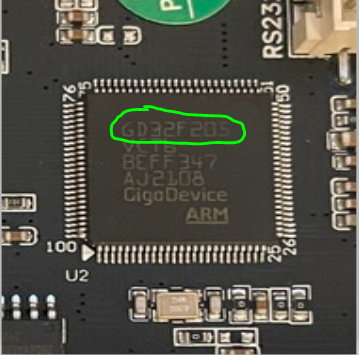
For **BTT GD TFTs**, the firmwares use the naming convention `BIGTREE_GD_TFT*_V*.*.*.x.bin`
For **MKS TFTs**:
1. The firmwares use the naming convention `MKS_TFT*_V*.*.*.x.bin`
2. Any binary file for an MKS firmware (e.g. `MKS_TFT28_V4.0.27.x.bin`) **MUST** be renamed to `MKSTFT*.bin` (e.g. `MKSTFT28.bin`, `MKSTFT35.bin` etc.) in order it can be recognized and installed by the TFT
For **MKS GD TFTs**:
For MKS TFT28 mounting GD32 MCU (GigaDevice MCU) (like the newest version of Genious Pro), you need to:
1. Rename the right binary (e.g. `MKS_GD_TFT28_V1_2_4.27.x.bin`) to `MKSTFT28EVO.bin`
2. Create an empty file named `MKSTFT28.bin`
3. Create two empty directories named `MKS_FONT` and `MKS_PIC`
For example, for BTT TFT35 V3 select:
`BIGTREE_TFT35_V3.0.27.x.bin`
where:
- `BIGTREE_TFT35`: Model
- `V3.0`: Hardware version
- `27.x`: Software version
**NOTE:**
For BTT TFT35, there are currently three different kinds of firmware available:
- V3.0
- E3_V3.0
- B1_V3.0
So, make sure to use the firmware matching your TFT screen.
#### Fonts and Icons
Themes are available on [`Copy to SD Card root directory to update`](https://github.com/bigtreetech/BIGTREETECH-TouchScreenFirmware/tree/master/Copy%20to%20SD%20Card%20root%20directory%20to%20update) folder.
The root folder for fonts and icons is `TFT*`, where `*` is the size of the TFT (e.g. `TFT24`, `TFT35`, `TFT50` etc). Fonts and icons folder structure:
- `TFT*/font`: Includes the fonts in .fon format and a readme.md
- `TFT*/bmp`: Includes the icons in .bmp format and a readme.md
For **MKS TFT32**, the `TFT28` folder has to be used and **MUST** be renamed to `TFT32` in order it can be recognized and installed by the TFT.
#### Configuration File
Templates for configuration file are available on [`Copy to SD Card root directory to update`](https://github.com/bigtreetech/BIGTREETECH-TouchScreenFirmware/tree/master/Copy%20to%20SD%20Card%20root%20directory%20to%20update) folder.
The configuration file is named `config.ini`.
**NOTE:** RepRap firmware users have to make their changes using the `config_rrf.ini` template file and renaming it to `config.ini`.
#### Optional - Language Files
Optional language files are available on [`Copy to SD Card root directory to update/Language Packs`](https://github.com/bigtreetech/BIGTREETECH-TouchScreenFirmware/tree/master/Copy%20to%20SD%20Card%20root%20directory%20to%20update/Language%20Packs) folder.
Language files use the naming convention `language_*.ini` (e.g. `language_it.ini`).
### Configuration
The firmware configuration can be modified by changing the `config.ini` (or the renamed `config_rrf.ini`) file using a simple text editor (make sure to use UTF encoding).
A configuration can be uploaded without the need to upload the firmware or the TFT folder again, as long as the firmware and the configuration file are from the same version (see [Configuration Update](#configuration-update)).
#### Editing the Configuration File
**NOTE:** RepRap firmware users have to make their changes using the `config_rrf.ini` template file and renaming it to `config.ini`.
To edit the `config.ini` file, follow the instructions here: [Detailed Instructions](config_instructions.md).
### Installation
**NOTE:** For devices with USB flash drive support, it is possible to update the **icons**, **fonts**, **config** and the **language** files from a USB flash drive in the same way it is done through an SD card. However, the firmware can only be updated using an SD card.
The following steps are needed in order to install the firmware:
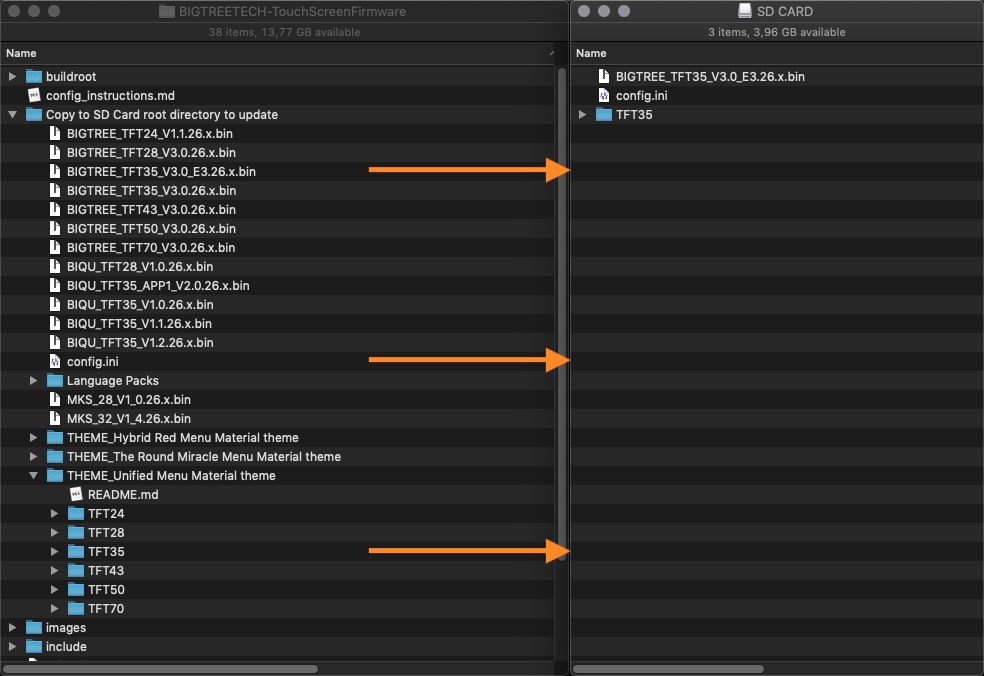
1. Copy the precompiled `BIGTREE_TFT*_V*.*.*.bin` or your self compiled **firmware**, plus the `TFT*` folder of your preferred theme along with `config.ini` to the root of a blank SD card not greater than 8GB and formatted as FAT32:
2. Optionally, copy one or more `language_*.ini` file(s) onto the SD card. Doing so, it will allow you to switch between English and the uploaded language(s) from the **Language** menu present in the TFT firmware. We recommend to upload the minimum amount of languages to keep the memory usage low. The `language_*.ini` file can be edited to change the text shown on the TFT:
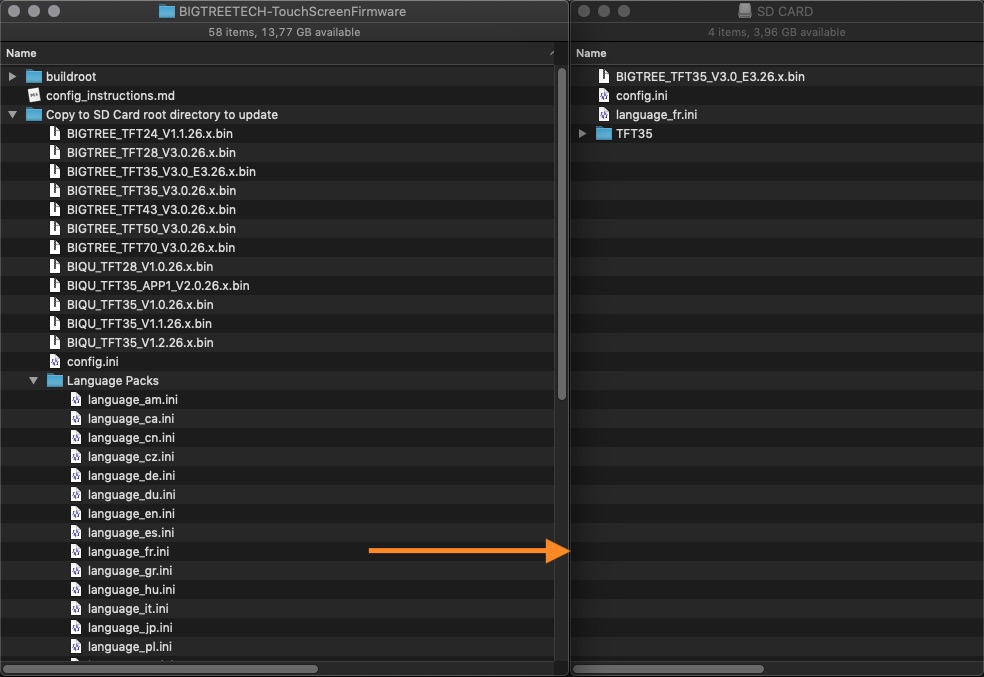
3. Place the SD card with `BIGTREE_TFT*_V*.*.*.bin`, the `TFT*` folder, `config.ini` and the optional `language_*.ini` file(s) into the TFT's SD card reader and reset your TFT (or optionally - power cycle your printer) to start the update process:
<p align=center> ⚠️ Failing to update your icons & fonts will result in missing icons and/or unreadable text ⚠️ </p>
**Update process shown on TFT screen:**
A successful update looks like this on the screen:

... and the name of the elements on the SD card changes to this:
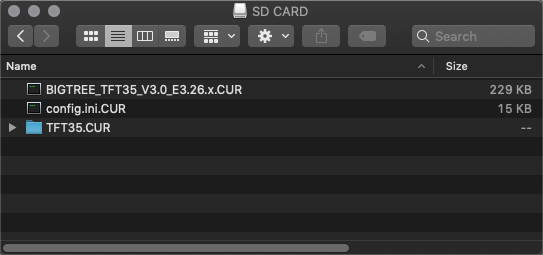
In case one or several parts of the update failed, an error will be shown. Follow the information on the screen to update the missing or outdated elements:
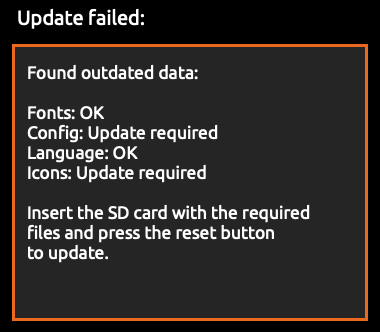
<p align=center> ⚠️ Errors during the update can not be ignored and must be solved before using the TFT ⚠️ </p>
After the update is done and the files are renamed, it is possible to reuse them again. To do so, change the name of the element(s) to the pre-update name and start the update process again.
4. After a successful update, the TFT will switch to one of the following menus:
- **Main** menu: The update is completed and you can use the TFT
- **Touch Screen Calibration** menu: A post installation process is needed before switching to Main menu. Please, see [Post Installation](#post-installation) section for completing the post installation process
**TIP:** Format the SD card after the firmware update in case you would like to print from it.
### Post Installation
In case major changes have been applied by the installed firmware, a post installation process consisting on touch screen calibration is automatically started.
Please, see [Touch Screen Calibration](#touch-screen-calibration) section for completing the process.
## Configuration Update
Please, see [Configuration](#configuration) section for configuring `config.ini` file.
**NOTES:**
- For devices with USB flash drive support, it is possible to update the **icons**, **fonts**, **config** and the **language** files from a USB flash drive in the same way it is done through an SD card. However, the firmware can only be updated using an SD card
- The following procedure can be also applied to any combination of resources (e.g. only **icons**, **icons** + **fonts**, **config** + **language** files etc.)
In order to update the firmware configuration:
1. Copy your edited `config.ini` file to the root of the SD card. The SD card capacity should be less than or equal to 8GB and formatted as FAT32
2. Insert the SD card into the TFT's SD card slot and press the reset button of the TFT (or power cycle your printer)
3. The TFT's configuration will update from the configuration file on reboot
4. The `config.ini` file will be renamed to `config.ini.CUR` after updating the configuration
## Touch Screen Calibration
The touch screen calibration process begins showing a white screen with a red dot in the upper right corner and the following text:
Touch Screen Calibration - Please click on the red dot
Once the process is started, to calibrate the touch screen press (with your finger or a stylus):
1. the red dot in the upper left corner
2. then the red dot in the upper right corner
3. then the red dot in the lower right corner
4. and finally, the black dot in the middle of the screen to finish the calibration
Repeat the process in case the following message is shown:
Adjustment failed, please try again.
### Forcing the Touch Screen Calibration
The touch screen calibration process can be forced in two ways:
- by menu: The calibration can be started from **Menu->Settings->Screen->TSC Adjust** menu
- by hard reset: The calibration is started at the end of the hard reset process (see [Hard Reset](#hard-reset))
## Hard Reset
**NOTES:**
- The hard reset process is typically used as the last chance when the firmware is not properly working (e.g. in case of freezes, errors on screen etc.)
- Unless the default hard coded settings have been properly configured (e.g. a self compiled firmware was installed), after an hard reset the TFT typically needs to be reconfigured with the proper `config.ini` file (see [Configuration Update](#configuration-update))
The hard reset process consists in:
1. resetting the TFT's configuration to the TFT's default hard coded settings
2. starting the touch screen calibration process (see [Touch Screen Calibration](#touch-screen-calibration)) at startup before moving to **Main** menu
In order to hard reset the firmware:
1. Create a blank file named `reset.txt`
2. Copy the `reset.txt` file to the root of the SD card. The SD card capacity should be less than or equal to 8GB and formatted as FAT32
3. Insert the SD card into the TFT's SD card slot and press the reset button of the TFT (or power cycle your printer)
4. The TFT's configuration will be reset to the TFT's default hard coded settings and the touch screen calibration process will start on reboot
5. The `reset.txt` file will be renamed to `reset.txt.DONE` after the touch screen calibration process is completed
### Resetting to Default Settings
When the default hard coded settings are properly configured for a TFT and the TFT's basic function such as surfing on the menus is working, in case of issues the user can opt to apply only a configuration reset (soft reset) instead of an hard reset.
In order to reset to default settings:
- Enter on **Menu->Settings->Feature** menu
- Select and press on **Reset default settings** item
- Press on **Ok** button to confirm the reset
- Leave the menu
## Customization
### Bootscreen and Icons
Please, see [Customization Guides](https://github.com/bigtreetech/BIGTREETECH-TouchScreenFirmware/tree/master/readme/) section for detailed information.
### Firmware
<details><summary>View full instructions</summary>
<ol>
<li>Setup Visual Studio Code with PlatformIO <a href="https://github.com/bigtreetech/Document/blob/master/How%20to%20install%20VScode+Platformio.md">instructions</a></li>
<li>Click on the PlatformIO icon (①) and then click on Open Project (②):
<img src="https://user-images.githubusercontent.com/25599056/56637513-6b258e00-669e-11e9-9fad-d0571e57499e.png"></li>
<li>Find the BIGTREETECH firmware source directory, then click Open:
<img src="https://user-images.githubusercontent.com/25599056/56637532-77115000-669e-11e9-809b-f6bc25412f75.png"></li>
<li>After opening the project, edit <a href="platformio.ini"><code>platformio.ini</code></a> and change the <code>default_envs</code> to one that matches your TFT model and version:
<pre>;BIGTREE_TFT24_V1_1
;BIGTREE_TFT28_V1_0
;BIGTREE_TFT28_V3_0
;BIGTREE_TFT35_V1_0
;BIGTREE_TFT35_V1_1
;BIGTREE_TFT35_V1_2
;BIGTREE_TFT35_V2_0
;BIGTREE_TFT35_V3_0
;BIGTREE_TFT35_E3_V3_0
;BIGTREE_TFT35_B1_V3_0
;BIGTREE_TFT43_V3_0
;BIGTREE_TFT50_V3_0
;BIGTREE_TFT70_V3_0
;BIGTREE_GD_TFT24_V1_1
;BIGTREE_GD_TFT35_V2_0
;BIGTREE_GD_TFT35_V3_0
;BIGTREE_GD_TFT35_E3_V3_0
;BIGTREE_GD_TFT35_B1_V3_0
;BIGTREE_GD_TFT43_V3_0
;BIGTREE_GD_TFT50_V3_0
;BIGTREE_GD_TFT70_V3_0
;MKS_TFT28_V3_0
;MKS_TFT28_V4_0
;MKS_TFT28_NEW_GENIUS
;MKS_TFT32_V1_3
;MKS_TFT32_V1_4
;MKS_TFT32_V1_4_NOBL
;MKS_TFT32L_V3_0
;MKS_TFT35_V1_0
;MKS_GD_TFT28_V1_2_4
[platformio]
src_dir = TFT
boards_dir = buildroot/boards
default_envs = BIGTREE_TFT35_V3_0</pre></li>
<li>Click the check mark (✓) at the bottom of VSCode or press <code>Ctrl</code>+<code>Alt</code>+<code>B</code> (Windows) / <code>Ctrl</code>+<code>Option</code>+<code>B</code> (macOS) to compile:
<img src="https://user-images.githubusercontent.com/25599056/56637550-809ab800-669e-11e9-99d3-6b502e294688.png"></li>
<li>A <code>BIGTREE_TFT*_V*.*.*.bin</code> file will be generated in the <em>hidden</em> <code>.pio\build\BIGTREE_TFT*_V*_*</code> folder. Follow the update process outlined in the <a href="#firmware-update">Firmware Update</a> section above to update your TFT to the latest version</li>
</ol>
</details>
**TIP:** In case there is a problem compiling the TFT firmware try to restart VSC. If this does not help and you are using macOS, delete the **packages** and **platforms** folders usually present under the folder `/Users/***username***/.platformio/`.
### Vertical Screen Orientation - Portrait Mode
All the precompiled firmwares available on [`Copy to SD Card root directory to update`](https://github.com/bigtreetech/BIGTREETECH-TouchScreenFirmware/tree/master/Copy%20to%20SD%20Card%20root%20directory%20to%20update) folder are compiled to support the standard (horizontal) screen orientation.
In case the TFT needs to be placed with a vertical orientation (e.g. 90°), the firmware needs to be compiled with the portrait mode support and installed following the procedure below:
- Start VSC
- Open `platformio.ini`
- Uncomment (remove the leading `;` character) the following line:</br>
`; -DPORTRAIT_MODE="_portrait" ; uncomment here to enable Portrait Mode .bin firmware generation`
- Compile the firmware
- The binary file named `BIGTREE_TFT*_V*.*.*.x_portrait.bin` is created (see the presence of the **_portrait** suffix)
- Rename the binary file to the standard name `BIGTREE_TFT*_V*.*.*.x.bin`
- Copy `BIGTREE_TFT*_V*.*.*.x.bin`, the `TFT*` folder, `config.ini` and also `reset.txt` (needed to force the screen calibration) into the SD card
- Proceed with the firmware update (following the usual procedure)
## Troubleshooting
### Firmware Update Failed
In case the firmware update process failed:
1. Verify that you have been using the firmware matching your TFT
2. Try to upload the **firmware**, the `TFT*` folder and `config.ini` again (like described above) using a **new** SD card - 8GB or smaller, FAT32 formatted
**NOTE:** Some uploads worked fine after executing a low level format of the SD card and not a quick format.
### Worst Case Scenario
In case:
- The screen remains black or the brightness is not stable
- The screen does not react after pressing a button or executes clicks by itself or does something similar
and the reset described above did not help, try the following:
- Remove the TFT from the enclosure and disconnect everything from the TFT, including the cable to the mainboard
- Cut a USB cable you do not need anymore and connect the red and black wire to 5V and GND of the TFT
- Do not use the unshielded wires directly but use a 2 pin connector instead
- Power up the TFT and try to reset the TFT or to instal a new firmware like described in this document
**NOTE:** With only power supplied, you should be able to navigate through the menus using the touchscreen and even to switch to Marlin Mode (if available). Marlin Mode will not show any interface without a proper EXP connection (see [Marlin Mode Setup](#marlin-mode-setup)).
## Version History
Please, see [BIGTREETECH-TouchScreenFirmware/releases](https://github.com/bigtreetech/BIGTREETECH-TouchScreenFirmware/releases) section for a complete version history.
## Appendix
### Printing from Host
OctoPrint, ESP3D, Pronterface etc, connected to a TFT's serial port, can browse files on both the TFT's and mainboard's media devices and start a print that will be handled by the host (TFT or mainboard). The following actions and the related triggering G-codes are currently supported by the TFT fw:
| | **TFT SD** | **TFT USB** | **onboard media** |
| :---------------------------- | :------------------------------------------------------------------------------------------------------------------------------------------------ | :--------------------------------------------------- | :--------------------- |
| **ACTION** | **G-CODE** | **G-CODE** | **G-CODE** |
| **init media device** | | | `M21 <S> <U>` |
| **release media device** | | | `M22` |
| **list files** | `M20 SD:<folder path>`<br>or<br>`M20 S <folder path>`<br><br>Examples:<br>`M20 SD:`<br>`M20 SD:/test`<br>`M20 S /test` | `M20 U:<folder path>`<br>or<br>`M20 U <folder path>` | `M20` |
| **select file** | `M23 SD:<file path>`<br>or<br>`M23 S <file path>`<br><br>Examples:<br>`M23 SD:cap.gcode`<br>`M23 SD:/test/cap2.gcode`<br>`M23 S /test/cap2.gcode` | `M23 U:<file path>`<br>or<br>`M23 U <file path>` | `M23 <file path>` |
| **start/resume print** | `M24` | `M24` | `M24` |
| **pause print** | `M25` | `M25` | `M25` |
| **pause print and park head** | `M125` | `M125` | `M125` |
| **abort print** | `M524` | `M524` | `M524` |
| **report print status** | `M27 [C]` | `M27 [C]` | `M27 [C] [S<seconds>]` |
| **start file write** | `M28 SD:<file path>`<br>or<br>`M28 S <file path>`<br><br>Examples:<br>`M28 SD:cap.gcode`<br>`M28 SD:/test/cap2.gcode`<br>`M28 S /test/cap2.gcode` | `M28 U:<file path>`<br>or<br>`M28 U <file path>` | `M28 [B1] <file path>` |
| **stop file write** | `M29` | `M29` | `M29` |
| **delete file** | `M30 SD:<file path>`<br>or<br>`M30 S <file path>`<br><br>Examples:<br>`M30 SD:cap.gcode`<br>`M30 SD:/test/cap2.gcode`<br>`M30 S /test/cap2.gcode` | `M30 U:<file path>`<br>or<br>`M30 U <file path>` | `M30 <file path>` |
| **firmware info** | `M115 TFT` | `M115 TFT` | `M115` |
| **play tone** | `M300 TFT [P<ms>] [S<Hz>]` | `M300 TFT [P<ms>] [S<Hz>]` | `M300 [P<ms>] [S<Hz>]` |
**NOTES:**
- TFT's media devices, if any, does not need to be initialized/released
- When present, the G-code's options (e.g. `M27 C`) have the same meaning like in Marlin fw
- G-code **M300 TFT P0** (with a duration of 0 ms) will mute (with the exception of touch type sound, if enabled) the TFT if not already muted while a duration different than 0 will unmute the TFT if not already unmuted
### Printing from Remote Host
OctoPrint, ESP3D, Pronterface etc, connected to a TFT's or mainboard's serial port, can host a print (print handled by the host) and optionally can trigger some actions to the TFT sending specific G-codes. The following actions and the related triggering G-codes are currently supported by the TFT fw:
| **ACTION** | **G-CODE** |
| :-------------------------- | :---------------------------------------------------------------------------------------------------------------------------------------------------------------------------------------------------------- |
| **start** | `M118 P0 A1 action:print_start` |
| **end** | `M118 P0 A1 action:print_end` |
| **cancel** | `M118 P0 A1 action:cancel` |
| **pause** | `M118 P0 A1 action:pause` |
| **resume** | `M118 P0 A1 action:resume` |
| **remaining time progress** | `M118 P0 A1 action:notification Time Left <XX>h<YY>m<ZZ>s`<br>or<br>`M117 Time Left <XX>h<YY>m<ZZ>s`<br><br>Examples:<br>`M118 P0 A1 action:notification Time Left 02h04m06s`<br>`M117 Time Left 02h04m06s` |
| **print layer progress** | `M118 P0 A1 action:notification Layer Left <XXXX>/<YYYY>`<br>or<br>`M117 Layer Left <XXXX>/<YYYY>`<br><br>Examples:<br>`M118 P0 A1 action:notification Layer Left 51/940`<br>`M117 Layer Left 51/940` |
| **file data progress** | `M118 P0 A1 action:notification Data Left <XXXX>/<YYYY>`<br>or<br>`M117 Data Left <XXXX>/<YYYY>`<br><br>Examples:<br>`M118 P0 A1 action:notification Data Left 123/12345`<br>`M117 Data Left 123/12345` |
When the trigger `print_start` is received, the TFT switches to **Printing** menu.
When the trigger `print_end` or `cancel` is received, the TFT Printing menu is finalized (statistics available etc.).
When on Printing menu, pressing on the **pause**, **resume** and **stop** buttons will trigger to the remote host the following notifications, respectively:
| **NOTIFICATION** | **ACK MESSAGE** |
| :-------------------------- | :------------------------------------ |
| **pause** | `//action:notification remote pause` |
| **resume** | `//action:notification remote resume` |
| **cancel** | `//action:notification remote cancel` |
The remote host must properly handle the received notifications. For example, if `//action:notification remote pause` is received then the remote host must effectively pause the print and send `M118 P0 A1 action:pause` in order to trigger the pause action to the TFT.
**NOTES:**
- A new plugin on OctoPrint implementing the above protocol should be the preferable way (available to everyone)
- With the exception of TFT70, the maximum number of displayable layer count is 999 (there's no space to display layer number and count if the layer count is above 999)
### Adding Gcode Thumbnails
The TFT can display embedded G-code thumbnails in the file viewer using two different flavors:
- Bigtreetech-style
- PrusaSlicer-style

The first type is to store the thumbnails at a specific location in the G-code file using a dedicated Cura plugin or external post-processing script.
The thumbnail's image data is raw encoded in a format which can be displayed on the TFT without any complex image transformation.
Displaying these embedded thumbnails at the TFT is the fastest approach and suitable for all different BigTreeTech's TFT variants.
Downside is that you either need a dedicated plugin, for example the [BTT 3D Plug-In Suit](https://github.com/bigtreetech/Bigtree3DPluginSuit), or you have to use the post-processing script.
The other type is to store the thumbnails using dedicated comments (`thumbnail begin...` and `thumbnail end`) which is implemented in stock by some slicers like Prusa-Slicer.
The thumbnail's image data is a PNG file encoded in Base64 which cannot be displayed directly on the TFT:
A base64 decoding and png decoding needs to be performed which is quite complex for the TFT.
Displaying these thumbnails is slower but more flexible.
Due to the memory requirements it is not suitable for all the different TFT variants (only for those with `RAM_SIZE > 96`).
Thumbnail generation needs to be specifically enabled in Prusa-Slicer.
Under _Printer Settings_ at the _G-code thumbnails_ settings you have to enter the specific required thumbnail image size for your TFT.

Thumbnail image sizes are:
- `70x70`: TFT24 / TFT28
- `95x80`: TFT43 / TFT50
- `95x95`: TFT35
- `160x140`: TFT70
If this setting is not visible within the Prusa-Slicer you need to enable _Expert Settings Mode_:

### TFT Screen Configuration and Support for RRF
#### Overview
The most recent version of the standard bigtreetech TFT firmware has built in support for RepRap firmware. The pre-built images have this enabled by default.
#### Loading the Firmware
There is now an RRF config file. It needs to be renamed from `config_rrf.ini` to `config.ini` for updating the configuration of the TFT for RRF.
#### Configuration Changes
Add the following line to your `config.g` to enable the screen: `M575 P1 S2 B57600`.
#### Implemented Features
- Auto detect fw type + separate config.ini for easier setup
- Temperature/movement/cooling status monitoring and control
- Print status monitoring with mid-print tuning/pausing
- Macro support
- Print from onboard/external SD card
- Please see [RRF further tweaks #2278](https://github.com/bigtreetech/BIGTREETECH-TouchScreenFirmware/issues/2278) for more information.
#### Menu System for Macros
- Thumbnail and menu system support for onboard G-codes
- Load/unload menu
- PID tune menu
### Setup of BTT TFT35 E3 V3 with MKS SGEN L Mainboards
The following mainboards are covered by this document:
- MKS GEN_L v1.0
- MKS SGEN (LPC1769)
- MKS SGEN_L v1.0 (LPC1768)
- MKS SGEN_L v2.0 (LPC1769)
#### Connections
The TFT35 E3 V3.0 has 3 cables to connect to the mainboard. Two 10 pin ribbon cables and one 5 pin serial cable. The 2 ribbon cables connect to the EXP1 and the EXP2 connections on both the TFT35 E3 V3.0 and the MKS mainboards.
The RS232 cable is connected to the RS232 connection on the touchscreen, with the other end connecting to the AUX1 connection on the mainboard. The RS232 cable has 5 wires. One end has a single 5 wire connector that goes to the RS232 connector on the touchscreen, and the other end has two connectors, one has 4 wires, and the second one has one wire. That single wire is for the Reset and is not used on these MKS mainboards. The 4-pin connector plugs into the AUX1 connection. It must connect to the top row of pins when looking at the socket with the notch facing away from the mainboard and must be also plugged in with the 5v+ wire connected to the first pin in the upper left corner of the socket. The RESET wire is not connected to anything.
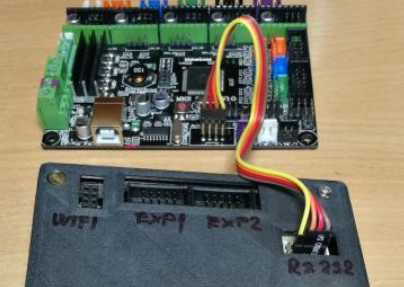
**NOTE:** On the MKS mainboards there is an issue that involves at least the MKS GEN_L, MKS SGEN, and MKS SGEN_L models. The EXP1 and EXP2 connections have the socket shell installed wrong way around. The notch that indexes the cable should be facing towards the mainboard. If you get a blank screen on the TFT35 E3 V3.0 touchscreen after connecting the two EXP cables and turning the printer on, turn printer off and disconnect the 10 pin cables from either the touch screen or the mainboard and using small diagonal cutters trim the tab down to be as close to flush as you can get on both cables (and only on one end) and plug them back in with the trimmed tab now facing the mainboard.
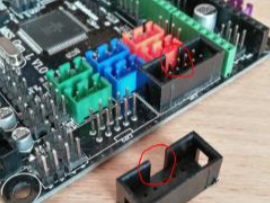
The second workaround for this issue is to carefully pry the two shells surrounding the pins on the mainboard upwards until they clear the pins. Do NOT use a metal tool for this, use a sturdy plastic or whalebone prying tool. Turn the shell 180 degrees and align the pins with the holes in the shells and push the shells back on with your thumb. Do not push the shell back on with something that could cause damage if it were to slip. Once the shells are installed you can use the stock (unaltered) cables as they are.
#### Firmware
Edit the `Configuration.h` file and enable (uncomment) `REPRAP_DISCOUNT_FULL_GRAPHIC_SMART_CONTROLLER`. Rebuild and deploy the Marlin firmware to your 3D Printer.
### Show more statistics at the end of the print
Statistics as filament length, filament weight and filament cost can be embedded into the G-code. After the print is finished there will be an infobox that you can click and a popup will present you the printed filename (limited to the first 25 characters), the time needed for the print, the filament length used, the filament weight and its cost. In the case of multi-filament usage the statistics will show the sum of all individual data (sum of length, sum of weight, sum of cost).
The statistic data in the G-code must have the following format (a good practice would be to include this at the beginning of the G-code):
- `M118 P0 filament_data L:{12.3456}m` L: represents the length in meters
- `M118 P0 filemant_data W:{1.23456}g` W: represents the weight in grams
- `M118 P0 filament_data C:{0.1234}` C: represents the cost without a unit
The values of every filament data can be in a brackets, parentheses, apostrophes, etc. or without them, measurement units can be there or not.
So `M118 P0 filament_data L:(12.3456)m`, `M118 P0 filament_data L:12.3456meters`, `M118 P0 filament_data L:[12.3456]` and so on are all valid formats.
For multi-filament print statistics the data for each used filament should be written, they can be separated by comma, space, asterix, whatever, except `;` and `.`.
Examples for multi-filament:
- `M118 P0 filament_data L:(12.3456, 8.2520974)m`
- `M118 P0 filament_data W: 24.87652 15.568264 gramm`
- `M118 P0 filament_data C:[1.3456], [0.56024]`
The inclusion of the filament data into the G-code can be automated. In Cura all you have to do is to insert the following into the Start G-Code:
- `M118 P0 filament_data L:{filament_amount}m`
- `M118 P0 filament_data W:{filament_weight}g`
- `M118 P0 filament_data C:{filament_cost}`
In case the G-code file has been generated using the [BTT 3D Plug-In Suit](https://github.com/bigtreetech/Bigtree3DPluginSuit), the data is automatically added.
In case filament data is not present in the G-code, the filament length data is calculated during print. Length is calculated regardless of using the TFT USB, TFT SD or the onboard media. Calculations are done in both absolute or relative extrusion mode. Filament data takes into account the flow rate also but with a caveat. It has to be the same flow rate during the entire time of the printing, because the end result is calculated based on the flow rate at the time the print has finished. If flow rate changes during the print the results will not be accurate anymore.