-
Notifications
You must be signed in to change notification settings - Fork 6.3k
Dependency Injection with Dagger 2
Many Android apps rely on instantiating objects that often require other dependencies. For instance, a Twitter API client may be built using a networking library such as Retrofit. To use this library, you might also need to add parsing libraries such as Gson. In addition, classes that implement authentication or caching may require accessing shared preferences or other common storage, requiring instantiating them first and creating an inherent dependency chain.
If you're not familiar with Dependency Injection, watch this quick video.
Dagger 2 analyzes these dependencies for you and generates code to help wire them together. While there are other Java dependency injection frameworks, many of them suffered limitations in relying on XML, required validating dependency issues at run-time, or incurred performance penalties during startup. Dagger 2 relies purely on using Java annotation processors and compile-time checks to analyze and verify dependencies. It is considered to be one of the most efficient dependency injection frameworks built to date.
Here is a list of other advantages for using Dagger 2:
-
Simplifies access to shared instances. Just as the ButterKnife library makes it easier to define references to Views, event handlers, and resources, Dagger 2 provides a simple way to obtain references to shared instances. For instance, once we declare in Dagger our singleton instances such as
MyTwitterApiClientorSharedPreferences, we can declare fields with a simple@Injectannotation:
public class MainActivity extends Activity {
   @Inject MyTwitterApiClient mTwitterApiClient;
   @Inject SharedPreferences sharedPreferences;

   public void onCreate(Bundle savedInstance) {
       // assign singleton instances to fields
       InjectorClass.inject(this);
} -
Easy configuration of complex dependencies. There is an implicit order in which your objects are often created. Dagger 2 walks through the dependency graph and generates code that is both easy to understand and trace, while also saving you from writing the large amount of boilerplate code you would normally need to write by hand to obtain references and pass them to other objects as dependencies. It also helps simplify refactoring, since you can focus on what modules to build rather than focusing on the order in which they need to be created.
-
Easier unit and integration testing Because the dependency graph is created for us, we can easily swap out modules that make network responses and mock out this behavior.
-
Scoped instances Not only can you easily manage instances that can last the entire application lifecycle, you can also leverage Dagger 2 to define instances with shorter lifetimes (i.e. bound to a user session, activity lifecycle, etc.).
Android Studio by default will not allow you to navigate to generated Dagger 2 code as legitimate classes because they are not normally added to the source path. Adding the annotationProcessor plugin will add these files into the IDE classpath and enable you to have more visibility.
Make sure to upgrade to the latest Gradle version to use the annotationProcessor syntax:
dependencies {
  implementation 'com.google.dagger:dagger-android:2.11'
  implementation 'com.google.dagger:dagger-android-support:2.11' // if you use the support libraries
  annotationProcessor 'com.google.dagger:dagger-android-processor:2.11'
  annotationProcessor 'com.google.dagger:dagger-compiler:2.11'
}
Note that the compileOnly keyword refers to dependencies that are only needed at compilation. Since Dagger 2 generates code that is used by your app at runtime, the implementation configuration should be used for the dagger libraries. The Dagger compiler generates code that is used to create the dependency graph of the classes defined in your source code. These classes are added to the IDE class path during compilation. The annotationProcessor keyword, which is understood by the Android Gradle plugin, does not add these classes to the class path, they are used only for annotation processing, which prevents accidentally referencing them.
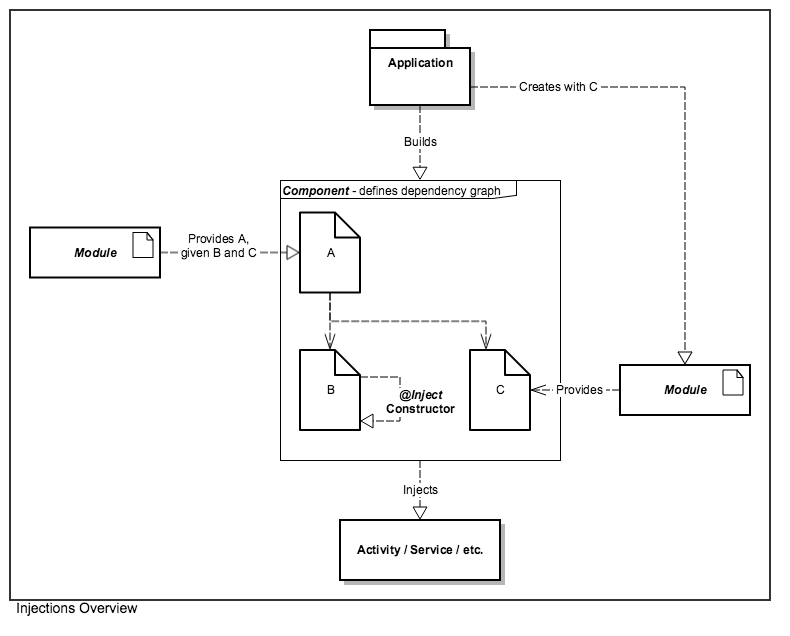
The simplest example is to show how to centralize all your singleton creation with Dagger 2. Suppose you weren't using any type of dependency injection framework and wrote code in your Twitter client similar to the following:
OkHttpClient client = new OkHttpClient();

// Enable caching for OkHttp
int cacheSize = 10 * 1024 * 1024; // 10 MiB
Cache cache = new Cache(getApplication().getCacheDir(), cacheSize);
client.setCache(cache);

// Used for caching authentication tokens
SharedPreferences sharedPreferences = PreferenceManager.getDefaultSharedPreferences(this);

// Instantiate Gson
Gson gson = new GsonBuilder().create();
GsonConverterFactory converterFactory = GsonConverterFactory.create(gson);

// Build Retrofit
Retrofit retrofit = new Retrofit.Builder()
                                .baseUrl("https://api.github.com")
                                .addConverterFactory(converterFactory)
                                .client(client)  // custom client
.build();You need to define what objects should be included as part of the dependency chain by creating a Dagger 2 module. For instance, if we wish to make a single Retrofit instance tied to the application lifecycle and available to all our activities and fragments, we first need to make Dagger aware that a Retrofit instance can be provided.
Because we wish to setup caching, we need an Application context. Our first Dagger module, AppModule.java, will be used to provide this reference. We will define a method annotated with @Provides that informs Dagger that this method is the constructor for the Application return type (i.e., it is the method in charge of providing the instance of the Application class):
@Module
public class AppModule {

    Application mApplication;

    public AppModule(Application application) {
        mApplication = application;
    }

    @Provides
    @Singleton
    Application providesApplication() {
        return mApplication;
    }
}
We create a class called NetModule.java and annotate it with @Module to signal to Dagger to search within the available methods for possible instance providers.
The methods that will actually expose available return types should also be annotated with the @Provides annotation. The @Singleton annotation also signals to the Dagger compiler that the instance should be created only once in the application. In the following example, we are specifying SharedPreferences, Gson, Cache, OkHttpClient, and Retrofit as the return types that can be used as part of the dependency list.
@Module
public class NetModule {

    String mBaseUrl;

    // Constructor needs one parameter to instantiate.
    public NetModule(String baseUrl) {
        this.mBaseUrl = baseUrl;
    }

    // Dagger will only look for methods annotated with @Provides
    @Provides
    @Singleton
    // Application reference must come from AppModule.class
    SharedPreferences providesSharedPreferences(Application application) {
        return PreferenceManager.getDefaultSharedPreferences(application);
    }

    @Provides
    @Singleton
    Cache provideOkHttpCache(Application application) {
        int cacheSize = 10 * 1024 * 1024; // 10 MiB
        Cache cache = new Cache(application.getCacheDir(), cacheSize);
        return cache;
    }

   @Provides
   @Singleton
   Gson provideGson() {
       GsonBuilder gsonBuilder = new GsonBuilder();
       gsonBuilder.setFieldNamingPolicy(FieldNamingPolicy.LOWER_CASE_WITH_UNDERSCORES);
       return gsonBuilder.create();
   }

   @Provides
   @Singleton
   OkHttpClient provideOkHttpClient(Cache cache) {
      OkHttpClient.Builder client = new OkHttpClient.Builder();
      client.cache(cache);
      return client.build();
   }

   @Provides
   @Singleton
   Retrofit provideRetrofit(Gson gson, OkHttpClient okHttpClient) {
      Retrofit retrofit = new Retrofit.Builder()
                .addConverterFactory(GsonConverterFactory.create(gson))
                .baseUrl(mBaseUrl)
                .client(okHttpClient)
                .build();
        return retrofit;
    }
}
Note that the method names (i.e. provideGson(), provideRetrofit(), etc) do not matter and can be named anything. The return type annotated with a @Provides annotation is used to associate this instantiation with any other modules of the same type. The @Singleton annotation is used to declare to Dagger to be only initialized only once during the entire lifecycle of the application.
A Retrofit instance depends both on a Gson and OkHttpClient instance, so we can define another method within the same class that takes these two types. The @Provides annotation and these two parameters in the method will cause Dagger to recognize that there is a dependency on Gson and OkHttpClient to build a Retrofit instance.
Dagger provides a way for the fields in your activities, fragments, or services to be assigned references simply by annotating the fields with an @Inject annotation and calling an inject() method. Calling inject() will cause Dagger 2 to locate the singletons in the dependency graph to try to find a matching return type. If it finds one, it assigns the references to the respective fields. For instance, in the example below, it will attempt to find a provider that returns MyTwitterApiClient and a SharedPreferences type:
public class MainActivity extends Activity {
   @Inject MyTwitterApiClient mTwitterApiClient;
   @Inject SharedPreferences sharedPreferences;

  public void onCreate(Bundle savedInstance) {
       // assign singleton instances to fields
       InjectorClass.inject(this);
   }
The injector class used in Dagger 2 is called a component. It assigns references in our activities, services, or fragments to have access to singletons we earlier defined. We will need to annotate this class with a @Component annotation. Note that the activities, services, or fragments that are allowed to request the dependencies declared by the modules (by means of the @Inject annotation) should be declared in this class with individual inject() methods:
@Singleton
@Component(modules={AppModule.class, NetModule.class})
public interface NetComponent {
   void inject(MainActivity activity);
   // void inject(MyFragment fragment);
   // void inject(MyService service);
}
Note that base classes are not sufficient as injection targets. Dagger 2 relies on strongly typed classes, so you must specify explicitly which ones should be defined. (There are suggestions to workaround the issue, but the code to do so may be more complicated to trace than simply defining them.)
An important aspect of Dagger 2 is that the library generates code for classes annotated with the @Component interface. You can use a class prefixed with Dagger (i.e. DaggerTwitterApiComponent.java) that will be responsible for instantiating an instance of our dependency graph and using it to perform the injection work for fields annotated with @Inject. See the setup guide.
We should do all this work within a specialization of the Application class since these instances should be declared only once throughout the entire lifespan of the application:
public class MyApp extends Application {

    private NetComponent mNetComponent;

    @Override
    public void onCreate() {
        super.onCreate();

        // Dagger%COMPONENT_NAME%
        mNetComponent = DaggerNetComponent.builder()
                // list of modules that are part of this component need to be created here too
                .appModule(new AppModule(this)) // This also corresponds to the name of your module: %component_name%Module
                .netModule(new NetModule("https://api.github.com"))
                .build();

        // If a Dagger 2 component does not have any constructor arguments for any of its modules,
        // then we can use .create() as a shortcut instead:
        //  mNetComponent = com.codepath.dagger.components.DaggerNetComponent.create();
    }

    public NetComponent getNetComponent() {
       return mNetComponent;
    }
}
Make sure to rebuild the project (in Android Studio, select Build > Rebuild Project) if you cannot reference the Dagger component.
Because we are extending the default Application class with the class MyApp, we have to specify MyApp as the application name in the AndroidManifest.xml in order for it to be instantiated. This way your app will launch MyApp to handle the initial instantiation.
<application
      android:allowBackup="true"
      android:name=".MyApp">
Within our activity, we simply need to get access to these components and call inject().
public class MyActivity extends Activity {
  @Inject OkHttpClient mOkHttpClient;
  @Inject SharedPreferences sharedPreferences;

  public void onCreate(Bundle savedInstance) {
        // assign singleton instances to fields
        // We need to cast to `MyApp` in order to get the right method
        ((MyApp) getApplication()).getNetComponent().inject(this);
} 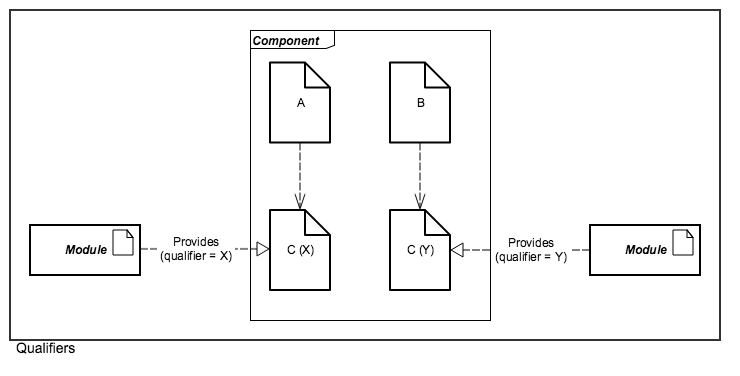
If we need two different objects of the same return type, we can use the @Named qualifier annotation. You will define it both where you provide the singletons (@Provides annotation), and where you inject them (@Inject annotations):
@Provides @Named("cached")
@Singleton
OkHttpClient provideOkHttpClient(Cache cache) {
    OkHttpClient client = new OkHttpClient();
    client.setCache(cache);
    return client;
}

@Provides @Named("non_cached") @Singleton
OkHttpClient provideOkHttpClient() {
    OkHttpClient client = new OkHttpClient();
    return client;
}
Injection will also require these named annotations too:
@Inject @Named("cached") OkHttpClient client;
@Inject @Named("non_cached") OkHttpClient client2;
@Named is a qualifier that is pre-defined by dagger, but you can create your own qualifier annotations as well:
@Qualifier
@Documented
@Retention(RUNTIME)
public @interface DefaultPreferences {
}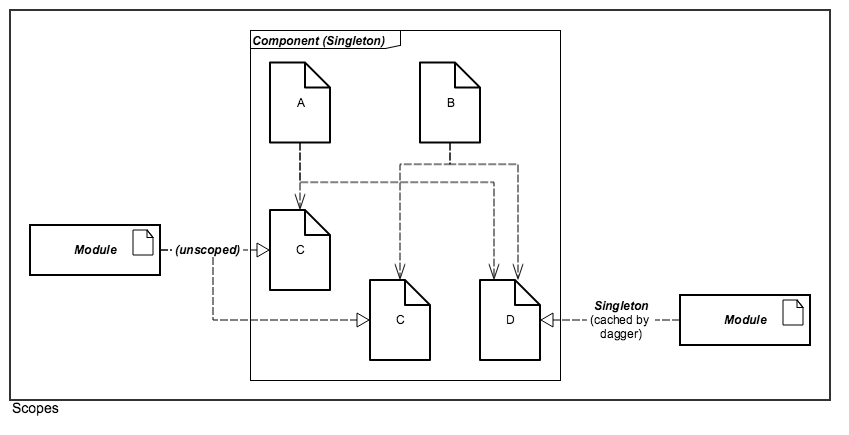
In Dagger 2, you can define how components should be encapsulated by defining custom scopes. For instance, you can create a scope that only lasts the duration of an activity or fragment lifecycle. You can create a scope that maps only to a user authenticated session. You can define any number of custom scope annotations in your application by declaring them as a public @interface:
@Scope
@Documented
@Retention(value=RetentionPolicy.RUNTIME)
public @interface MyActivityScope
{
}
Even though Dagger 2 does not rely on the annotation at runtime, keeping the RetentionPolicy at RUNTIME is useful in allowing you to inspect your modules later.
Leveraging scopes allows us to create either dependent components or subcomponents. The example above showed that we used the @Singleton annotation that lasted the entire lifecycle of the application. We also relied on one major Dagger component.
If we wish to have multiple components that do not need to remain in memory all the time (i.e. components that are tied to the lifecycle of an activity or fragment, or even tied to when a user is signed-in), we can create dependent components or subcomponents. In either case, each provide a way of encapsulating your code. We'll see how to use both in the next section.
There are several considerations when using these approaches:
- Dependent components require the parent component to explicitly list out what dependencies can be injected downstream, while subcomponents do not. For parent components, you would need to expose to the downstream component by specifying the type and a method:
// parent component
@Singleton
@Component(modules={AppModule.class, NetModule.class})
public interface NetComponent {
    // remove injection methods if downstream modules will perform injection

    // downstream components need these exposed
    // the method name does not matter, only the return type
    Retrofit retrofit();
    OkHttpClient okHttpClient();
    SharedPreferences sharedPreferences();
}
If you forget to add this line, you will likely to see an error about an injection target missing. Similar to how private/public variables are managed, using a parent component allows more explicit control and better encapsulation, but using subcomponents makes dependency injection easier to manage at the expense of less encapsulation.
-
Two dependent components cannot share the same scope. For instance, two components cannot both be scoped as
@Singleton. This restriction is imposed because of reasons described here. Dependent components need to define their own scope. -
While Dagger 2 also enables the ability to create scoped instances, the responsibility rests on you to create and delete references that are consistent with the intended behavior. Dagger 2 does not know anything about the underlying implementation. See this Stack Overflow discussion for more details.
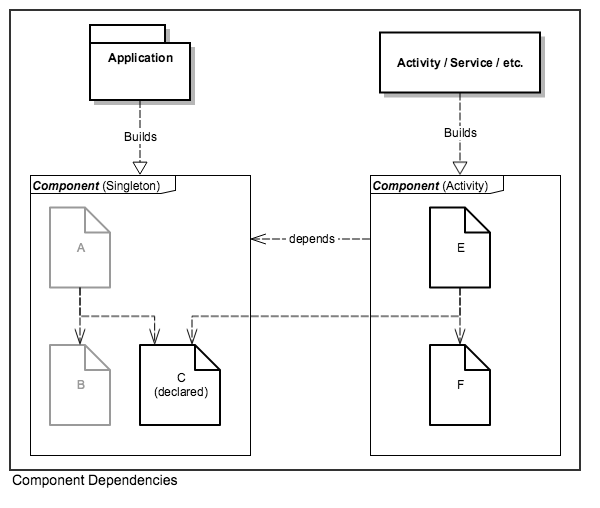
For instance, if we wish to use a component created for the entire lifecycle of a user session signed into the application, we can define our own UserScope interface:
import java.lang.annotation.Retention;
import javax.inject.Scope;

@Scope
public @interface UserScope {
}
Next, we define the parent component:
  @Singleton
  @Component(modules={AppModule.class, NetModule.class})
  public interface NetComponent {
      // downstream components need these exposed with the return type
      // method name does not really matter
      Retrofit retrofit();
  }
We can then define a child component:
@UserScope // using the previously defined scope, note that @Singleton will not work
@Component(dependencies = NetComponent.class, modules = GitHubModule.class)
public interface GitHubComponent {
    void inject(MainActivity activity);
}
Let's assume this GitHub module simply returns back an API interface to the GitHub API:
@Module
public class GitHubModule {

    public interface GitHubApiInterface {
      @GET("/org/{orgName}/repos")
      Call<ArrayList<Repository>> getRepository(@Path("orgName") String orgName);
    }

    @Provides
    @UserScope // needs to be consistent with the component scope
    public GitHubApiInterface providesGitHubInterface(Retrofit retrofit) {
        return retrofit.create(GitHubApiInterface.class);
    }
}
In order for this GitHubModule.java to get access to the Retrofit instance, we need explicitly define them in the upstream component. If the downstream modules will be performing the injection, they should also be removed from the upstream components too:
@Singleton
@Component(modules={AppModule.class, NetModule.class})
public interface NetComponent {
    // remove injection methods if downstream modules will perform injection

    // downstream components need these exposed
    Retrofit retrofit();
    OkHttpClient okHttpClient();
    SharedPreferences sharedPreferences();
}
The final step is to use the GitHubComponent to perform the instantiation. This time, we first need to build the NetComponent and pass it into the constructor of the DaggerGitHubComponent builder:
NetComponent mNetComponent = DaggerNetComponent.builder()
                .appModule(new AppModule(this))
                .netModule(new NetModule("https://api.github.com"))
                .build();

GitHubComponent gitHubComponent = DaggerGitHubComponent.builder()
                .netComponent(mNetComponent)
                .gitHubModule(new GitHubModule())
                .build();
See this example code for a working example.
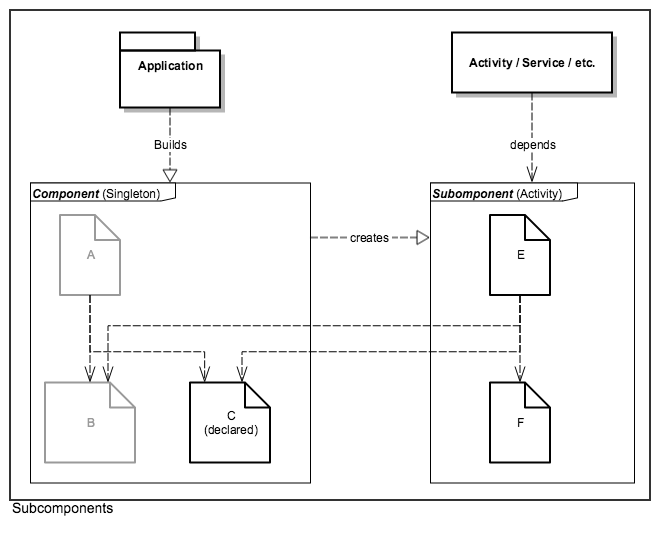
Using subcomponents is another way to extend the object graph of a component. Like components with dependencies, subcomponents have their own life-cycle and can be garbage collected when all references to the subcomponent are gone, and have the same scope restrictions. One advantage in using this approach is that you do not need to define all the downstream components.
Another major difference is that subcomponents simply need to be declared in the parent component.
Here's an example of using a subcomponent for an activity. We annotate the class with a custom scope and the @Subcomponent annotation:
@MyActivityScope
@Subcomponent(modules={ MyActivityModule.class })
public interface MyActivitySubComponent {
    void inject(MyActivity activity);
}
The module that will be used is defined below:
@Module
public class MyActivityModule {
    private final MyActivity activity;

    // must be instantiated with an activity
    public MyActivityModule(MyActivity activity) { this.activity = activity; }

    @Provides @MyActivityScope @Named("my_list")
    public ArrayAdapter providesMyListAdapter() {
        return new ArrayAdapter<String>(activity, android.R.layout.my_list);
    }
    ...
}
Finally, in the parent component, we will define a factory method with the return value of the component and the dependencies needed to instantiate it:
@Singleton
@Component(modules={ ... })
public interface MyApplicationComponent {
    // injection targets here

    // factory method to instantiate the subcomponent defined here (passing in the module instance)
    MyActivitySubComponent newMyActivitySubcomponent(MyActivityModule activityModule);
}
In the above example, a new instance of the subcomponent will be created every time that the newMyActivitySubcomponent() is called. To use the submodule to inject an activity:
public class MyActivity extends Activity {
  @Inject ArrayAdapter arrayAdapter;

  public void onCreate(Bundle savedInstance) {
        // assign singleton instances to fields
        // We need to cast to `MyApp` in order to get the right method
        ((MyApp) getApplication()).getApplicationComponent())
            .newMyActivitySubcomponent(new MyActivityModule(this))
            .inject(this);
    }
}Available starting in v2.7
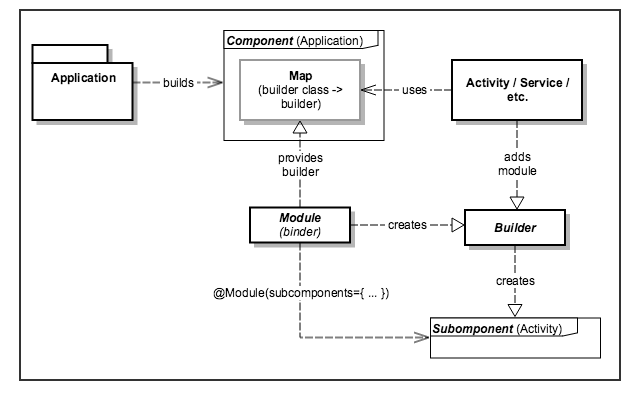
Subcomponent builders allow the creator of the subcomponent to be de-coupled from the parent component, by removing the need to have a subcomponent factory method declared on that parent component.
@MyActivityScope
@Subcomponent(modules={ MyActivityModule.class })
public interface MyActivitySubComponent {
    ...
    @Subcomponent.Builder
    interface Builder extends SubcomponentBuilder<MyActivitySubComponent> {
        Builder activityModule(MyActivityModule module);
    }
}

public interface SubcomponentBuilder<V> {
    V build();
}
The subcomponent is declared as an inner interface in the subcomponent interface and it must include a build() method which the return type matching the subcomponent. It's convenient to declare a base interface with this method, like SubcomponentBuilder above. This new builder must be added to the parent component graph using a "binder" module with a "subcomponents" parameter:
@Module(subcomponents={ MyActivitySubComponent.class })
public abstract class ApplicationBinders {
    // Provide the builder to be included in a mapping used for creating the builders.
    @Binds @IntoMap @SubcomponentKey(MyActivitySubComponent.Builder.class)
    public abstract SubcomponentBuilder myActivity(MyActivitySubComponent.Builder impl);
}

@Component(modules={..., ApplicationBinders.class})
public interface ApplicationComponent {
    // Returns a map with all the builders mapped by their class.
    Map<Class<?>, Provider<SubcomponentBuilder>> subcomponentBuilders();
}

// Needed only to create the above mapping
@MapKey @Target({ElementType.METHOD}) @Retention(RetentionPolicy.RUNTIME)
public @interface SubcomponentKey {
    Class<?> value();
}
Once the builders are made available in the component graph, the activity can use it to create its subcomponent:
public class MyActivity extends Activity {
  @Inject ArrayAdapter arrayAdapter;

  public void onCreate(Bundle savedInstance) {
        // assign singleton instances to fields
        // We need to cast to `MyApp` in order to get the right method
        MyActivitySubcomponent.Builder builder = (MyActivitySubcomponent.Builder)
            ((MyApp) getApplication()).getApplicationComponent())
            .subcomponentBuilders()
            .get(MyActivitySubcomponent.Builder.class)
            .get();
        builder.activityModule(new MyActivityModule(this)).build().inject(this);
    }
}Dagger 2 should work out of box without ProGuard, but if you start seeing library class dagger.producers.monitoring.internal.Monitors$1 extends or implements program class javax.inject.Provider, make sure your Gradle configuration uses the annotationProcessor declaration instead of provided.
- If you are upgrading Dagger 2 versions (i.e. from v2.0 to v2.5), some of the generated code has changed. If you are incorporating Dagger code that was generated with older versions, you may see
MemberInjectorandactual and former argument lists different in lengtherrors. Make sure to clean the entire project and verify that you have upgraded all versions to use the consistent version of Dagger 2.
- Dagger 2 Github Page
- Sample project using Dagger 2
- Vince Mi's Codepath Meetup Dagger 2 Slides
- http://code.tutsplus.com/tutorials/dependency-injection-with-dagger-2-on-android--cms-23345
- Jake Wharton's Devoxx Dagger 2 Slides
- Jake Wharton's Devoxx Dagger 2 Talk
- Dagger 2 Google Developers Talk
- Dagger 1 to Dagger 2
- Tasting Dagger 2 on Android
- Dagger 2 Testing with Mockito
- Snorkeling with Dagger 2
- Dependency Injection in Java
- Component Dependency vs. Submodules in Dagger 2
- Dagger 2 Component Scopes Test
- Advanced Dagger Talk
Created by CodePath with much help from the community. Contributed content licensed under cc-wiki with attribution required. You are free to remix and reuse, as long as you attribute and use a similar license.
Finding these guides helpful?
We need help from the broader community to improve these guides, add new topics and keep the topics up-to-date. See our contribution guidelines here and our topic issues list for great ways to help out.
Check these same guides through our standalone viewer for a better browsing experience and an improved search. Follow us on twitter @codepath for access to more useful Android development resources.