This is a fork from kubeflow_examples created with the intent of allowing students to be able to go through a lab.
1 hour 30 minutes 9 Credits
As datasets continue to expand and models grow become complex, distributing machine learning (ML) workloads across multiple nodes is becoming more attractive. Unfortunately, breaking up and distributing a workload can add both computational overhead, and a great deal more complexity to the system. Data scientists should be able to focus on ML problems, not DevOps.
Fortunately, distributed workloads are becoming easier to manage, thanks to Kubernetes. Kubernetes is a mature, production ready platform that gives developers a simple API to deploy programs to a cluster of machines as if they were a single piece of hardware. Using Kubernetes, computational resources can be added or removed as desired, and the same cluster can be used to both train and serve ML models.
This lab will serve as an introduction to Kubeflow, an open-source project which aims to make running ML workloads on Kubernetes simple, portable and scalable. Kubeflow adds some resources to your cluster to assist with a variety of tasks, including training and serving models and running Jupyter Notebooks. It also extends the Kubernetes API by adding new Custom Resource Definitions (CRDs) to your cluster, so machine learning workloads can be treated as first-class citizens by Kubernetes.
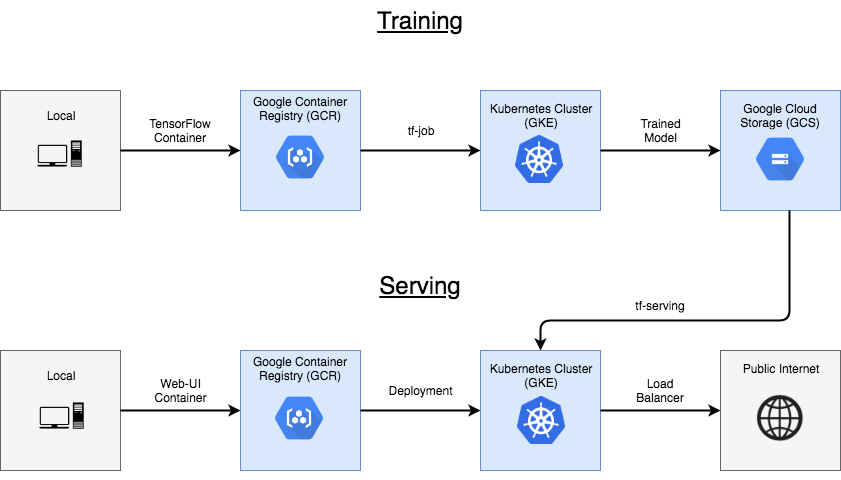
This lab will describe how to train and serve a TensorFlow model, and then how to deploy a web interface to allow users to interact with the model over the public internet. You will build a classic handwritten digit recognizer using the MNIST dataset.
The purpose of this lab is to get a brief overview of how to interact with Kubeflow. To keep things simple, the model you'll deploy will use CPU-only training, and only make use of a single node for training. Kubeflow's documentation has more information when you are ready to explore further.
-
How to set up a Kubeflow cluster on GCP
-
How to package a TensorFlow program in a container, and upload it to Google Container Registry
-
How to submit a Tensorflow training job, and save the resulting model to Google Cloud Storage
-
How to serve and interact with a trained model
- Open Google Console
- Agree terms
- Select the lab project
- Open Cloud Shell
This is what you should see:
If you see a yellow tag in your prompt, you're ready: go to the next section.
If you are NOT seeing a terminal with an yellow tag in your prompt describing your project-id, then you must execute this command:
gcloud config set project <your_project_id>In the Cloud Shell window, click on the Settings dropdown at the far right. Select Enable Boost Mode, then “Restart Cloud Shell in Boost Mode”. This will provision a larger instance for your Cloud Shell session, resulting in speedier Docker builds.
The first step is to download a copy of the Kubeflow examples repository, which hosts the code you will be deploying:
git clone https://github.com/arki1/examples.git ~/kubeflow-examplesLets set the gcloud command-line to use a given region and a zone by default.
gcloud config set compute/zone us-central1-a
gcloud config set compute/region us-central1
Now, set up a few environment variables to use through the course of the lab.
export ZONE=us-central1-aThe contents of this lab is saved in the "mnist" directory of the repository. Set an environment variable to use it later.
export WORKING_DIR=~/kubeflow-examples/mnistKubeflow uses a tool called Kustomize to manage deployments. This is a way to setup an application so that the same code can be deployed across different environments.
mkdir -p $WORKING_DIR/bin

# using current kustomize version instead of old lab version
cd $WORKING_DIR/bin
curl -s "https://raw.githubusercontent.com/kubernetes-sigs/kustomize/master/hack/install_kustomize.sh"  | bash
PATH=$PATH:${WORKING_DIR}/bin
For other ways to install Kustomize, check out the installation guide.
The Kubeflow command-line tool, kfctl, can be installed running a few steps.
First, let's define what version we want to install and export some variables:
export KUBEFLOW_TAG=0.7.1
export KUBEFLOW_BRANCH=v0.7-branch
export KUBEFLOW_TAG_SUFFIX=-2-g55f9b2a
Then, we download the kfctl from the version we have defined and then extract it to the working directory bin subfolder. As this subfolder is already the PATH, we'll be able to use the kfctl from anywhere.
# installs kfctl
wget -P /tmp https://github.com/kubeflow/kubeflow/releases/download/v${KUBEFLOW_TAG}/kfctl_v${KUBEFLOW_TAG}${KUBEFLOW_TAG_SUFFIX}_linux.tar.gz
tar -xvf /tmp/kfctl_v${KUBEFLOW_TAG}${KUBEFLOW_TAG_SUFFIX}_linux.tar.gz -C ${WORKING_DIR}/bin
kfctl allows you to install Kubeflow on an existing cluster or create one from scratch.
Ensure the Google Kubernetes Engine (GKE) API is enabled for your project
gcloud services enable container.googleapis.comTo create a managed Kubernetes cluster on Kubernetes Engine using kfctl, we will walk through the following steps.
As of January 2020, because of an error in the kubeflow installation, we have to make a few extra steps.
- Create an application directory
- Download the configuration and manifest files
- Set variables for the instalation
- Apply the configuration, installing the cluster
To create an application directory with local config files and enable APIs for your project, run these commands:
Setting a variable with the name of the cluster and the path where we'll install it.
export KF_NAME=kflab
export BASE_DIR=$WORKING_DIR/kf
export KF_DIR=${BASE_DIR}/${KF_NAME}

# creates KF installation path
mkdir -p $KF_DIR
Lets set variables for both the URL where we'll get the config file and manifest file and the file names themselves.
export CONFIG_FILE="kfctl_gcp_basic_auth.${KUBEFLOW_TAG}.yaml" ## here using basic auth instead Cloud IAP
export CONFIG_URI="https://raw.githubusercontent.com/kubeflow/manifests/${KUBEFLOW_BRANCH}/kfdef/${CONFIG_FILE}"

export MANIFEST_FILE="${KUBEFLOW_BRANCH}.tar.gz"
export MANIFEST_URI="https://github.com/kubeflow/manifests/archive/${MANIFEST_FILE}"
So let's download the config file and manifest, make a small change so that the config file points to the local manifest file (which is the workaround we're doing).
# save configuration and manifest files locally
wget -P $KF_DIR ${CONFIG_URI}
wget -P $KF_DIR ${MANIFEST_URI}

# workaround KF install error:
#   changing manifest URI inside the configuration file to read a local file instead of URL
sed -i -e "s,${MANIFEST_URI},file:${KF_DIR}/${MANIFEST_FILE}," ${KF_DIR}/${CONFIG_FILE}
Lets set variables for the username and password to be used in the install process.
export KUBEFLOW_USERNAME=qwiklabs_user
export KUBEFLOW_PASSWORD=password
Now we get to the installation path and run kfctl apply passing the configuration file we downloaded and changed.
cd ${KF_DIR}
kfctl apply --verbose -f ${CONFIG_FILE}
Cluster creation will take a few minutes to complete (between 5 and 10). While it is running, you can view instantiation of the following objects in the GCP Console:
In Deployment Manager, two deployment objects will appear:
- kflab
- kflab-storage
In Kubernetes Engine, a cluster will appear: kflab
-
In the Workloads section, a number of Kubeflow components;
-
In the Services section, a number of Kubeflow services;
After the cluster is set up, use gcloud to fetch its credentials so you can communicate with it using kubectl. That is not necessary anymore, Cloud Shell already makes that configuration for us. But it's useful to know you can use it, and it's no harm to run again.
gcloud container clusters get-credentials ${KF_NAME} --zone ${ZONE} --project ${DEVSHELL_PROJECT_ID}Sets the default namespace for the kubernetes control CLI, kubectl. All following commands will be directed only to the recently created kubeflow namespace.
kubectl config set-context $(kubectl config current-context) --namespace=kubeflowCheck view all the Kubeflow resources deployed on the cluster
kubectl get allThe code for our Tensorflow project can be found in the model.py file in the examples repository. model.py defines a fairly straight-forward Tensorflow training program, with no special modifications for Kubeflow. After training is complete, it will attempt to upload the trained model to a file path provided as an argument. For the purpose of this lab, you will create and use a Google Cloud Storage (GCS) bucket to hold the trained model.
Create a storage bucket on Google Cloud Storage to hold our trained model. Note that the name you choose for your bucket must be unique across all of GCS.
# bucket name can be anything, but must be unique across all projects
export BUCKET_NAME=${KF_NAME}-${DEVSHELL_PROJECT_ID}

# create the GCS bucket
gsutil mb gs://${BUCKET_NAME}/To deploy the code to Kubernetes, you have to first build it into a container image:
# coming back to the mnist directory
cd ${WORKING_DIR}

# set the path on GCR you want to push the image to
export IMAGE_PATH=gcr.io/$DEVSHELL_PROJECT_ID/kubeflow-train

# build the tensorflow model into a container image
# image is tagged with its eventual path on GCR, but it stays local for now
docker build $WORKING_DIR -t $IMAGE_PATH -f $WORKING_DIR/Dockerfile.model
Now, test the new container image locally to make sure everything is working as expected
docker run -it $IMAGE_PATHYou should see training logs start appearing in your console:
If you're seeing logs, that means training is working and you can terminate the container with Ctrl+c. Now that you know that the container can run locally, you can safely upload it to Google Container Registry (GCR) so you can run it on your cluster.
# allow docker to access our GCR registry
#   that used to be necessary, but not anymore, Cloud Shell already configures that for us
gcloud auth configure-docker --quiet

# push container to GCR
docker push $IMAGE_PATH
You should now see your new container listed on the GCR console.
Finally, you can run the training job on the cluster. First, move into the training directory
cd $WORKING_DIR/training/GCSIf you look around this directory, you will see a number of YAML files. You can now use kustomize to configure the manifests. First, set a unique name for the training run
kustomize edit add configmap mnist-map-training --from-literal=name=mnist-train-distNow, configure the manifest to use your custom bucket and training image
kustomize edit set image training-image=${IMAGE_PATH}:latest
kustomize edit add configmap mnist-map-training --from-literal=modelDir=gs://${BUCKET_NAME}/my-model
kustomize edit add configmap mnist-map-training --from-literal=exportDir=gs://${BUCKET_NAME}/my-model/export
Run this script to define the number of Ps and Workers.
../base/definition.sh --numPs 1 --numWorkers 2Next, set some default training parameters (number of training steps, batch size and learning rate)
kustomize edit add configmap mnist-map-training --from-literal=trainSteps=200
kustomize edit add configmap mnist-map-training --from-literal=batchSize=100
kustomize edit add configmap mnist-map-training --from-literal=learningRate=0.01
One thing to keep in mind is that the python training code has to have permissions to read/write to the storage bucket you set up. Kubeflow solves this by creating a service account within your project as a part of the deployment. You can verify this by listing your service accounts:
gcloud iam service-accounts list | grep $KF_NAMEThis service account should be automatically granted the right permissions to read and write to our storage bucket. Kubeflow also added a Kubernetes secret called "user-gcp-sa" to our cluster, containing the credentials needed to authenticate as this service account within our cluster:
kubectl describe secret user-gcp-saTo access your storage bucket from inside our training container, you need to set the GOOGLE_APPLICATION_CREDENTIALS environment variable to point to the json file contained in the secret. You can do this by setting a few more Kustomize parameters:
kustomize edit add configmap mnist-map-training --from-literal=secretName=user-gcp-sa
kustomize edit add configmap mnist-map-training --from-literal=secretMountPath=/var/secrets
kustomize edit add configmap mnist-map-training --from-literal=GOOGLE_APPLICATION_CREDENTIALS=/var/secrets/user-gcp-sa.json
Now that all the parameters are set, use Kustomize to build the new customized YAML file:
kustomize build .You can pipe this YAML manifest to kubectl to deploy the training job to the cluster:
kustomize build . | kubectl apply -f -After applying the component, there should be a new tf-job on the cluster called my-train-1-chief-0 . You can use kubectl to query some information about the job, including its current state.
kubectl describe tfjobFor even more information, you can retrieve the python logs from the pod that's running the container itself (after the container has finished initializing).
If this command fails with Error from server (BadRequest): container "tensorflow" in pod "mnist-train-dist-chief-0" is waiting to start: ContainerCreating, don't worry: just try again.
kubectl logs -f mnist-train-dist-chief-0Hit CTRL-C to interrupt the logs streaming.
When training is complete, you can query your bucket's data using gsutil. You should see the model data added to your bucket:
gsutil ls -r gs://${BUCKET_NAME}/my-model/exportAlternatively, you can check the contents of your bucket through the GCP Cloud Console.
Note: The model is actually saving two outputs:-
a set of checkpoints to resume training later if desired
-
A directory called
export, which holds the model in a format that can be read by a pTensorFlow Serving component
Now that you have a trained model, it's time to put it in a server so it can be used to handle requests. To do this, move into the "serving/GCS" directory
cd $WORKING_DIR/serving/GCSThe Kubeflow manifests in this directory contain a TensorFlow Serving implementation. You simply need to point the component to your GCS bucket where the model data is stored, and it will spin up a server to handle requests. Unlike the tf-job, no custom container is required for the server process. Instead, all the information the server needs is stored in the model file.
Like before, start by setting some parameters to customize the deployment for our use. First, set the name for the service:
kustomize edit add configmap mnist-map-serving --from-literal=name=mnist-serviceNext, point the server at the trained model in your GCP bucket:
kustomize edit add configmap mnist-map-serving --from-literal=modelBasePath=gs://${BUCKET_NAME}/my-model/exportNow, deploy the server to the cluster:
kustomize build . | kubectl apply -f -Lets check the logs to see if everything is alright.
If the command fails with Error... ContainerCreating, just try again. When it displays RAW: Entering the event loop it means, it's ready for incoming requests. Let's move on to the last step.
kubectl logs -f $(kubectl get pods | grep mnist-service | grep -Eo '^[^ ]+')Hit CTRL-C to interrupt the logs streaming.
If you describe the new service, you'll see it's listening for connections within the cluster on port 9000:
kubectl describe service mnist-serviceChange to the directory containing the web front end manifests:
cd $WORKING_DIR/frontUnlike the other steps, this manifest requires no customization. It can be applied directly:
kustomize build . | kubectl apply -f -The service added is of type ClusterIP, meaning it can't be accessed from outside the cluster. In order to load the web UI in your web browser, you have to set up a direct connection to the cluster.
If the command below fails with error: unable to forward port because pod is not running. Current status=Pending, try again.
kubectl port-forward svc/web-ui 8080:80You know the command worked when it displays Forwarding from 127.0.0.1:8080 -> 5000.
Now in your Cloud Shell interface, press the web preview button and select "Preview on port 8080" to open the web interface in your browser:
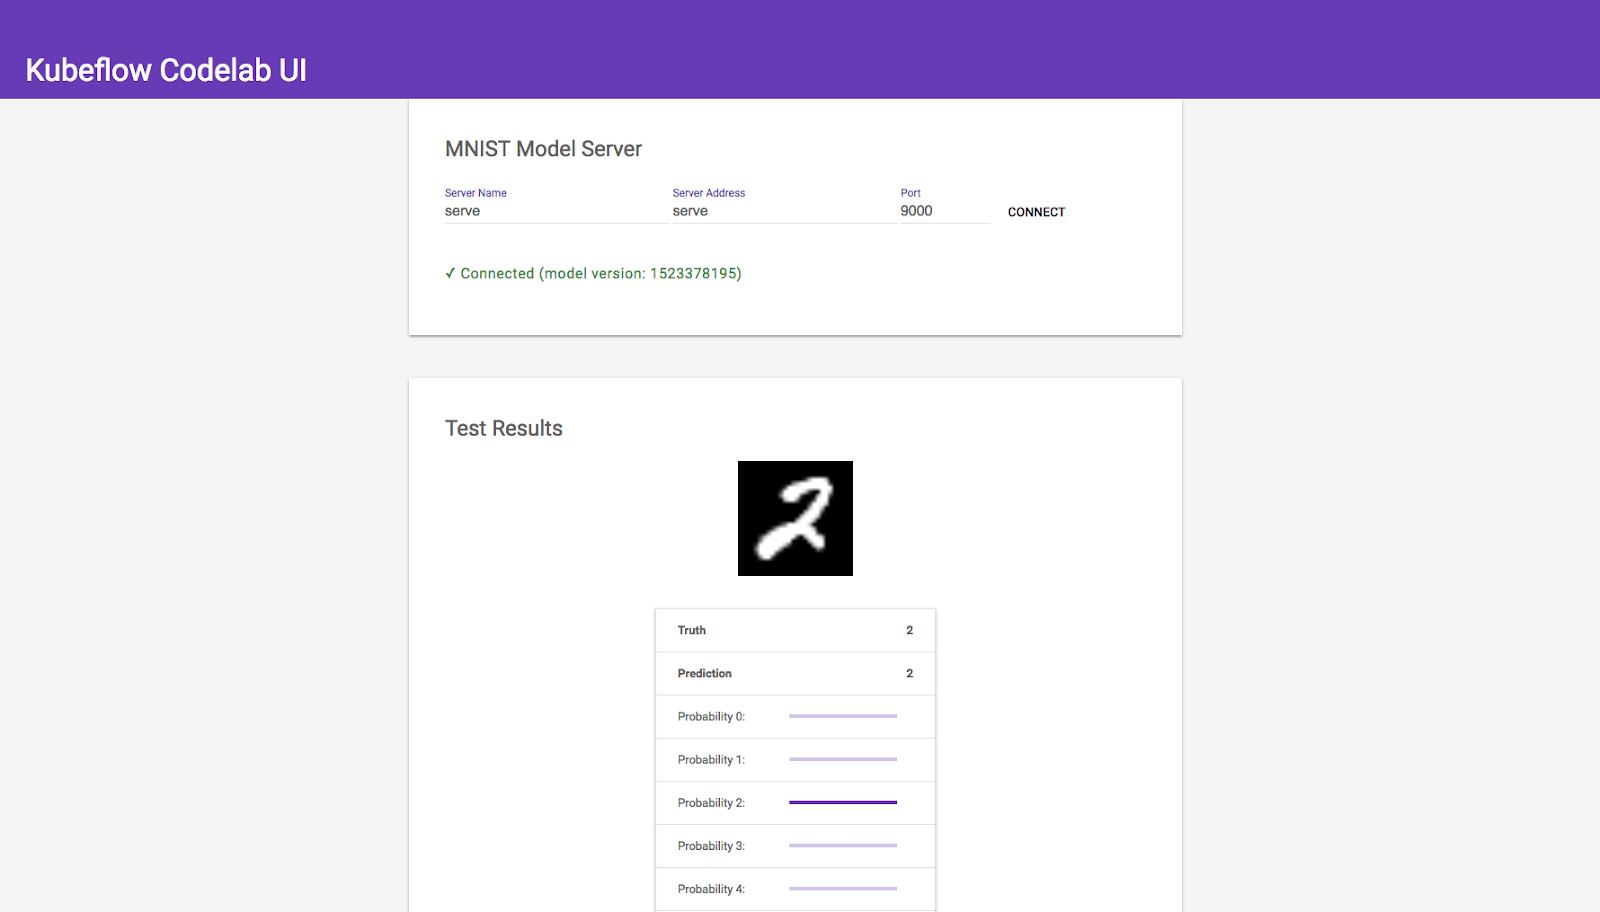
You should now see the MNIST Web UI:
Keep in mind that the web interface doesn't do much on its own, it's simply a basic HTML/JS wrapper around the Tensorflow Serving component, which performs the actual predictions. To emphasize this, the web interface allows you to manually connect with the serving instance located in the cluster. It has three fields:
Model Name: mnist
- The model name associated with the Tensorflow Serving component
- You configured this when you set the modelName parameter for the mnist-deploy-gcp component
Server Address: mnist-service
- The IP address or DNS name of the server
- Because Kubernetes has an internal DNS service, you can enter the service name here
Port: 9000
- The port the server is listening on
- Kubeflow sets this to 9000 by default These three fields uniquely define your model server. If you deploy multiple serving components, you should be able to switch between them using the web interface. Feel free to experiment!
If everything worked properly, you should see an interface for your machine learning model. Each time you refresh the page, it will load a random image from the MNIST testing set and perform a prediction. The table below the image displays the probability of each class label. Because the model was properly trained, confidence will be high and mistakes should be very rare. See if you can find any!
You successfully set up Kubeflow on a Kubernetes Engine cluster and used it to deploy a TensorFlow model training service, and an interactive API based on the trained model.
-
If you’re interested in learning some more about Kubeflow, check out the Kubeflow End-to-End lab.
-
Simplifying Machine Learning on Open Hybrid Clouds with Kubeflow
-
Cloud OnAir: Kubeflow: Machine Learning + Kubernetes (open this video in a new tab, 37 minutes long)


