Welcome to the official repository for QMK firmware source files and comprehensive documentation for all Mad Noodle Keypads. This repository contains the fully updated source keyboard folder for QMK firmware, compiled default firmware, and detailed documentation for each Mad Noodle Keypad model. Start by using the provided keymaps as a foundation to customize your own unique layout.
(Last tested with QMK v0.23.5)

For FULL, detailed instructions on how to create, modify, and compile QMK firmware, Please visit https://docs.qmk.fm/
Tip
If you are looking for an option with a much simpler configuration experience, explore our Mad Noodle Via Github!
- Vist QMK's Github and clone or download current release Optional (If your local QMK is not up to date with the current release)
- Place or clone the
qmk_firmwarefolder into the directory you plan on working out of. - Copy the entire
/QMK-Mad-Noodle-KeyPads/themadnoodlefolder toqmk_firmware/keyboardsdirectory of the QMK firmware you just downloaded
Then you're good to go!
Modify your keymaps to your desired layout and follow the instructions on https://docs.qmk.fm/ to compile your new firmware.
After setting up your Build Environment
Compile example:
qmk compile -kb themadnoodle/noodlepad/v2 -km default
Flashing example:
qmk flash -kb themadnoodle/noodlepad/v2 -km default
See the Build Your Firmware and the Flashing Your Keyboard guides for more information. Brand new to QMK? Start with our Complete Newbs Guide.
Note
This only applies to keypads made BEFORE 2024.
- NCC1701KB v2
- Noodlepad v1 & v2
- Udon:13
- Connect the keypad to your computer via a USB-C Cable (not included).
- Open QMK Toolbox software (If not already downloaded, please see https://qmk.fm/toolbox/).
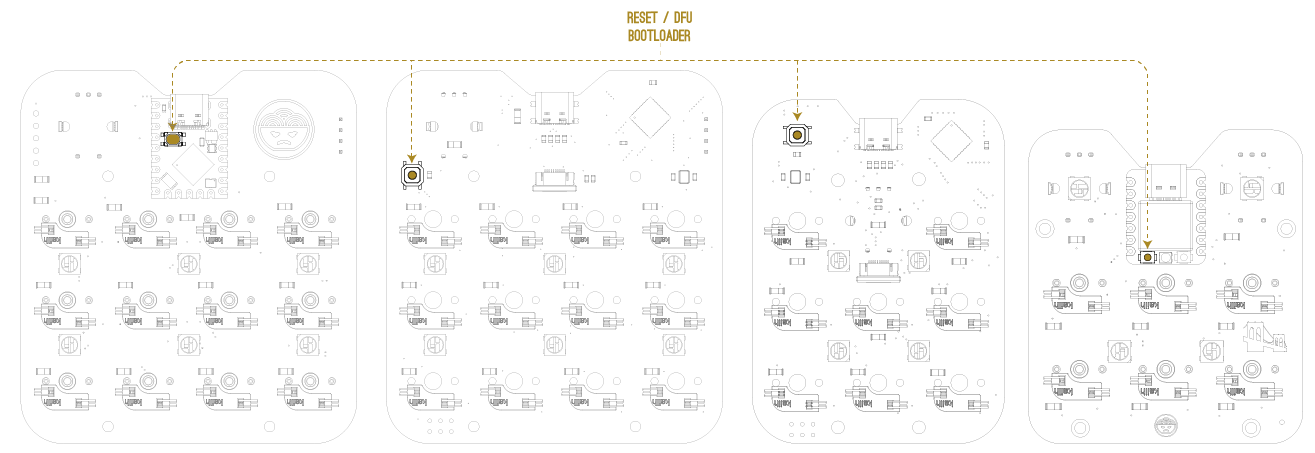
- Press the
RESETbutton located on the bottom of the keypad (Top left corner, to the left of the USB connector) labeled RST (See image above). - In your QMK Toolbox Consol, you should see
*** DFU device connected:appear. - Under
Local Fileopen your compliled HEX file. - Ensure
Microcontrolleris set to atmega32u4. - Click the
Flashbutton to begin flashing process. - When the flashing is complete, your console should show an indication of a successful flash and the device will disconnect.
Congrats! Your keypad is now successfully flashed with your new Keymap!
Note
This only applies to keypads made AFTER 2024.
- NoodlePad[Micro]
- Udon:13 v.2
-
Put your Keypad into Bootloader Mode:
-
NoodlePad[Micro] : Plug your USB-C Cable (not included) into your keypad. Once powered on, quickly double-press the reset button on the back, center, left of the PCB labeled "R" to enter Bootloader Mode (See image above).
-
Udon:13 v.2 : While holding down the boot button on the back, center of the PCB, labled "BOOT" (See image above), connect your USB-C Cable to your keypad, then release the boot button. Your keypad is now in Bootloader Mode.
-
-
When in Bootloader Mode, A drive named
RPI-RP2will appear on your computer. -
Copy the compiled .u2f file (I.E.
themadnoodle_noodlepad_micro_default.uf2) intoRPI-RP2drive. -
Once finished copying, the drive will close, and your keypad will restart with the new firmware automatically.
Congrats! Your keypad is now successfully flashed with your new firmware!
- Ensure your Build Enviroment is setup correctly.
- See the Prepare Your Build Environment section on docs.qmk.fm/
- In your console, type
qmk flash -kb themadnoodle/<keyboard> -km <Keymap>Example:
qmk flash -kb themadnoodle/noodlepad_micro -km default - Wait for your firmware to compile. Then you'll be prompted with:
Flashing for bootloader: rp2040
Waiting for drive to deploy... - Quickly double-press the reset button on the back, center, left of the PCB labeled "R" to enter the bootloader drive mode and the flashing will begin.
Congrats! Your keypad is now successfully flashed with your new firmware!
Tip
If you are having issues, feel free to reach out via our contact form at https://www.themadnoodle.com/contact