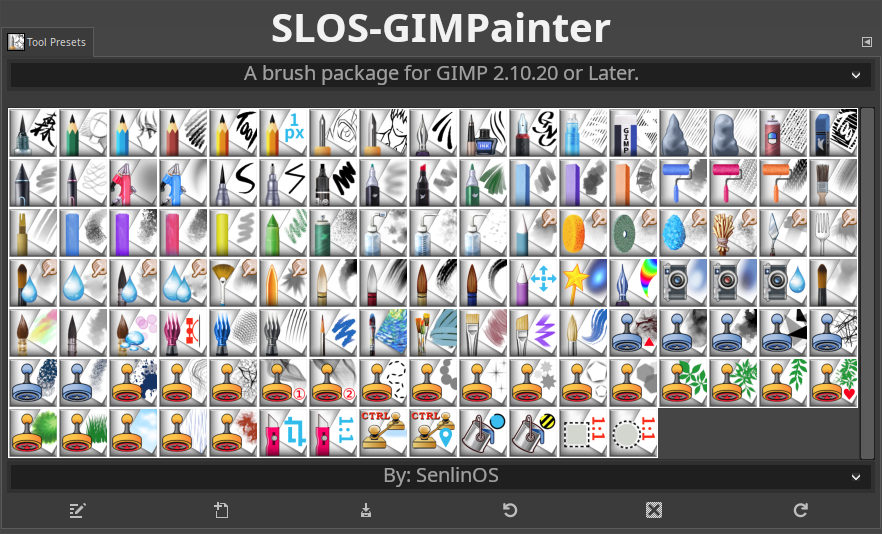
SLOS-GIMPainter is a brush package for GIMP 2.10.20 or Later.
SLOS-GIMPainter stable version
- Total: 115 = 107 Brushes + 8 Tools
2022-04-29
- Improve Tool Presets: 046a_Wet-FanBrush.gtp, 056_Watercolor-1.gtp, 057_Watercolor-2.gtp
2021-06-17
- Added 5 brushes. Please see the screenshot for details, Here.
2021-01-09
- Improvement: 016_Digital-Brush, the smudge effect is more obvious.
- Add 15 new brush presets. The video demo for details, Here.
The GIMP is a powerful image processing Free (Libre) Software and can certainly be used for painting,
But there is no professional brush set for the GIMP.
The previous Brush Presets is no longer applicable to the current GIMP version.
If you want to paint with GIMP, you have to make your own brushes, which causes inconvenience and waste of time.
Because I decided to use GIMP as the main painting software, I started to make brushes on 2.10.12 and finished on 2.10.14.
But previous versions of GIMP had Bugs in the Tool Options, so I didn't publish the finished brushes.
GIMP 2.10.20 fixed Bugs, and I also added presets and improvements to SLOS-GIMPainter during this period.
NOTE: Old Brush Shape files can also continue to be used: .VBR, .GBR, .GIH
- Creating brushes with rich effects in GIMP requires a combination of three settings:
Brushes (Brush Shape) + Dynamics + Tool Presets
The project name = My Name Abbreviation + GIMP + Painter
- The word
Painterto better explain the function of the project. GIMP is adjacent to thePin Painter, so the twoPare merged.
The name of the project is SLOS-GIMPainter
- Brushes are displayed as Icons. (Suitable for users of different languages)
- Orderly arrangement and clear classification.
- Choose a suitable Brush and replace the brush shape to get a new effect. (Avoid always creating new brushes)
- SVG files (Paths) included with the project can be used with brushes to create effect lines.
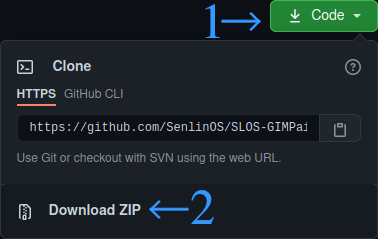
How to download: Click the green Code button and click Download ZIP.
Menu, Setting Installation:
-
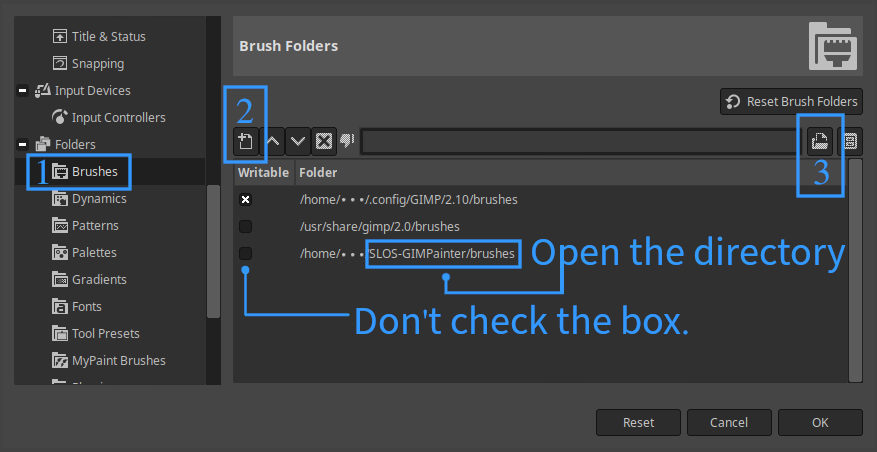
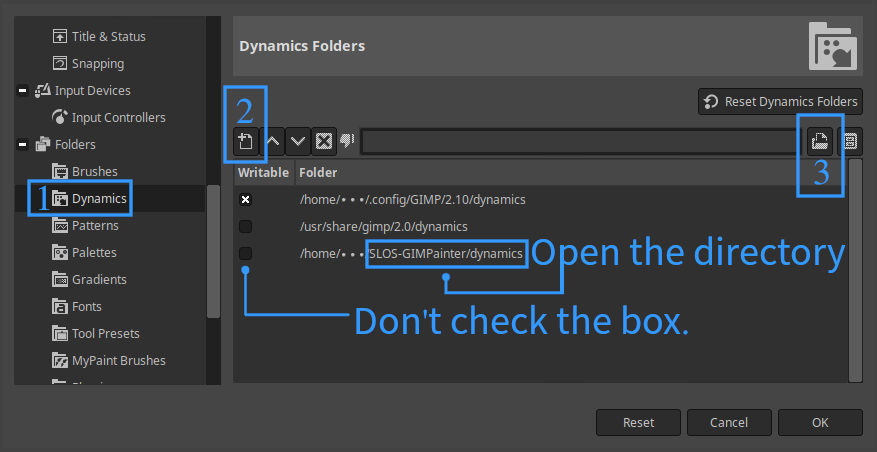
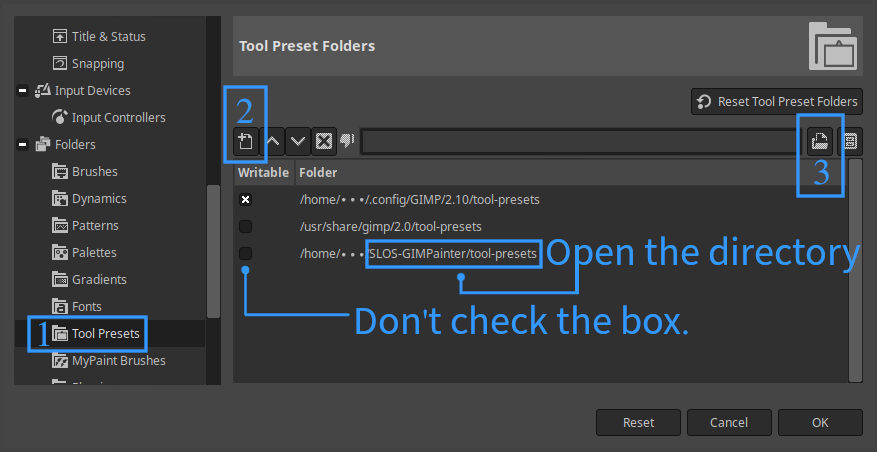
Edit -> Preferences ->(Folders -> Brushes), (Folders -> Dynamics), (Folders -> Tool Presets)
-
Click the [Add New Folder] button to open the corresponding directories in the SLOS-GIMPainter folder respectively:
Example location:
□ /.../SLOS-GIMPainter/brushesExample location:
□ /.../SLOS-GIMPainter/dynamicsExample location:
□ /.../SLOS-GIMPainter/tool-presetsClick position 1, 2 and 3 in the screenshot to open the corresponding directory. Click OK to finish.
(/home/.../ is the demo location, subject to the location where you store SLOS-GIMPainter) -
Restart GIMP.
NOTE: Do not check the box to prevent changing the default setting of SLOS-GIMPainter.
- I didn't install SLOS-GIMPainter by copying the corresponding directory to the GIMP-Profile-Folders. Because the Checkbox cannot be canceled. (maybe you will accidentally modify the default parameters)
- My suggested method is to manually open the corresponding directory in the Project Folder by using the (Edit -> Preferences -> Folders...) of GIMP Menu.
Open the Window menu: Dockable Dialogs -> Tool Presets, and you can see SLOS-GIMPainter.
-
Click the small triangle button on the upper right of the Tool Presets dialog, and click to
View as Grid. -
Click the small triangle button on the upper right of the Tool Presets dialog to
Preview Sizeand select theLarge. -
Select the
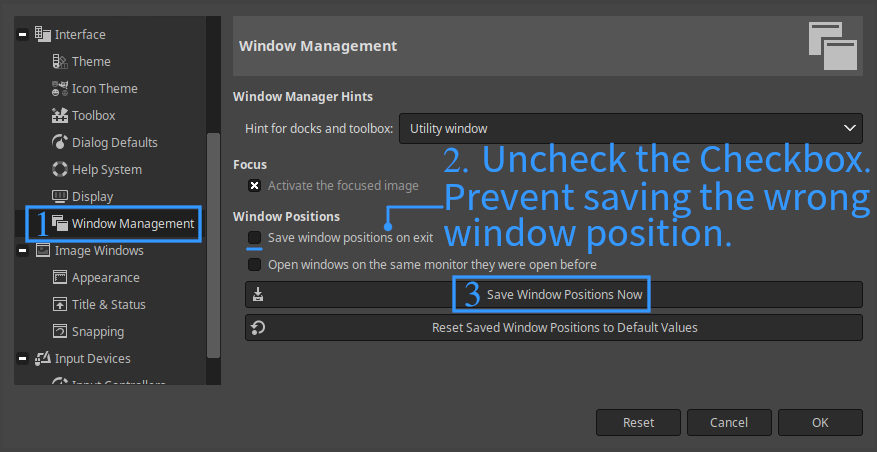
SLOStab at the top of Tool Presets dialog to hide the built-in presets.After setting, in the menu, Edit -> Preferences -> Interface(Window Management), save the settings as shown in the screenshot, and click OK to finish.
The Project is under an MIT License. See the LICENSE file for more information.
For a detailed explanation, please see my Video Demo:
(Silent / Subtitles)
- Install SLOS-GIMPainter and use demos in GIMP, Here.
- Replace the brush shape of SLOS-GIMPainter and Make Texture(+GMIC) in GIMP, Here.
- How to use SLOS-GIMPainter 060 Effect Lines Brush in GIMP, Here.
- Use SLOS-GIMPainter to Draw Radial Lines in GIMP, Here.
- Add 15 new brush presets. The video demo for details, Here.
Text Description:
- For Line Art, please check the text description: Here.
- Manually save temporary presets, the text+video: Here.
Other Tips:
