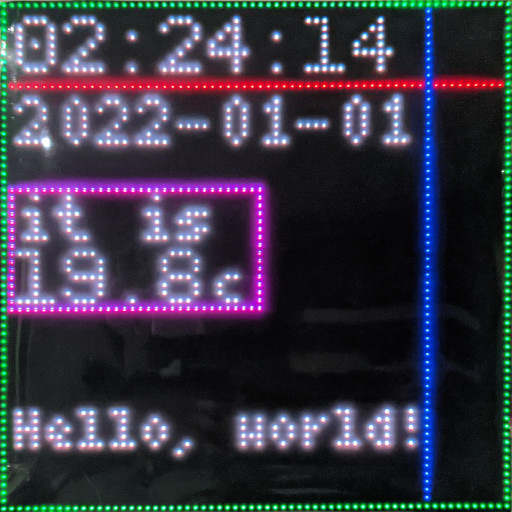
Panoply is a Python program to drive an RGB Matrix display. This program comes with Home Assistant integration, which makes it a great display to view Home Assistant devices.
- Make sure you the rgbmatrix library installed and your RGB matrix is connected.
- Configure your display settings in
config.py(Copy this fromconfig_sample.py). The default size is 64x64, with no rotation. - If you've got the display connected and configured, go into the
panoplydirectory and simply runpython3 main.py! - If all works, you can configure the layout in
config.pyto your liking. - (Optional) To have it persist after your terminal closes, I recommend using
tmux(tmux new-session).
The following is the default configuration for Panoply, with every option commented with usage. Please place the configuration at panoply/config.py after configuring.
config_sample.py
# How often the display refreshes
DISPLAY_REFRESH_RATE = 0.25
# How often information on the device is polled (Date, time)
LOCAL_REFRESH_INTERVAL = 0.5
# How often information over web requests is polled (Home Assistant)
WEB_REFRESH_INTERVAL = 30

# Put your display resolution here
DISPLAY_WIDTH = 64
DISPLAY_HEIGHT = 64
# If you need any rotation, specify this as a multiple of 90, otherwise leave it at 0
DISPLAY_ROTATION = 0
# Display mapping, read https://github.com/hzeller/rpi-rgb-led-matrix#changing-parameters-via-command-line-flags
DISPLAY_HARDWARE_MAPPING = "adafruit-hat"

# Path to font files, NEEDS TO BE "BDF" bitmap fonts!
TINY_FONT = "../fonts/Tiny-4x6.bdf"
SMALL_FONT = "../fonts/Small-5x7.bdf"
LARGE_FONT = "../fonts/PixeloidMono.bdf"

# Time when to dim the display
# BE SURE TO ZERO-FILL THE TIMES (06:00, NOT 6:00)
DIM_START_TIME = "20:00"
# Time when to stop dimming the display
DIM_STOP_TIME = "06:00"
# How much the display should be dimmer as a multiplier of the usual brightness.
# Set to 1 to disable dimming
DIM_MODIFIER = 1

# This defines placeholders which are retrieved from shell commands
# These are refreshed according to LOCAL_REFRESH_INTERVAL
# '<new placeholder name>' : '<shell command>'
COMMAND_PLACEHOLDERS = {
    'time' : 'date +"%H:%M:%S"',
    'date' : 'date +"%Y-%m-%d"'
}

# URL of your Home Assistant instance
HOME_ASSISTANT_URL = "https://home.example.com"
# Long-lived access token
HOME_ASSISTANT_KEY = "ABCDEF"

# This defines placeholders which are retrieved from a Home Assistant instance
# Leave blank to disable entirely
# These are refreshed according to WEB_REFRESH_INTERVAL
# '<new placeholder name>' : '<home assistant entity>'
HOME_ASSISTANT_STATE_PLACEHOLDERS = {
    'temp' : 'sensor.room_temperature',
    'phonebattery' : 'sensor.phone_battery_level'
}

# Colors that are retrieved from a Home Assistant lightbulb
# These can be used instead of the usual tuple:
# 'text definition' : (<x position>, <y position>, 'bulbs')
# Leave blank to disable entirely
# These are refreshed according to WEB_REFRESH_INTERVAL
# '<new color name>' : '<home assistant entity>'
HOME_ASSISTANT_COLORS = {
    'bulbs' : 'light.bulbs'
}

# Layout settings
# Here you can customise the location and content of text elements or place shapes

# AVAILABLE TEXT PLACEHOLDERS:
# %time% - Replaced with the current time
# %date% - Replaced with the current date
# And any entities defined from Home Assistant

# Large text, using the PixeloidMono font
# '<text %placeholder%>' : (<x position bottom-left>, <y position bottom-left>, (<red>, <green>, <blue>))
LARGE_TEXT_ELEMENTS = {
    '%time%' : (2, 9, (200, 200, 200)),
    '%temp%' : (2, 38, (200, 200, 200))
}

# Small text, using the 5x7 font
# '<text %placeholder%>' : (<x position bottom-left>, <y position bottom-left>, (<red>, <green>, <blue>))
SMALL_TEXT_ELEMENTS = {
    '%date%' : (2, 18, (200, 200, 200)),
    'it is' : (2, 30, (200, 200, 200))
}

# Tiny text, using the 4x6 font
# '<text %placeholder%>' : (<x position bottom-left>, <y position bottom-left>, (<red>, <green>, <blue>))
TINY_TEXT_ELEMENTS = {
    'c' : (27, 38, (200, 200, 200)),
    'Hello, world!' : (2, 56, 'bulbs') # Example of using colors retrieved from Home Assistant
}

# Place a line going from x0, y0 to x1, y1
# (<first x position>, <first y position>, <second x position>, <second y position) (<red>, <green>, <blue>))
LINES = [
    (0, 10, 64, 10, (200, 0, 0)),
    (53, 0, 53, 64, (0, 0, 200))
]

# Place a hollow rectangle
# (<first x position>, <first y position>, <second x position>, <second y position>, (<red>, <green>, <blue>))
RECTANGLES = [
    (0, 0, 63, 63, (0, 200, 0)),
    (1, 23, 32, 38, (200, 0, 200))
]
For every text field, placeholders can be used. These placeholders can be defined earlier in the config at HOME_ASSISTANT_STATE_PLACEHOLDERS and COMMAND_PLACEHOLDERS. When you type the placeholder surrounded by percentage signs, these will be replaced with the last value retrieved from the command/entity configured.
There are also color placeholders which are retrieved from Home Assistant entities. These take the entity's rgb_color field and use them as the colour. These can be used by defining them in HOME_ASSISTANT_COLORS and then using the colors name instead of the colour tuple.
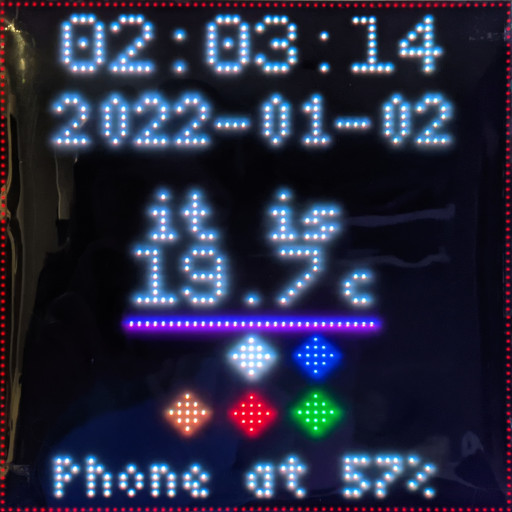
In this image my configuration is shown. I have the time and date displayed at the top. The temperature is shown after being retrieved from Home Assistant.
Beneath that is a horizontal line which takes the colour of my LED strip (Which you can see in the reflection!), and below that are 6 icons representing my ceiling bulbs, these also take the colour they are set to. In the picture there's one turned off, one at cool white, one at warm white and a red, blue and green bulb.
At the bottom there is text which says my phone's current battery level, and the entire panel is wrapped in a red square. Hopefully this gives an idea of the possibilities so far!
The configuration used for it is the following:
config.py
# How often the display refreshes
DISPLAY_REFRESH_RATE = 0.25
# How often information on the device is polled (Date, time)
LOCAL_REFRESH_INTERVAL = 0.4
# How often information over web requests is polled (Home Assistant)
WEB_REFRESH_INTERVAL = 10

# Put your display resolution here
DISPLAY_WIDTH = 64
DISPLAY_HEIGHT = 64
# If you need any rotation, specify this as a multiple of 90, otherwise leave it at 0
DISPLAY_ROTATION = 180
# Display mapping, read https://github.com/hzeller/rpi-rgb-led-matrix#changing-parameters-via-command-line-flags
DISPLAY_HARDWARE_MAPPING = "adafruit-hat"

# Path to font files, NEEDS TO BE "BDF" bitmap fonts!
TINY_FONT = "../fonts/Tiny-4x6.bdf"
SMALL_FONT = "../fonts/Small-5x7.bdf"
LARGE_FONT = "../fonts/PixeloidMono.bdf"

# Time when to dim the display
# BE SURE TO ZERO-FILL THE TIMES (06:00, NOT 6:00)
DIM_START_TIME = "22:00"
# Time when to stop dimming the display
DIM_STOP_TIME = "07:00"
# How much the display should be dimmer as a multiplier of the usual brightness
DIM_MODIFIER = 0.15

# This defines placeholders which are retrieved from shell commands
# These are refreshed according to LOCAL_REFRESH_INTERVAL
# '<new placeholder name>' : '<shell command>'
COMMAND_PLACEHOLDERS = {
    'time' : 'date +"%H:%M:%S"',
    'date' : 'date +"%Y-%m-%d"'
}

# URL of your Home Assistant instance
HOME_ASSISTANT_URL = "https://home.example.com"
# Long-lived access token
HOME_ASSISTANT_KEY = "ABCDEF"

# This defines placeholders which are retrieved from a Home Assistant instance
# Leave blank to disable entirely
# These are refreshed according to WEB_REFRESH_INTERVAL
# '<new placeholder name>' : '<home assistant entity>'
HOME_ASSISTANT_STATE_PLACEHOLDERS = {
    'temp' : 'sensor.room_temperature',
    'phonebattery' : 'sensor.phone_battery_level'
}

# Colors that are retrieved from a Home Assistant lightbulb
# These can be used instead of the usual tuple:
# 'text definition' : (<x position>, <y position>, 'bulbs')
# Leave blank to disable entirely
# These are refreshed according to WEB_REFRESH_INTERVAL
# '<new color name>' : '<home assistant entity>'
HOME_ASSISTANT_COLORS = {
    'bulb1' : 'light.bulb1',
    'bulb2' : 'light.bulb2',
    'bulb3' : 'light.bulb3',
    'bulb4' : 'light.bulb4',
    'bulb5' : 'light.bulb5',
    'bulb6' : 'light.bulb6',
    'led_01' : 'light.led_01'
}

# Layout settings
# Here you can customise the location and content of text elements or place shapes

# Large text, using the PixeloidMono font
# '<text %placeholder%>' : (<x position bottom-left>, <y position bottom-left>, (<red>, <green>, <blue>))
LARGE_TEXT_ELEMENTS = {
    '%time%' : (8, 9, (200, 200, 200)),
    '%temp%' : (17, 38, (200, 200, 200)),
    '●' : (21, 48, 'bulb1'),
    '● ' : (21, 55, 'bulb2'),
    '●  ' : (29, 48, 'bulb3'),
    '●   ' : (29, 55, 'bulb4'),
    '●    ' : (37, 48, 'bulb5'),
    '●     ' : (37, 55, 'bulb6') # The spaces are required so these show up as unique values in the dict, but they do not get rendered!
}

# Small text, using the 5x7 font
# '<text %placeholder%>' : (<x position bottom-left>, <y position bottom-left>, (<red>, <green>, <blue>))
SMALL_TEXT_ELEMENTS = {
    '%date%' : (7, 18, (200, 200, 200)),
    'it is' : (18, 30, (200, 200, 200))
}

# Tiny text, using the 4x6 font
# '<text %placeholder%>' : (<x position bottom-left>, <y position bottom-left>, (<red>, <green>, <blue>))
TINY_TEXT_ELEMENTS = {
    'c' : (43, 38, (200, 200, 200)),
    'Phone at %phonebattery%%' : (7, 62, (200, 200, 200))
}

# Place a line going from x0, y0 to x1, y1
# (<first x position>, <first y position>, <second x position>, <second y position>, (<red>, <green>, <blue>))
LINES = [
    (16, 40, 48, 40, 'led_01')
]

# Place a hollow rectangle
# (<first x position>, <first y position>, <second x position>, <second y position>, (<red>, <green>, <blue>))
RECTANGLES = [
    (0, 0, 63, 63, (64, 0, 0))
]This project uses fonts under the public domain and fonts licensed under the SIL Open Font License. For more information, check the README.md in the fonts directory.
This has been tested with a Raspberry Pi 4b with 4GB of RAM. The display I am using is a JOY-iT 64x64 RGB-LED Matrix Module with an Adafruit RGB Matrix HAT. The code is made to work with any display that supports the rgbmatrix library though, although I doubt lower resolutions will be able to display much.
The cause of the reflections in the images are because I covered the display with a plastic film to dim it so it can be kept on at night, not the display itself.
The rgbmatrix library requires root unless configured otherwise, this is not a bug with this program!


